Laravel Image Upload with Spatie's Media Library Example
Hello,
I am going to show you example of laravel image upload with spatie media library. We will use laravel spatie media library tutorial. let’s discuss about laravel spatie media library. you'll learn laravel image upload spatie media library. Alright, let’s dive into the steps.
In this example we will do image upload using spatie/laravel-medialibrary composer package. Spatie Media Library provide easily image uploading with laravel eloquent model. using this package you can easily store image, get image, generate thumbnail image. you can use this example with laravel 6, laravel 7, laravel 8, laravel 9, laravel 10 and laravel 11 version.
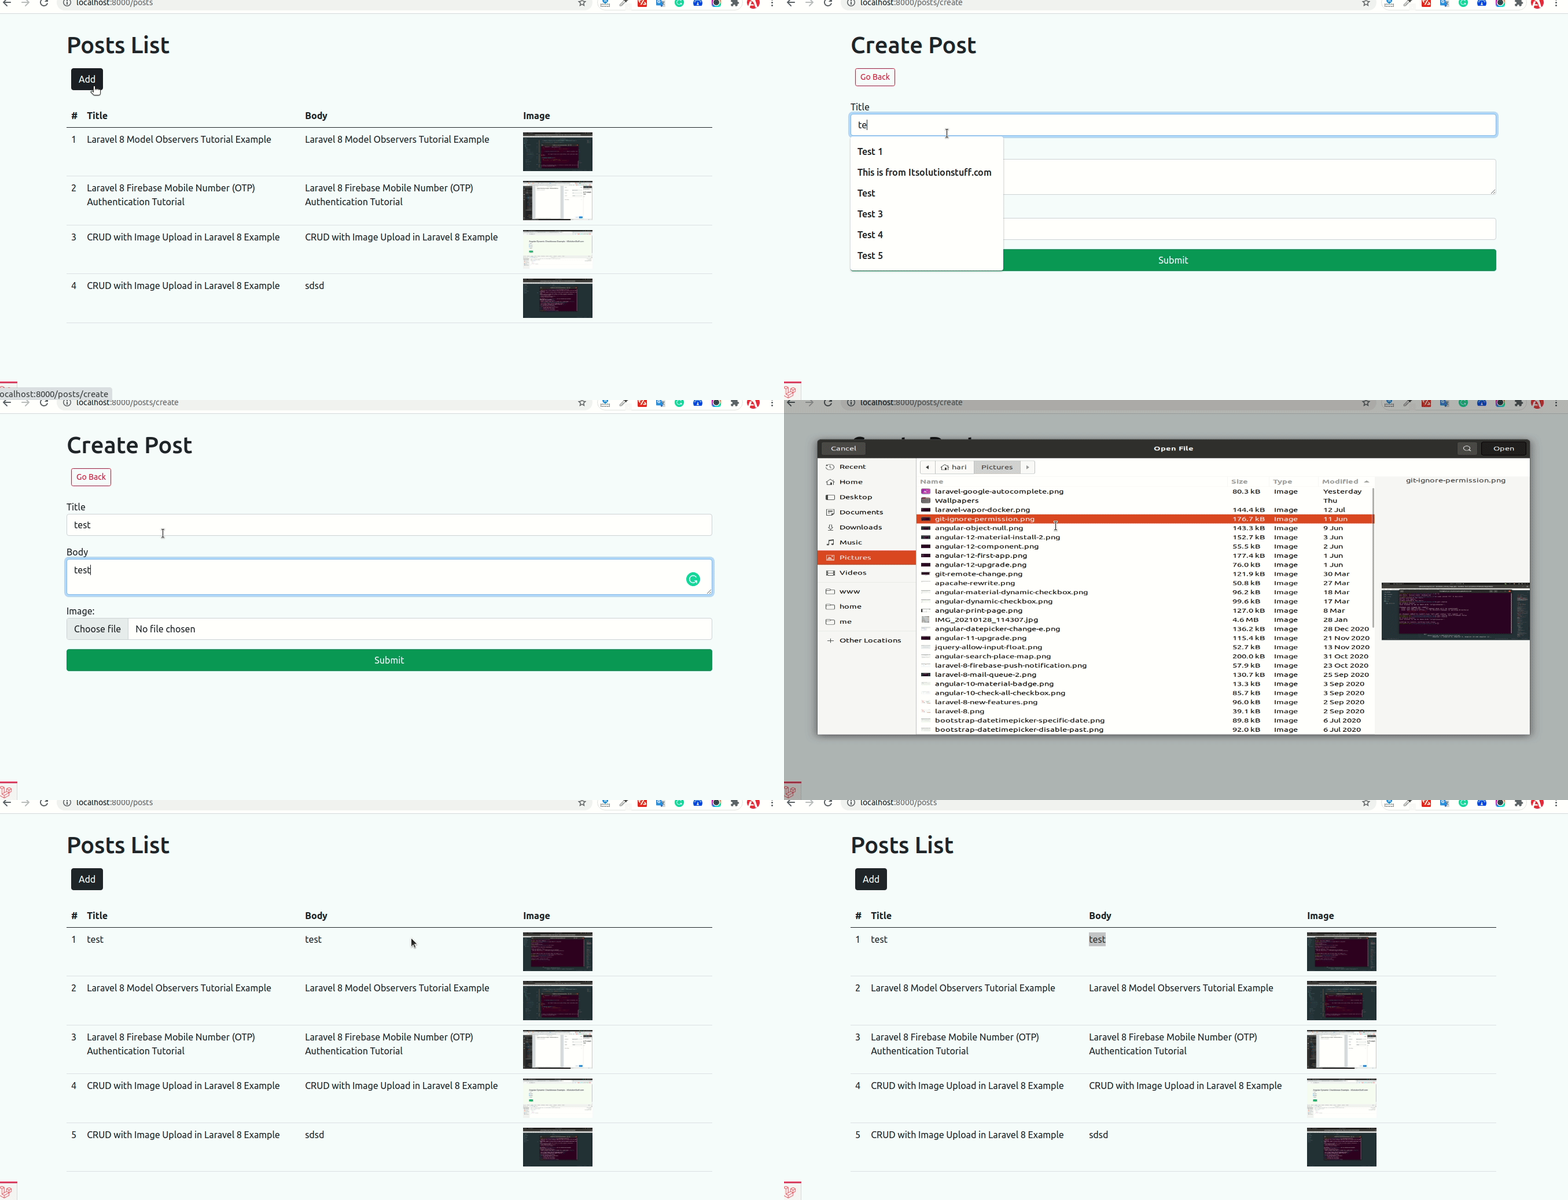
Here, we will create posts table and we will add images of each post using spatie/laravel-medialibrary library and listing of posts with image.
Just let's follow bellow step and see preview as bellow:
Preview:

Step 1: Create Laravel Project
first of all we need to get fresh Laravel 8 version application using bellow command, So open your terminal OR command prompt and run bellow command:
composer create-project laravel/laravel blog
Step 2: Install spatie/laravel-medialibrary Package
in first step, we need install spatie/laravel-medialibrary composer package so let's use bellow command to install:
composer require spatie/laravel-medialibrary
after installing successfully, we need to run following command to create migration for "media" table:
php artisan vendor:publish --provider="Spatie\MediaLibrary\MediaLibraryServiceProvider" --tag="migrations"
now let's run migration command:
php artisan migrate
Step 3: Create Post Table and Model
in first step, we need create new migration for adding "posts" table:
php artisan make:migration create_posts_table
database/migrations/2021_07_13_140744_create_posts_table.php
<?php
use Illuminate\Database\Migrations\Migration;
use Illuminate\Database\Schema\Blueprint;
use Illuminate\Support\Facades\Schema;
class CreatePostsTable extends Migration
{
/**
* Run the migrations.
*
* @return void
*/
public function up()
{
Schema::create('posts', function (Blueprint $table) {
$table->id();
$table->string('title');
$table->string('body');
$table->timestamps();
});
}
/**
* Reverse the migrations.
*
* @return void
*/
public function down()
{
Schema::dropIfExists('posts');
}
}
now let's run migration command:
php artisan migrate
now, just create post model and add code as like bellow:
app/Models/Post.php
<?php
namespace App\Models;
use Illuminate\Database\Eloquent\Factories\HasFactory;
use Illuminate\Database\Eloquent\Model;
use Spatie\MediaLibrary\InteractsWithMedia;
use Spatie\MediaLibrary\HasMedia;
class Post extends Model implements HasMedia
{
use HasFactory, InteractsWithMedia;
protected $fillable = [
'title',
'body',
];
}
Step 4: Create Route
In this is step we need to create some routes for listing posts and creating post.
routes/web.php
<?php
use Illuminate\Support\Facades\Route;
use App\Http\Controllers\PostController;
/*
|--------------------------------------------------------------------------
| Web Routes
|--------------------------------------------------------------------------
|
| Here is where you can register web routes for your application. These
| routes are loaded by the RouteServiceProvider within a group which
| contains the "web" middleware group. Now create something great!
|
*/
Route::get('posts',[PostController::class,'index'])->name('posts.index');
Route::get('posts/create',[PostController::class,'create'])->name('posts.create');
Route::post('posts/store',[PostController::class,'store'])->name('posts.store');
Step 5: Create Controller
in this step, we need to create PostController and add following code on that file:
app/Http/Controllers/PostController.php
<?php
namespace App\Http\Controllers;
use Illuminate\Http\Request;
use App\Models\Post;
class PostController extends Controller
{
/**
* Write code on Method
*
* @return response()
*/
public function index()
{
$posts = Post::latest()->get();
return view('posts.index', compact('posts'));
}
/**
* Write code on Method
*
* @return response()
*/
public function create()
{
return view('posts.create');
}
/**
* Write code on Method
*
* @return response()
*/
public function store(Request $request)
{
$valiator = $request->validate([
'title' => 'required',
'body' => 'required',
'image' => 'required',
]);
$post = Post::create($request->all());
if($request->hasFile('image') && $request->file('image')->isValid()){
$post->addMediaFromRequest('image')->toMediaCollection('images');
}
return redirect()->route('posts.index');
}
}
Step 6: Create Blade Files
here, we need to create blade files for index and create. so let's create one by one files:
resources/views/posts/index.blade.php
<!DOCTYPE html>
<html lang="{{ str_replace('_', '-', app()->getLocale()) }}">
<head>
<meta charset="utf-8">
<meta name="viewport" content="width=device-width, initial-scale=1">
<title>Laravel Image Upload with Spatie Medialibrary Example - ItSolutionstuff.com </title>
<link href="https://cdn.jsdelivr.net/npm/bootstrap@5.0.2/dist/css/bootstrap.min.css" rel="stylesheet">
</head>
<body>
<div class="container">
<h1>Posts List</h1>
<div class="d-flex p-2 bd-highlight mb-3">
<a href="{{ route('posts.create') }}" class="btn btn-dark">Add</a>
</div>
<table class="table">
<thead>
<tr>
<th>#</th>
<th>Title</th>
<th>Body</th>
<th width="30%">Image</th>
</tr>
</thead>
<tbody>
@foreach($posts as $key=>$post)
<tr>
<td>{{ ++$key }}</td>
<td>{{ $post->title }}</td>
<td>{{ $post->body }}</td>
<td><img src="{{$post->getFirstMediaUrl('images', 'thumb')}}" / width="120px"></td>
</tr>
@endforeach
</tbody>
</table>
</div>
</body>
</html>
resources/views/posts/create.blade.php
<!DOCTYPE html>
<html lang="{{ str_replace('_', '-', app()->getLocale()) }}">
<head>
<meta charset="utf-8">
<meta name="viewport" content="width=device-width, initial-scale=1">
<title>Laravel Image Upload with Spatie Medialibrary Example</title>
<link href="https://cdn.jsdelivr.net/npm/bootstrap@5.0.2/dist/css/bootstrap.min.css" rel="stylesheet">
</head>
<body>
<div class="container">
<h1>Create Post</h1>
<div class="d-flex p-2 bd-highlight mb-3">
<a href="{{ route('posts.index') }}" class="btn btn-outline-danger btn-sm">Go Back</a>
</div>
<div>
<form action="{{ route('posts.store') }}" enctype="multipart/form-data" method="post">
@csrf
<div class="mb-3">
<label>Title</label>
<input type="text" name="title" class="form-control">
</div>
<div class="mb-3">
<label>Body</label>
<textarea class="form-control" name="body"></textarea>
</div>
<div class="mb-3">
<label>Image:</label>
<input type="file" name="image" class="form-control">
</div>
<div class="d-grid">
<button class="btn btn-success">Submit</button>
</div>
</form>
</div>
</div>
</body>
</html>
Now we need to do following configuration. you need to link storage folder to public by using following command:
php artisan storage:link
then make sure your .env url path should be correct:
.env
APP_URL=https://localhost:8000
Now we are ready to run our example. so run bellow command so quick run:
php artisan serve
Now you can open bellow URL on your browser:
localhost:8000/posts
you can get more method about Spatie Media Library.
i hope it can help you...

