Laravel 11 Multi Auth: Create Multiple Authentication in Laravel 11
In this post, I will show you how to create multiple authentication using middleware in Laravel 11 application.
In this example, we will install a fresh Laravel 11 application for multi-auth. Then we will install Laravel UI with Bootstrap 5 for auth scaffold. Then we will add a "type" column in the users' table, where we will define three types (User, Manager, and Admin) of users. Then, we will create a "user-access" middleware to check access permission. So, let's see the steps below to create a full example for multi-auth.
Step for Laravel 11 Multiple Authentication using Middleware Example
- Step 1: Install Laravel 11
- Step 2: Create Migration and Update Model
- Step 3: Create Auth using Scaffold
- Step 4: Create UserAccess Middleware
- Step 5: Create Routes
- Step 6: Update Controller
- Step 7: Create Blade Files
- Step 8: Update LoginController File
- Step 9: Create User Seeder
- Run Laravel App
Step 1: Install Laravel 11
This step is not required; however, if you have not created the Laravel app, then you may go ahead and execute the below command:
composer create-project laravel/laravel example-appStep 2: Create Migration and Update Model
In this step, we need to add a new column "type" in the users table and model. Then, we need to run migration. So let's change that in both files.
Let's create a new migration using the following command:
php artisan make:migration add_type_to_users_tablenext, let's update the migration:
database/migrations/2024_04_05_143013_add_type_to_users_table.php
<?php

use Illuminate\Database\Migrations\Migration;
use Illuminate\Database\Schema\Blueprint;
use Illuminate\Support\Facades\Schema;

return new class extends Migration
{
    /**
     * Run the migrations.
     */
    public function up(): void
    {
        Schema::table('users', function (Blueprint $table) {
            $table->tinyInteger('type')->default(0); // Users: 0=>User, 1=>Admin, 2=>Manager
        });
    }

    /**
     * Reverse the migrations.
     */
    public function down(): void
    {
        Schema::table('users', function (Blueprint $table) {
            //
        });
    }
};
Now we need to run migration.
So let's run the below command:
php artisan migrateLet's update the User Model as the code below:
app/Models/User.php
<?php

namespace App\Models;

use Illuminate\Database\Eloquent\Factories\HasFactory;
use Illuminate\Foundation\Auth\User as Authenticatable;
use Illuminate\Notifications\Notifiable;
use Illuminate\Database\Eloquent\Casts\Attribute;

class User extends Authenticatable
{
    use HasFactory, Notifiable;

    /**
     * The attributes that are mass assignable.
     *
     * @var array
     */
    protected $fillable = [
        'name',
        'email',
        'password',
        'type'
    ];

    /**
     * The attributes that should be hidden for serialization.
     *
     * @var array
     */
    protected $hidden = [
        'password',
        'remember_token',
    ];

    /**
     * Get the attributes that should be cast.
     *
     * @return array
     */
    protected function casts(): array
    {
        return [
            'email_verified_at' => 'datetime',
            'password' => 'hashed',
        ];
    }

    /**
     * Interact with the user's first name.
     *
     * @param  string  $value
     * @return \Illuminate\Database\Eloquent\Casts\Attribute
     */
    protected function type(): Attribute
    {
        return new Attribute(
            get: fn ($value) =>  ["user", "admin", "manager"][$value],
        );
    }
}
Step 3: Create Auth using Scaffold
Now, in this step, we will create an auth scaffold command to generate login, register, and dashboard functionalities. So, run the following commands:
Laravel 11 UI Package:
composer require laravel/ui Generate Auth:
php artisan ui bootstrap --auth npm installnpm run buildStep 4: Create UserAccess Middleware
In this step, we need to create a user access middleware that will restrict users from accessing that page. So, let's create and update the code.
php artisan make:middleware UserAccessapp/Http/Middleware/UserAccess.php
<?php

namespace App\Http\Middleware;

use Closure;
use Illuminate\Http\Request;
use Symfony\Component\HttpFoundation\Response;

class UserAccess
{
    /**
     * Handle an incoming request.
     *
     * @param  \Closure(\Illuminate\Http\Request): (\Symfony\Component\HttpFoundation\Response)  $next
     */
    public function handle(Request $request, Closure $next, $userType): Response
    {
        if(auth()->user()->type == $userType){
            return $next($request);
        }

        return response()->json(['You do not have permission to access for this page.']);
    }
}
Next, we need to register the UserAccess middleware to the app.php file.
bootstrap/app.php
<?php

use Illuminate\Foundation\Application;
use Illuminate\Foundation\Configuration\Exceptions;
use Illuminate\Foundation\Configuration\Middleware;

return Application::configure(basePath: dirname(__DIR__))
    ->withRouting(
        web: __DIR__.'/../routes/web.php',
        commands: __DIR__.'/../routes/console.php',
        health: '/up',
    )
    ->withMiddleware(function (Middleware $middleware) {
        $middleware->alias([
            'user-access' => \App\Http\Middleware\UserAccess::class,
        ]);
    })
    ->withExceptions(function (Exceptions $exceptions) {
        //
    })->create();
Step 5: Create Routes
Here, We will add following routes group where you can create new routes for users, admins and manager access. let's update code:
routes/web.php
<?php

use Illuminate\Support\Facades\Route;

use App\Http\Controllers\HomeController;

Route::get('/', function () {
    return view('welcome');
});

Auth::routes();

/*------------------------------------------
--------------------------------------------
All Normal Users Routes List
--------------------------------------------
--------------------------------------------*/
Route::middleware(['auth', 'user-access:user'])->group(function () {

    Route::get('/home', [HomeController::class, 'index'])->name('home');
});

/*------------------------------------------
--------------------------------------------
All Admin Routes List
--------------------------------------------
--------------------------------------------*/
Route::middleware(['auth', 'user-access:admin'])->group(function () {

    Route::get('/admin/home', [HomeController::class, 'adminHome'])->name('admin.home');
});

/*------------------------------------------
--------------------------------------------
All Admin Routes List
--------------------------------------------
--------------------------------------------*/
Route::middleware(['auth', 'user-access:manager'])->group(function () {

    Route::get('/manager/home', [HomeController::class, 'managerHome'])->name('manager.home');
});
Step 6: Update Controller
Here, we need to add the `index()`, `adminHome()` and `managerHome()` methods for the admin route in the HomeController. So let's add them as follows:
app/Http/Controllers/HomeController.php
<?php

namespace App\Http\Controllers;

use Illuminate\Http\Request;
use Illuminate\View\View;

class HomeController extends Controller
{
    /**
     * Create a new controller instance.
     *
     * @return void
     */
    public function __construct()
    {
        $this->middleware('auth');
    }

    /**
     * Show the application dashboard.
     *
     * @return \Illuminate\Contracts\Support\Renderable
     */
    public function index(): View
    {
        return view('home');
    }

    /**
     * Show the application dashboard.
     *
     * @return \Illuminate\Contracts\Support\Renderable
     */
    public function adminHome(): View
    {
        return view('adminHome');
    }

    /**
     * Show the application dashboard.
     *
     * @return \Illuminate\Contracts\Support\Renderable
     */
    public function managerHome(): View
    {
        return view('managerHome');
    }
}
Step 7: Create Blade Files
In this step, we need to create a new blade file for the admin and update the user blade file. So let's change it.
resources/views/home.blade.php
@extends('layouts.app')

@section('content')
<div class="container">
    <div class="row justify-content-center">
        <div class="col-md-8">
            <div class="card">
                <div class="card-header">{{ __('Dashboard') }}</div>

                <div class="card-body">
                    @if (session('status'))
                        <div class="alert alert-success" role="alert">
                            {{ session('status') }}
                        </div>
                    @endif

                    <h2>You are a User.</h2>
                </div>
            </div>
        </div>
    </div>
</div>
@endsection
resources/views/adminHome.blade.php
@extends('layouts.app')

@section('content')
<div class="container">
    <div class="row justify-content-center">
        <div class="col-md-8">
            <div class="card">
                <div class="card-header">{{ __('Dashboard') }}</div>

                <div class="card-body">
                    @if (session('status'))
                        <div class="alert alert-success" role="alert">
                            {{ session('status') }}
                        </div>
                    @endif

                    <h2>You are a Admin User.</h2>
                </div>
            </div>
        </div>
    </div>
</div>
@endsection
resources/views/managerHome.blade.php
@extends('layouts.app')

@section('content')
<div class="container">
    <div class="row justify-content-center">
        <div class="col-md-8">
            <div class="card">
                <div class="card-header">{{ __('Dashboard') }}</div>

                <div class="card-body">
                    @if (session('status'))
                        <div class="alert alert-success" role="alert">
                            {{ session('status') }}
                        </div>
                    @endif

                    <h2>You are a Manager User.</h2>
                </div>
            </div>
        </div>
    </div>
</div>
@endsection
Step 8: Update LoginController File
In this step, we will make changes on the LoginController. When the user logs in, we will redirect them according to their access level. If they are a normal user, we will redirect them to the home route, and if they are an admin user, we will redirect them to the admin route. So, let's make the change.
app/Http/Controllers/Auth/LoginController.php
<?php

namespace App\Http\Controllers\Auth;

use App\Http\Controllers\Controller;
use Illuminate\Foundation\Auth\AuthenticatesUsers;
use Illuminate\Http\Request;
use Illuminate\Http\RedirectResponse;

class LoginController extends Controller
{
    /*
    |--------------------------------------------------------------------------
    | Login Controller
    |--------------------------------------------------------------------------
    |
    | This controller handles authenticating users for the application and
    | redirecting them to your home screen. The controller uses a trait
    | to conveniently provide its functionality to your applications.
    |
    */

    use AuthenticatesUsers;

    /**
     * Where to redirect users after login.
     *
     * @var string
     */
    protected $redirectTo = '/home';

    /**
     * Create a new controller instance.
     *
     * @return void
     */
    public function __construct()
    {
        $this->middleware('guest')->except('logout');
    }

    /**
     * Create a new controller instance.
     *
     * @return RedirectResponse
     */
    public function login(Request $request): RedirectResponse
    {
        $input = $request->all();

        $this->validate($request, [
            'email' => 'required|email',
            'password' => 'required',
        ]);

        if(auth()->attempt(array('email' => $input['email'], 'password' => $input['password'])))
        {
            if (auth()->user()->type == 'admin') {
                return redirect()->route('admin.home');
            }else if (auth()->user()->type == 'manager') {
                return redirect()->route('manager.home');
            }else{
                return redirect()->route('home');
            }
        }else{
            return redirect()->route('login')
                ->with('error','Email-Address And Password Are Wrong.');
        }

    }
}
Step 9: Create User Seeder
We will create a seeder to create new admin and normal users. So let's create the seeder using the following command:
php artisan make:seeder CreateUsersSeederdatabase/seeders/CreateUsersSeeder.php
<?php

namespace Database\Seeders;

use Illuminate\Database\Console\Seeds\WithoutModelEvents;
use Illuminate\Database\Seeder;
use App\Models\User;

class CreateUsersSeeder extends Seeder
{
    /**
     * Run the database seeds.
     *
     * @return void
     */
    public function run(): void
    {
        $users = [
            [
               'name'=>'Admin User',
               'email'=>'admin@itsolutionstuff.com',
               'type'=>1,
               'password'=> bcrypt('123456'),
            ],
            [
               'name'=>'Manager User',
               'email'=>'manager@itsolutionstuff.com',
               'type'=> 2,
               'password'=> bcrypt('123456'),
            ],
            [
               'name'=>'User',
               'email'=>'user@itsolutionstuff.com',
               'type'=>0,
               'password'=> bcrypt('123456'),
            ],
        ];

        foreach ($users as $key => $user) {
            User::create($user);
        }
    }
}
Now let's run seeder:
php artisan db:seed --class=CreateUsersSeederRun Laravel App:
All the required steps have been done, now you have to type the given below command and hit enter to run the Laravel app:
php artisan serveNow, Go to your web browser, type the given URL and view the app output:
http://localhost:8000/Now, Let's login with following credentials:
Normal User:
Email: user@itsolutionstuff.com
Password: 123456
Admin User:
Email: admin@itsolutionstuff.com
Password: 123456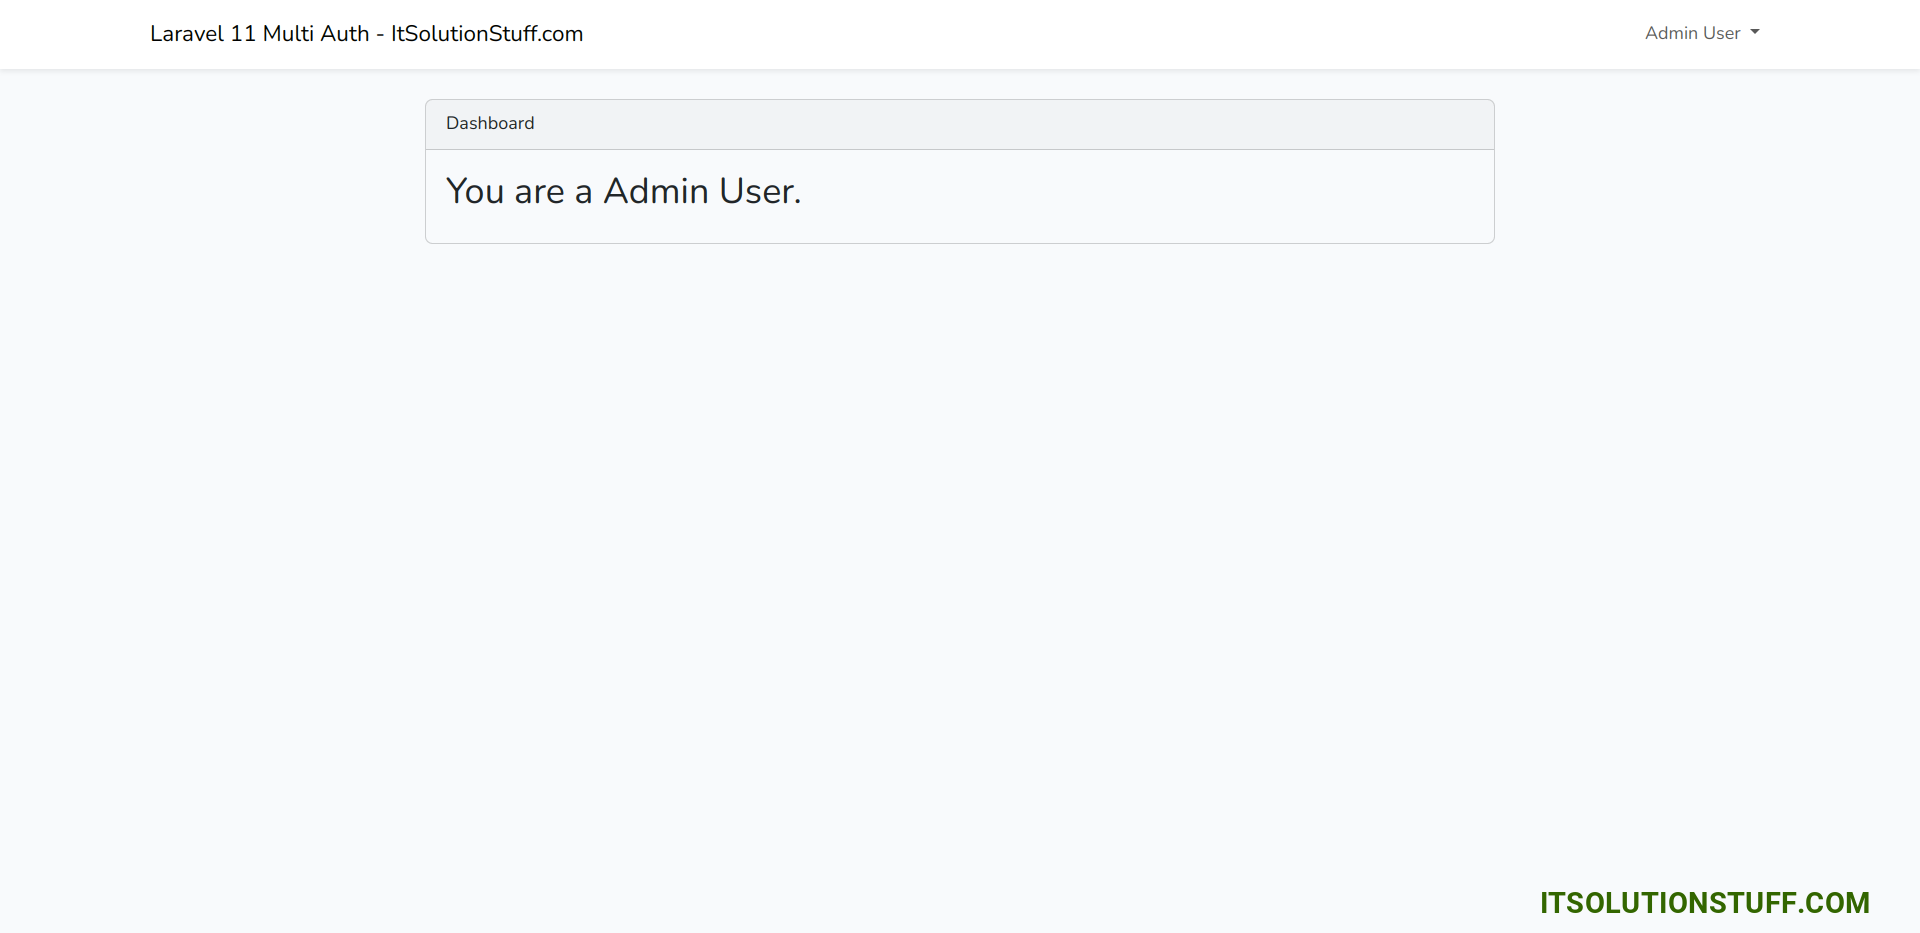
Manager User:
Email: manager@itsolutionstuff.com
Password: 123456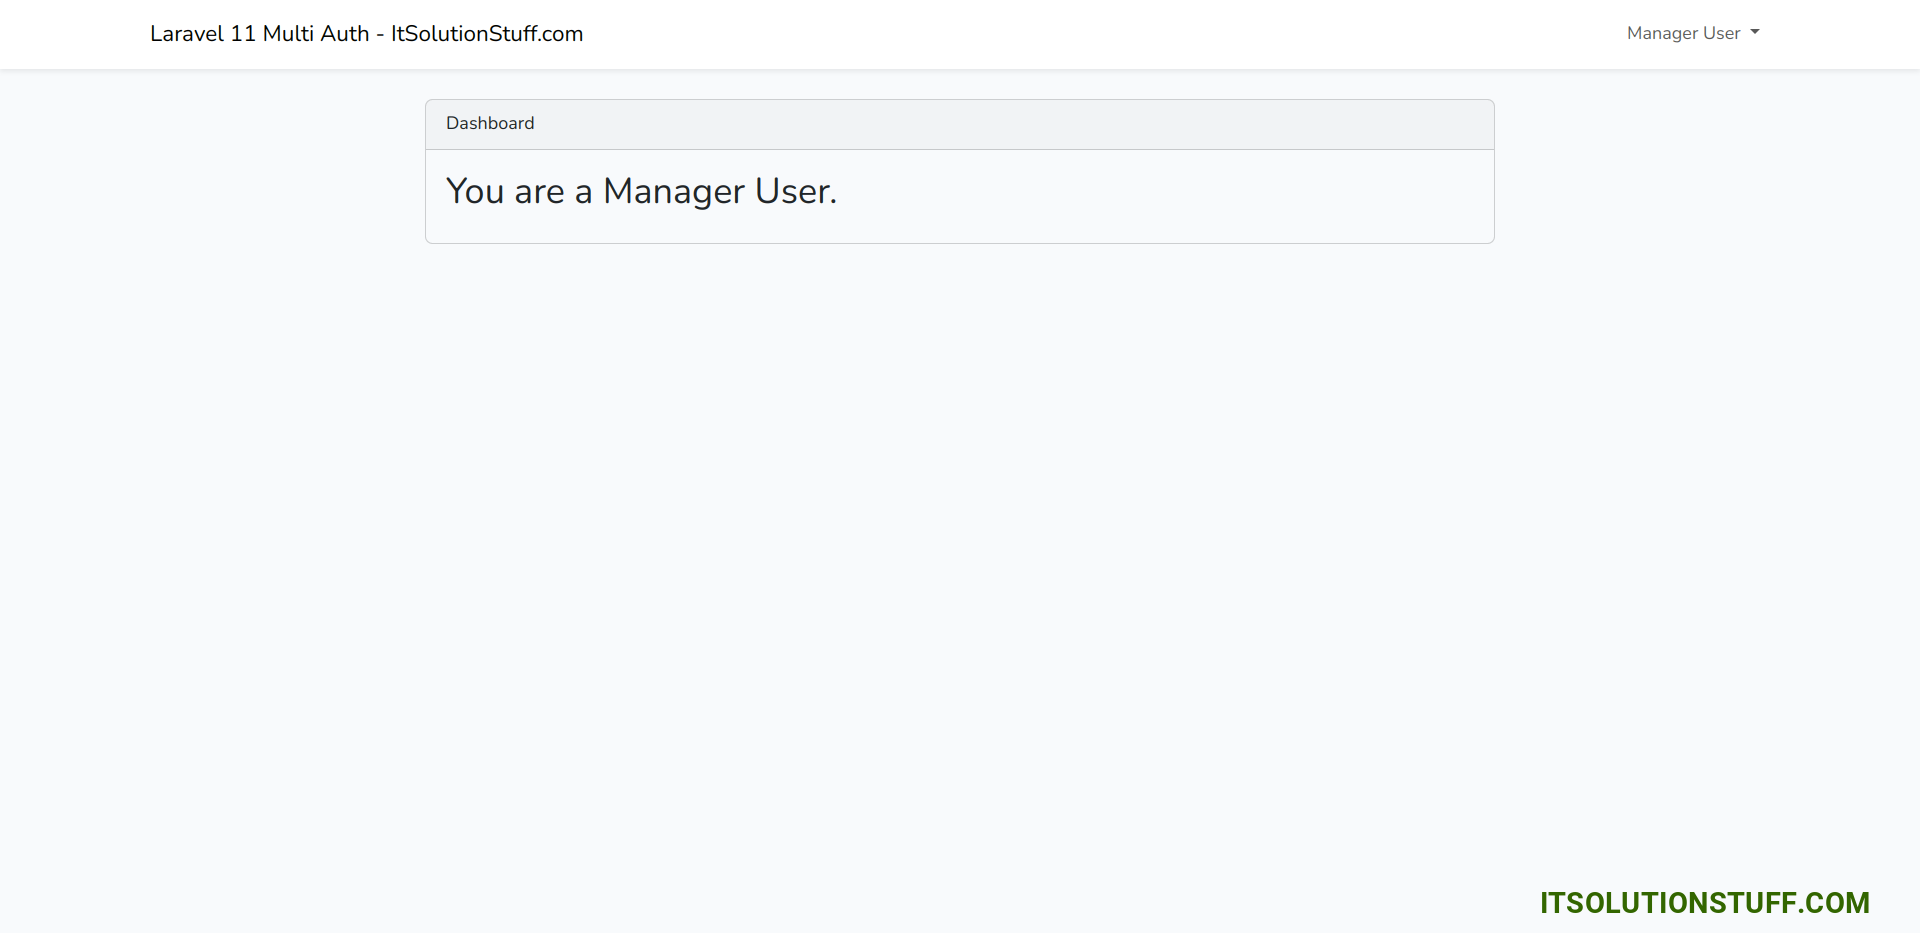
Output:
You can download the code from git:
Download Code from Github for Laravel 11 Multi Auth
I hope it can help you...

