Laravel 11 Ajax Dependent Dropdown Example
In this tutorial, I will teach you how to create ajax dependent dropdown in laravel 11 application. we will create dynamic dependent dropdown for country, state, and city selection in laravel 11.
What is Dependent Dropdown?
A dependent dropdown is a type of menu where the options available in one dropdown menu depend on the choice made in another dropdown menu. For example, if you choose "Fruit" in the first dropdown, the options in the second dropdown might be "Apple," "Banana," and "Orange." But if you choose "Vegetable" in the first dropdown, the options in the second dropdown might change to "Carrot," "Broccoli," and "Tomato."
In this example, we will create tables for country, state, and city. Then we will add some dummy data to those tables using a database seeder. After that, we will create a form with three select boxes for country, state, and city. When the user selects a country, the state select box will fill based on the selected country. Then, after the user selects a state, the city select box will fill based on the selected state. So, let's see the simple step-by-step code for dynamic dependent dropdowns.
Step for How to Create Dynamic Dependent Dropdown in Laravel 11?
- Step 1: Install Laravel 11
- Step 2: Create Migration
- Step 3: Create Models
- Step 4: Create Routes
- Step 5: Create Controller
- Step 6: Create View File
- Step 7: Create Seeder
- Run Laravel App:
Step 1: Install Laravel 11
First of all, we need to get a fresh Laravel 11 version application using the command below because we are starting from scratch. So, open your terminal or command prompt and run the command below:
composer create-project laravel/laravel example-appStep 2: Create Migration
In this step, we will create migrations for the countries, states, and cities tables. So let's run the below command to create tables.
php artisan make:migration create_countries_states_cities_tablesNext, simply update the code below in the migration file.
database/migrations/create_countries_states_cities_tables.php
<?php

use Illuminate\Database\Migrations\Migration;
use Illuminate\Database\Schema\Blueprint;
use Illuminate\Support\Facades\Schema;

return new class extends Migration
{
    /**
     * Run the migrations.
     *
     * @return void
     */
    public function up(): void
    {
        Schema::create('countries', function (Blueprint $table) {
            $table->id();
            $table->string('name');
            $table->timestamps();
        });

        Schema::create('states', function (Blueprint $table) {
            $table->id();
            $table->string('name');
            $table->integer('country_id');
            $table->timestamps();
        });

        Schema::create('cities', function (Blueprint $table) {
            $table->id();
            $table->string('name');
            $table->integer('state_id');
            $table->timestamps();
        });
    }

    /**
     * Reverse the migrations.
     *
     * @return void
     */
    public function down(): void
    {
        Schema::dropIfExists('countries');
        Schema::dropIfExists('states');
        Schema::dropIfExists('cities');
    }
};
Then run the created new migration with the below command:
php artisan migrateStep 3: Create Models
In this step, we will create three models for tables Country.php, State.php, and City.php model files.
So, let's run the below command to create files and update the following code:
php artisan make:model Country
php artisan make:model State
php artisan make:model City
You have to update your model file as below:
app/Models/Country.php
<?php

namespace App\Models;

use Illuminate\Database\Eloquent\Factories\HasFactory;
use Illuminate\Database\Eloquent\Model;

class Country extends Model
{
    use HasFactory;

    protected $fillable = [
        'name'
    ];
}
app/Models/State.php
<?php

namespace App\Models;

use Illuminate\Database\Eloquent\Factories\HasFactory;
use Illuminate\Database\Eloquent\Model;

class State extends Model
{
    use HasFactory;

    protected $fillable = [
        'name', 'country_id'
    ];
}
app/Models/City.php
<?php

namespace App\Models;

use Illuminate\Database\Eloquent\Factories\HasFactory;
use Illuminate\Database\Eloquent\Model;

class City extends Model
{
    use HasFactory;

    protected $fillable = [
        'name', 'state_id'
    ];
}
Step 4: Create Routes
In this step, we will add three routes with GET and POST methods in routes/web.php file. So let's add it.
routes/web.php
<?php

use Illuminate\Support\Facades\Route;

use App\Http\Controllers\DropdownController;

Route::get('dropdown', [DropdownController::class, 'index']);
Route::post('api/fetch-states', [DropdownController::class, 'fetchState']);
Route::post('api/fetch-cities', [DropdownController::class, 'fetchCity']);
Step 5: Create Controller
In this step, we have to create a new controller as DropdownController with index(), fetchState(), and fetchCity() methods. So let's update the following code:
app/Http/Controllers/DropdownController.php
<?php

namespace App\Http\Controllers;

use Illuminate\Http\Request;
use App\Models\Country;
use App\Models\State;
use App\Models\City;
use Illuminate\View\View;
use Illuminate\Http\JsonResponse;

class DropdownController extends Controller
{
    /**
     * Write code on Method
     *
     * @return response()
     */
    public function index(): View
    {
        $data['countries'] = Country::get(["name", "id"]);
        return view('dropdown', $data);
    }

    /**
     * Write code on Method
     *
     * @return response()
     */
    public function fetchState(Request $request): JsonResponse
    {
        $data['states'] = State::where("country_id", $request->country_id)
                                ->get(["name", "id"]);

        return response()->json($data);
    }

    /**
     * Write code on Method
     *
     * @return response()
     */
    public function fetchCity(Request $request): JsonResponse
    {
        $data['cities'] = City::where("state_id", $request->state_id)
                                    ->get(["name", "id"]);

        return response()->json($data);
    }
}
Step 6: Create View File
In the last step, let's create dropdown.blade.php to display the form and insert the following code:
resources/views/dropdown.blade.php
<!DOCTYPE html>
<html>
<head>
    <meta charset="utf-8">
    <meta name="csrf-token" content="{{ csrf_token() }}">
    <meta name="viewport" content="width=device-width, initial-scale=1">
    <title>Laravel AJAX Dependent Country State City Dropdown Example - ItSolutionStuff.com</title>
    <link href="https://cdn.jsdelivr.net/npm/bootstrap@5.0.0-beta1/dist/css/bootstrap.min.css" rel="stylesheet">
    <script src="https://ajax.googleapis.com/ajax/libs/jquery/3.5.1/jquery.min.js"></script>
</head>
<body>
<div class="container mt-4" >
    <div class="card mt-5">
        <h3 class="card-header p-3">Laravel 11 AJAX Dependent Country State City Dropdown Example - ItSolutionStuff.com</h3>
        <div class="card-body">
            <form>
                <div class="form-group mb-3">
                    <select  id="country-dropdown" class="form-control">
                        <option value="">-- Select Country --</option>
                        @foreach ($countries as $data)
                        <option value="{{$data->id}}">
                            {{$data->name}}
                        </option>
                        @endforeach
                    </select>
                </div>
                <div class="form-group mb-3">
                    <select id="state-dropdown" class="form-control">
                    </select>
                </div>
                <div class="form-group">
                    <select id="city-dropdown" class="form-control">
                    </select>
                </div>
            </form>
        </div>
    </div>
</div>

<script type="text/javascript">
    $(document).ready(function () {

        /*------------------------------------------
        --------------------------------------------
        Country Dropdown Change Event
        --------------------------------------------
        --------------------------------------------*/
        $('#country-dropdown').on('change', function () {
            var idCountry = this.value;
            $("#state-dropdown").html('');
            $.ajax({
                url: "{{url('api/fetch-states')}}",
                type: "POST",
                data: {
                    country_id: idCountry,
                    _token: '{{csrf_token()}}'
                },
                dataType: 'json',
                success: function (result) {
                    $('#state-dropdown').html('<option value="">-- Select State --</option>');
                    $.each(result.states, function (key, value) {
                        $("#state-dropdown").append('<option value="' + value
                            .id + '">' + value.name + '</option>');
                    });
                    $('#city-dropdown').html('<option value="">-- Select City --</option>');
                }
            });
        });

        /*------------------------------------------
        --------------------------------------------
        State Dropdown Change Event
        --------------------------------------------
        --------------------------------------------*/
        $('#state-dropdown').on('change', function () {
            var idState = this.value;
            $("#city-dropdown").html('');
            $.ajax({
                url: "{{url('api/fetch-cities')}}",
                type: "POST",
                data: {
                    state_id: idState,
                    _token: '{{csrf_token()}}'
                },
                dataType: 'json',
                success: function (res) {
                    $('#city-dropdown').html('<option value="">-- Select City --</option>');
                    $.each(res.cities, function (key, value) {
                        $("#city-dropdown").append('<option value="' + value
                            .id + '">' + value.name + '</option>');
                    });
                }
            });
        });

    });
</script>
</body>
</html>
Step 7: Create Seeder
In this step, we will create the "CountryStateCitySeeder" file to generate dummy records. So, let's create the seeder and run it.
Create the Seeder file using the command below:
php artisan make:seeder CountrySateCitySeederLet's update the following code in the seeder file:
database/seeders/CountrySateCitySeeder.php
<?php

namespace Database\Seeders;

use Illuminate\Database\Console\Seeds\WithoutModelEvents;
use Illuminate\Database\Seeder;
use App\Models\Country;
use App\Models\State;
use App\Models\City;

class CountrySateCitySeeder extends Seeder
{
    /**
     * Run the database seeds.
     *
     * @return void
     */
    public function run(): void
    {
        /*------------------------------------------
        --------------------------------------------
        US Country Data
        --------------------------------------------
        --------------------------------------------*/
        $country = Country::create(['name' => 'United State']);

        $state = State::create(['country_id' => $country->id, 'name' => 'Florida']);

        City::create(['state_id' => $state->id, 'name' => 'Miami']);
        City::create(['state_id' => $state->id, 'name' => 'Tampa']);

        /*------------------------------------------
        --------------------------------------------
        India Country Data
        --------------------------------------------
        --------------------------------------------*/
        $country = Country::create(['name' => 'India']);

        $state = State::create(['country_id' => $country->id, 'name' => 'Gujarat']);

        City::create(['state_id' => $state->id, 'name' => 'Rajkot']);
        City::create(['state_id' => $state->id, 'name' => 'Surat']);

    }
}
Next, run the seeder with the below command:
php artisan db:seed --class=CountrySateCitySeederRun Laravel App:
All the required steps have been done, now you have to type the given below command and hit enter to run the Laravel app:
php artisan serveNow, Go to your web browser, type the given URL and view the app output:
http://localhost:8000/dropdownOutput:
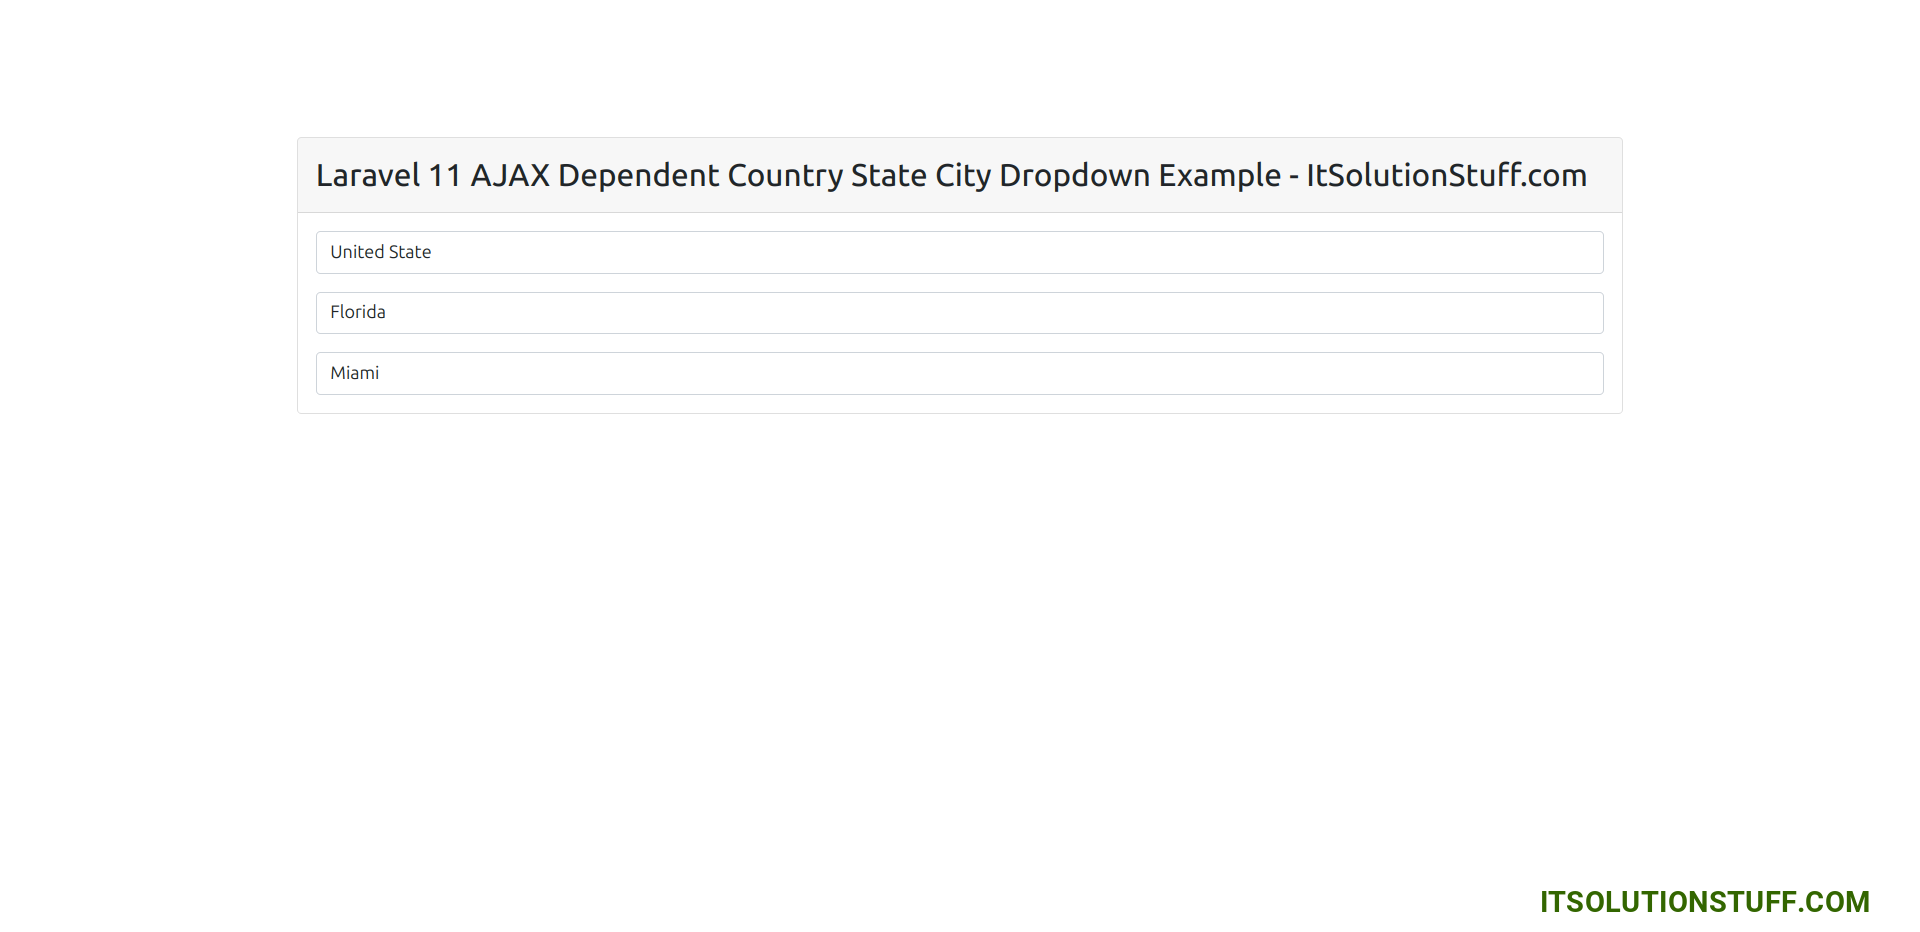
I hope it can help you...

