Laravel 11 REST API Authentication using Sanctum Tutorial
In this tutorial, we will learn about Laravel 11 REST API using Sanctum authentication by developing a complete Laravel 11 REST API authentication with Sanctum application with simple and step by step guide.
We will learn from scratch about APIs, REST APIs, and Laravel Sanctum, and create an example API as well.
What is API?
An API (application programming interface) is simply a way of communication between two or more computer programs.
APIs are also used for web and mobile application development; therefore, building a REST API is very essential for any web and mobile application developer.
What is Laravel Sanctum?
Laravel Sanctum is an API authentication package for Laravel applications, providing a lightweight, simple-to-use authentication system for single-page applications (SPAs), mobile apps, and other API-driven projects. It offers token-based authentication using JSON Web Tokens (JWT) or API tokens, enabling secure authentication without the overhead of traditional session-based authentication. Sanctum simplifies setting up token authentication, allowing developers to focus on building their applications rather than dealing with authentication complexities.
We will use Laravel Sanctum, an authentication system package for developing simple APIs for SPAs (single-page applications) which are commonly built via React JS, Angular, or Vue JS.
In this example, we will install the Laravel 11 application. Then, we will install the Sanctum composer package for API authentication. After that, we will create register and login APIs for user authentication. Then, we will create a products REST API, and you must authenticate using a user token. So, let's follow the steps below to complete this example step by step:
Step for Laravel 11 Sanctum REST API Authentication Example
- Step 1: Install Laravel 11
- Step 2: Install Sanctum API
- Step 3: Sanctum Configuration
- Step 4: Add Product Table and Model
- Step 5: Create API Routes
- Step 6: Create Controller Files
- Run Laravel App
Follow the steps below to create a RESTful API example in the Laravel 11 app.
Step 1: Install Laravel 11
This step is not required; however, if you have not created the Laravel app, then you may go ahead and execute the below command:
composer create-project laravel/laravel example-appStep 2: Install Sanctum API
In Laravel 11, by default, we don't have an api.php route file. So, you just need to run the following command to install Sanctum with api.php file.
php artisan install:apiStep 3: Sanctum Configuration
In this step, we have to configure three places: the model, service provider, and auth config file. So you only need to make the following changes in those files:
In the model, we added the HasApiTokens class of Sanctum.
In auth.php, we added API auth configuration.
app/Models/User.php
<?php

namespace App\Models;

use Illuminate\Database\Eloquent\Factories\HasFactory;
use Illuminate\Foundation\Auth\User as Authenticatable;
use Illuminate\Notifications\Notifiable;
use Laravel\Sanctum\HasApiTokens;

class User extends Authenticatable
{
    use HasFactory, Notifiable, HasApiTokens;

    /**
     * The attributes that are mass assignable.
     *
     * @var array
     */
    protected $fillable = [
        'name',
        'email',
        'password',
    ];

    /**
     * The attributes that should be hidden for serialization.
     *
     * @var array
     */
    protected $hidden = [
        'password',
        'remember_token',
    ];

    /**
     * Get the attributes that should be cast.
     *
     * @return array
     */
    protected function casts(): array
    {
        return [
            'email_verified_at' => 'datetime',
            'password' => 'hashed',
        ];
    }
}
Step 4: Add Product Table and Model
Next, we need to create a migration for the products table using the laravel artisan command. So first, execute the command below:
php artisan make:migration create_products_tableAfter this command, you will find one file in the following path database/migrations, and you have to put the below code in your migration file to create the products table.
<?php

use Illuminate\Database\Migrations\Migration;
use Illuminate\Database\Schema\Blueprint;
use Illuminate\Support\Facades\Schema;

return new class extends Migration
{
    /**
     * Run the migrations.
     */
    public function up(): void
    {
        Schema::create('products', function (Blueprint $table) {
            $table->id();
            $table->string('name');
            $table->text('detail');
            $table->timestamps();
        });
    }

    /**
     * Reverse the migrations.
     */
    public function down(): void
    {
        Schema::dropIfExists('products');
    }
};
After creating the migration, we need to run the above migration by following command:
php artisan migrateAfter creating the "products" table, you should create a Product model for the products. So, first, create a file at this path app/Models/Product.php and put the content below in the item.php file:
app/Models/Product.php
<?php

namespace App\Models;

use Illuminate\Database\Eloquent\Factories\HasFactory;
use Illuminate\Database\Eloquent\Model;

class Product extends Model
{
    use HasFactory;

    /**
     * The attributes that are mass assignable.
     *
     * @var array
     */
    protected $fillable = [
        'name', 'detail'
    ];
}
Step 5: Create API Routes
In this step, we will create API routes for login, register, and products REST API. So, let's add a new route in that file.
routes/api.php
<?php

use Illuminate\Http\Request;
use Illuminate\Support\Facades\Route;

use App\Http\Controllers\API\RegisterController;
use App\Http\Controllers\API\ProductController;

Route::controller(RegisterController::class)->group(function(){
    Route::post('register', 'register');
    Route::post('login', 'login');
});

Route::middleware('auth:sanctum')->group( function () {
    Route::resource('products', ProductController::class);
});
Step 6: Create Controller Files
In the next step, we have created a new controller named BaseController, ProductController, and RegisterController. I created a new folder named "API" in the Controllers folder because we will have separate API controllers. So, let's create both controllers.
app/Http/Controllers/API/BaseController.php
<?php

namespace App\Http\Controllers\API;

use Illuminate\Http\Request;
use App\Http\Controllers\Controller as Controller;

class BaseController extends Controller
{
    /**
     * success response method.
     *
     * @return \Illuminate\Http\Response
     */
    public function sendResponse($result, $message)
    {
        $response = [
            'success' => true,
            'data'    => $result,
            'message' => $message,
        ];

        return response()->json($response, 200);
    }

    /**
     * return error response.
     *
     * @return \Illuminate\Http\Response
     */
    public function sendError($error, $errorMessages = [], $code = 404)
    {
        $response = [
            'success' => false,
            'message' => $error,
        ];

        if(!empty($errorMessages)){
            $response['data'] = $errorMessages;
        }

        return response()->json($response, $code);
    }
}
app/Http/Controllers/API/RegisterController.php
<?php

namespace App\Http\Controllers\API;

use Illuminate\Http\Request;
use App\Http\Controllers\API\BaseController as BaseController;
use App\Models\User;
use Illuminate\Support\Facades\Auth;
use Validator;
use Illuminate\Http\JsonResponse;

class RegisterController extends BaseController
{
    /**
     * Register api
     *
     * @return \Illuminate\Http\Response
     */
    public function register(Request $request): JsonResponse
    {
        $validator = Validator::make($request->all(), [
            'name' => 'required',
            'email' => 'required|email',
            'password' => 'required',
            'c_password' => 'required|same:password',
        ]);

        if($validator->fails()){
            return $this->sendError('Validation Error.', $validator->errors());
        }

        $input = $request->all();
        $input['password'] = bcrypt($input['password']);
        $user = User::create($input);
        $success['token'] =  $user->createToken('MyApp')->plainTextToken;
        $success['name'] =  $user->name;

        return $this->sendResponse($success, 'User register successfully.');
    }

    /**
     * Login api
     *
     * @return \Illuminate\Http\Response
     */
    public function login(Request $request): JsonResponse
    {
        if(Auth::attempt(['email' => $request->email, 'password' => $request->password])){
            $user = Auth::user();
            $success['token'] =  $user->createToken('MyApp')->plainTextToken;
            $success['name'] =  $user->name;

            return $this->sendResponse($success, 'User login successfully.');
        }
        else{
            return $this->sendError('Unauthorised.', ['error'=>'Unauthorised']);
        }
    }
}
app/Http/Controllers/API/ProductController.php
<?php

namespace App\Http\Controllers\API;

use Illuminate\Http\Request;
use App\Http\Controllers\API\BaseController as BaseController;
use App\Models\Product;
use Validator;
use App\Http\Resources\ProductResource;
use Illuminate\Http\JsonResponse;

class ProductController extends BaseController
{
    /**
     * Display a listing of the resource.
     *
     * @return \Illuminate\Http\Response
     */
    public function index(): JsonResponse
    {
        $products = Product::all();

        return $this->sendResponse(ProductResource::collection($products), 'Products retrieved successfully.');
    }

    /**
     * Store a newly created resource in storage.
     *
     * @param  \Illuminate\Http\Request  $request
     * @return \Illuminate\Http\Response
     */
    public function store(Request $request): JsonResponse
    {
        $input = $request->all();

        $validator = Validator::make($input, [
            'name' => 'required',
            'detail' => 'required'
        ]);

        if($validator->fails()){
            return $this->sendError('Validation Error.', $validator->errors());
        }

        $product = Product::create($input);

        return $this->sendResponse(new ProductResource($product), 'Product created successfully.');
    }

    /**
     * Display the specified resource.
     *
     * @param  int  $id
     * @return \Illuminate\Http\Response
     */
    public function show($id): JsonResponse
    {
        $product = Product::find($id);

        if (is_null($product)) {
            return $this->sendError('Product not found.');
        }

        return $this->sendResponse(new ProductResource($product), 'Product retrieved successfully.');
    }

    /**
     * Update the specified resource in storage.
     *
     * @param  \Illuminate\Http\Request  $request
     * @param  int  $id
     * @return \Illuminate\Http\Response
     */
    public function update(Request $request, Product $product): JsonResponse
    {
        $input = $request->all();

        $validator = Validator::make($input, [
            'name' => 'required',
            'detail' => 'required'
        ]);

        if($validator->fails()){
            return $this->sendError('Validation Error.', $validator->errors());
        }

        $product->name = $input['name'];
        $product->detail = $input['detail'];
        $product->save();

        return $this->sendResponse(new ProductResource($product), 'Product updated successfully.');
    }

    /**
     * Remove the specified resource from storage.
     *
     * @param  int  $id
     * @return \Illuminate\Http\Response
     */
    public function destroy(Product $product): JsonResponse
    {
        $product->delete();

        return $this->sendResponse([], 'Product deleted successfully.');
    }
}
Step 7: Create Eloquent API Resources
This is a very important step in creating a REST API in Laravel 11. You can use Eloquent API resources with the API. It will help you to maintain the same response layout of your model object. We used it in the ProductController file. Now, we have to create it using the following command:
php artisan make:resource ProductResourceNow, a new file has been created with a new folder at the following path:
app/Http/Resources/ProductResource.php
<?php

namespace App\Http\Resources;

use Illuminate\Http\Request;
use Illuminate\Http\Resources\Json\JsonResource;

class ProductResource extends JsonResource
{
    /**
     * Transform the resource into an array.
     *
     * @return array
     */
    public function toArray(Request $request): array
    {
        return [
            'id' => $this->id,
            'name' => $this->name,
            'detail' => $this->detail,
            'created_at' => $this->created_at->format('d/m/Y'),
            'updated_at' => $this->updated_at->format('d/m/Y'),
        ];
    }
}
Run Laravel App:
All the required steps have been done. Now you have to type the given below command and hit enter to run the Laravel app:
php artisan serveNow, go to your Postman and check the following APIs.
Make sure in the details API, we will use the following headers as listed below:
'headers' => [
    'Accept' => 'application/json',
    'Authorization' => 'Bearer '.$accessToken,
]
Here are the Routes URLs with Verbs:
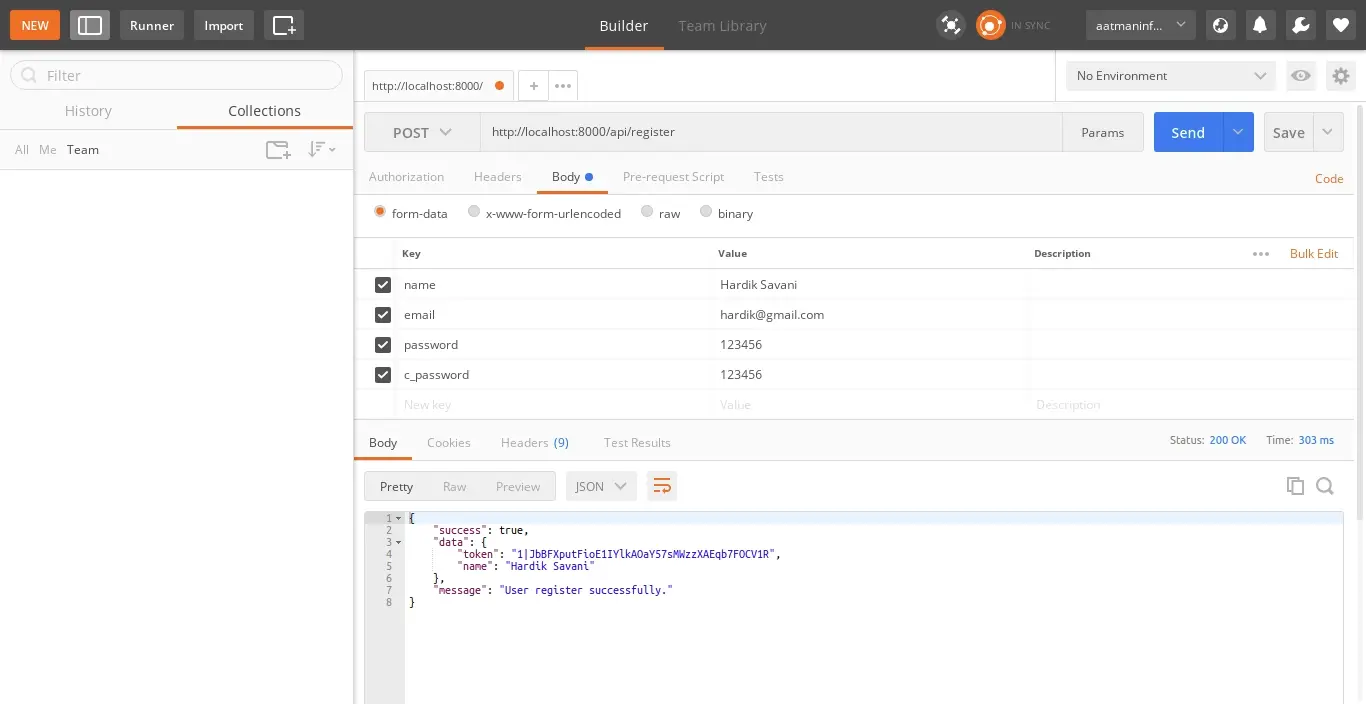
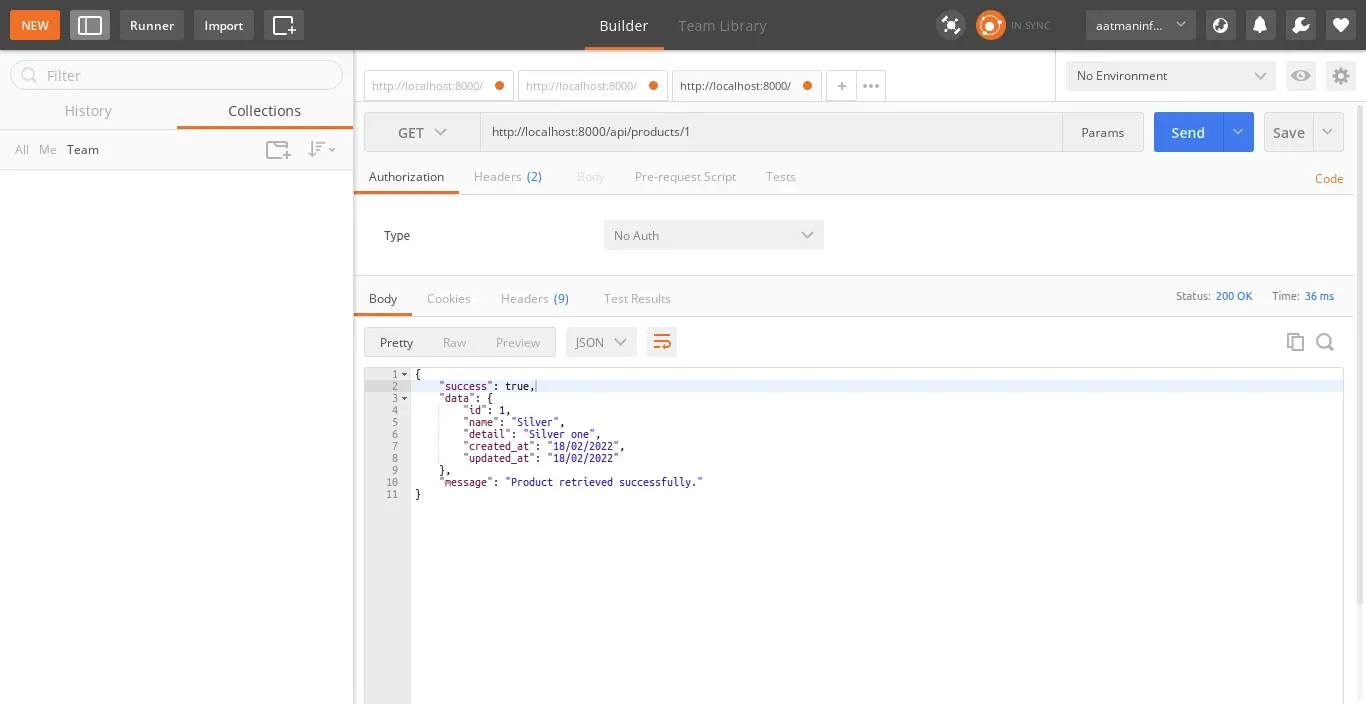
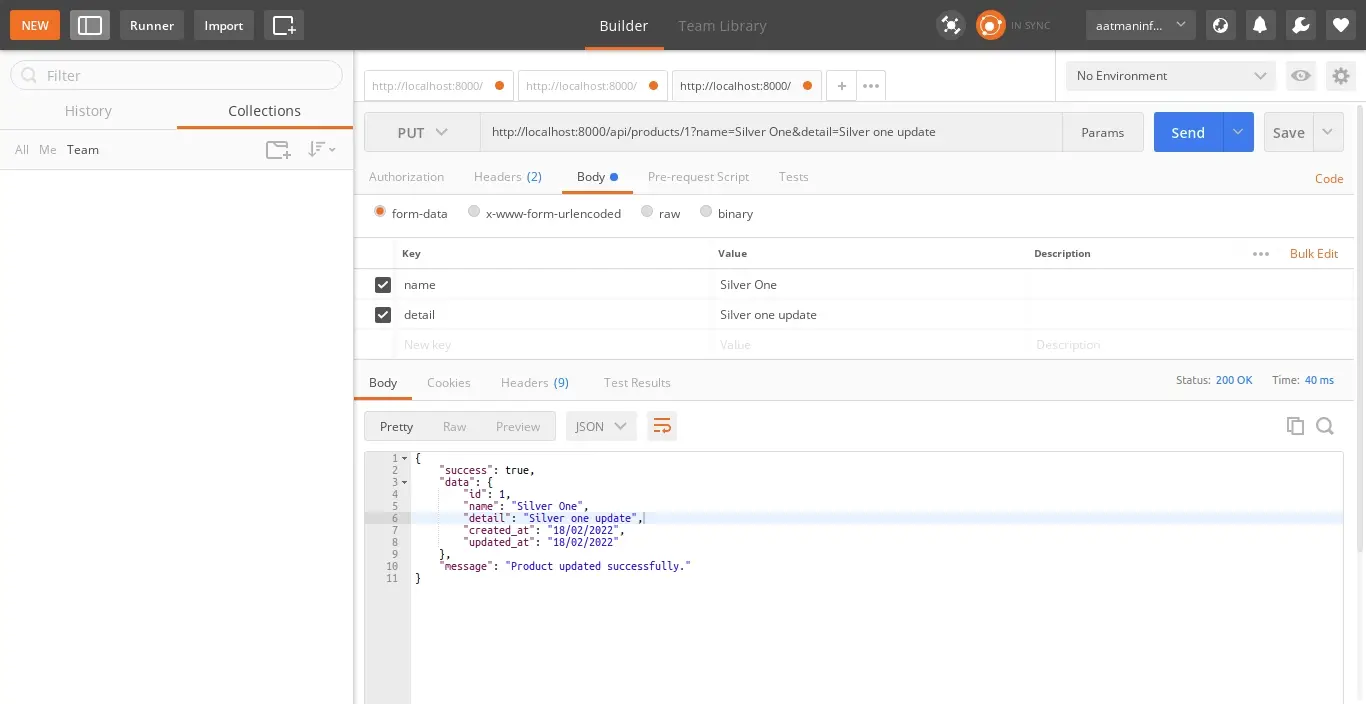
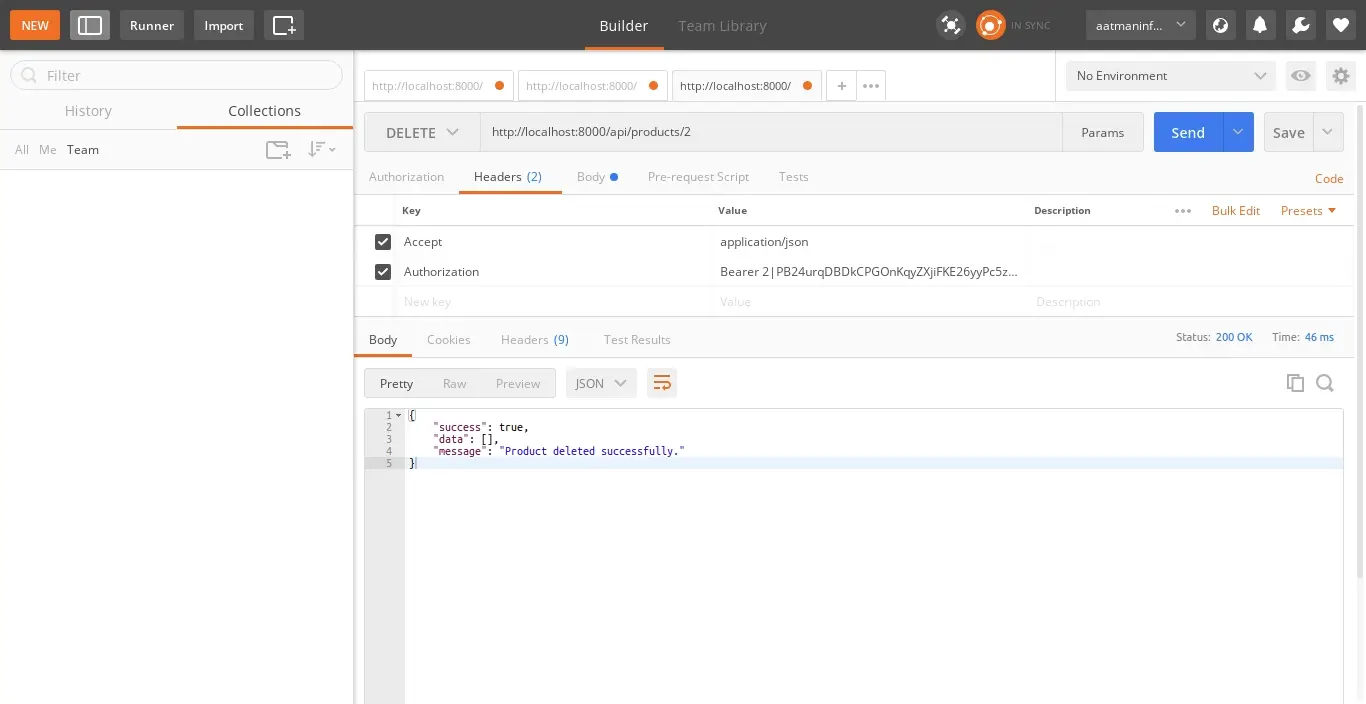
Now you can simply run the above listed URLs as shown in the screenshot below:
1) Register API: Verb:GET, URL:http://localhost:8000/api/register
2) Login API: Verb:GET, URL:http://localhost:8000/api/login

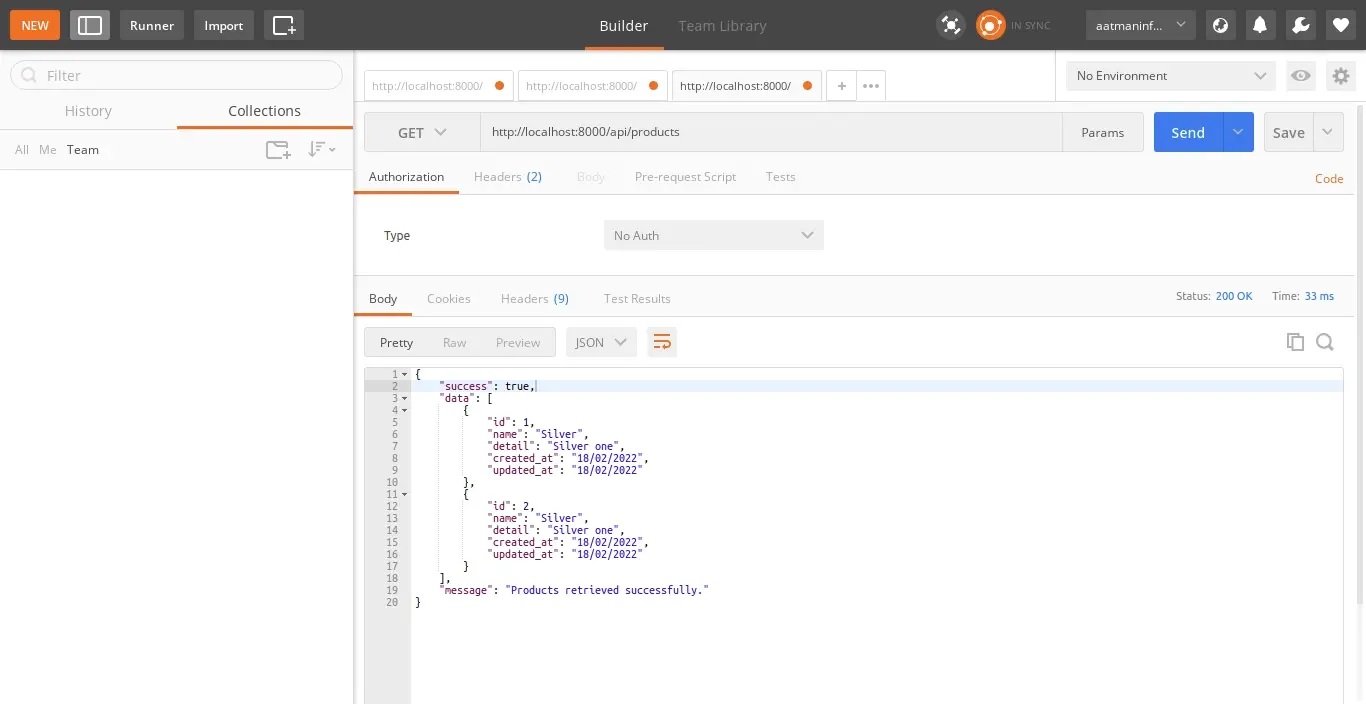
3) Product List API: Verb:GET, URL:http://localhost:8000/api/products
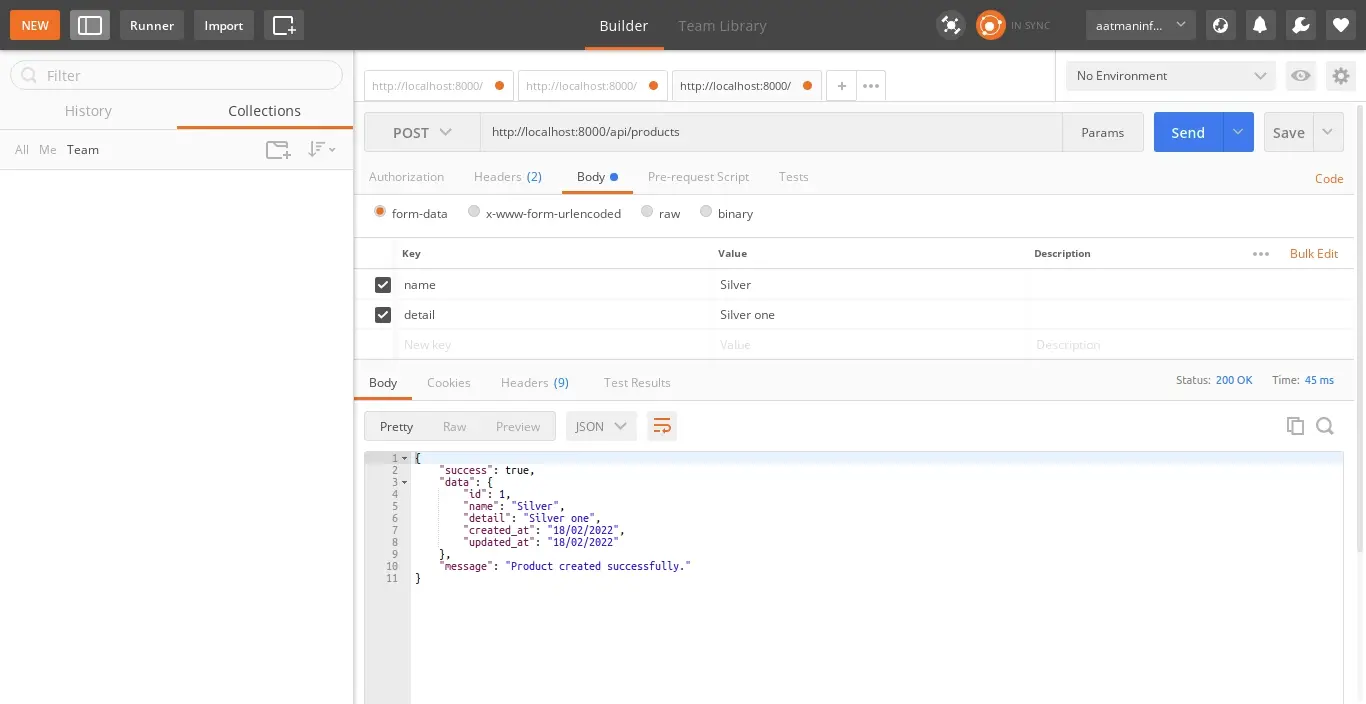
4) Product Create API: Verb:POST, URL:http://localhost:8000/api/products
5) Product Show API: Verb:GET, URL:http://localhost:8000/api/products/{id}
6) Product Update API: Verb:PUT, URL:http://localhost:8000/api/products/{id}
7) Product Delete API: Verb:DELETE, URL:http://localhost:8000/api/products/{id}
You can download code from git: Download Code from Github
I hope it can help you...

