Laravel Firebase Push Notification Tutorial
Hi All,
Today our leading topic is laravel firebase push notification example. i would like to share with you laravel firebase web push notification. This tutorial will give you simple example of laravel send push notification firebase. let’s discuss about send firebase push notification using laravel. follow bellow step for firebase push notification laravel.
Today, i will give you simple example of send firebase push notification using laravel. you can also use in laravel 6, laravel 7, laravel 8, laravel 9, laravel 10 and laravel 11 version.
Firebase provides a realtime database and backend as a service. The service provides application developers an API that allows application data to be synchronized across clients and stored on Firebase’s cloud.
firebase push notification is a free open source and you can easily implement using your google account. here i will give you simple to getting device token of logged in users and then we will send web push notification. so let's simply follow bellow step to create push notification with laravel app.
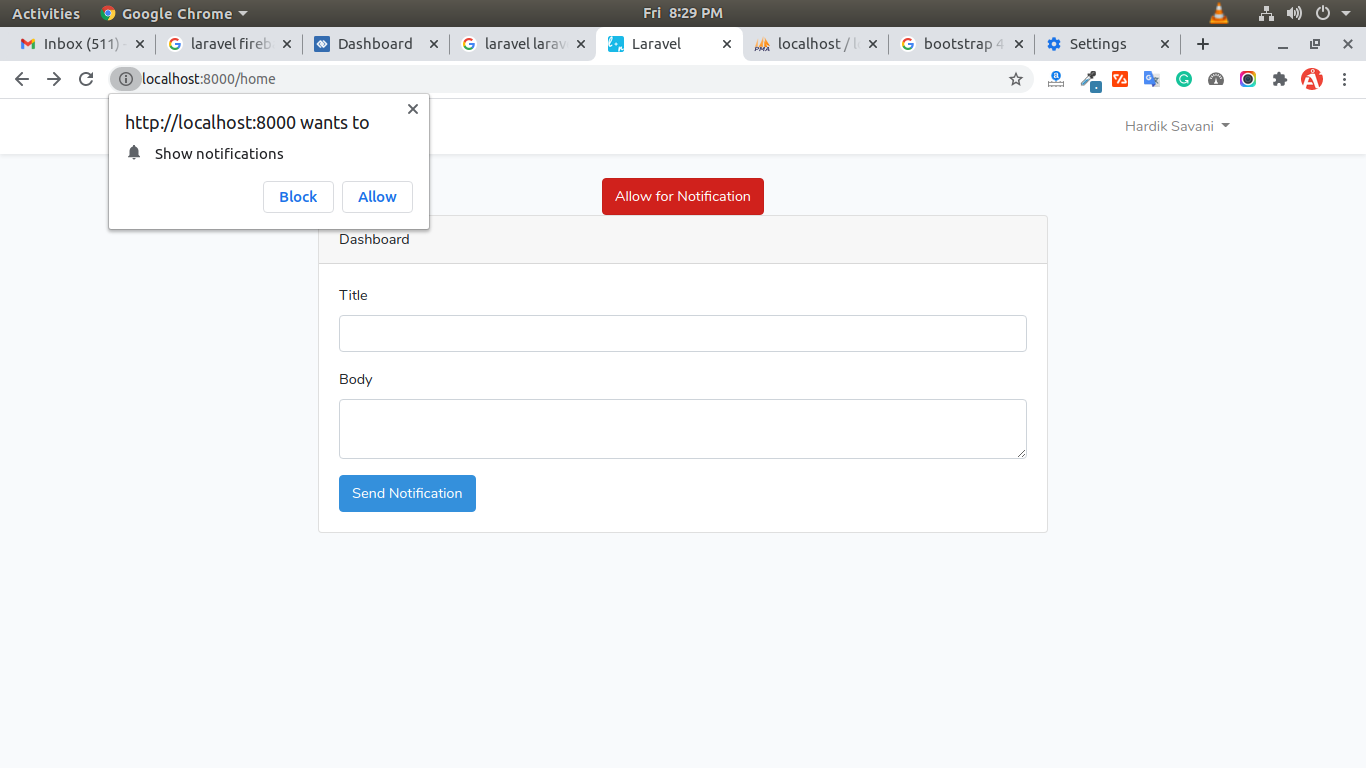
Preview:
Step 1: Create Firebase Project and App
In first step, we have to go Firebase Console and create a project. then you have to create web app on that project as like i added bellow screenshot:
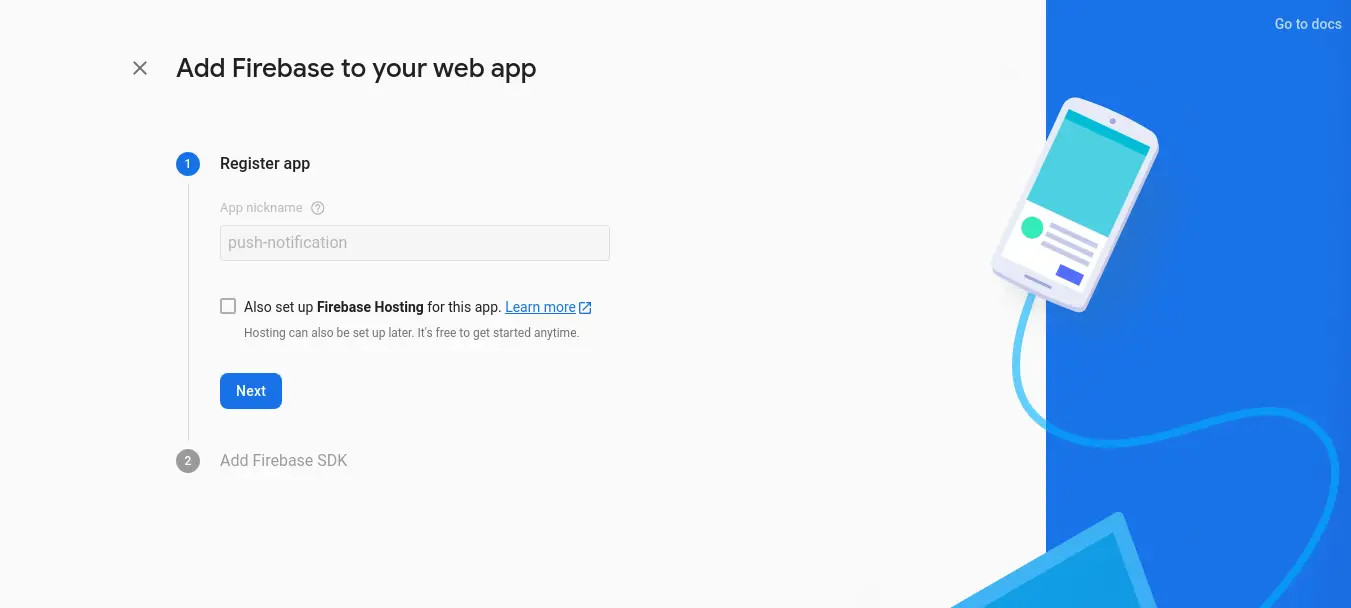
After given name and next then you will received firebase sdk as like bellow screen shot:

You have to save that all information because we will use in our app.
Step 2: Install Laravel
first of all we need to get fresh Laravel application using bellow command, So open your terminal OR command prompt and run bellow command:
composer create-project --prefer-dist laravel/laravel blogFirebase
Step 3: Create Auth using scaffold
Now, in this step, we will create auth scaffold command to create login, register and dashboard. so run following commands:
Laravel UI Package
composer require laravel/ui
Generate auth
php artisan ui bootstrap --auth
npm install
npm run dev
Step 4: Create Migration and Update Model
In this step, we need to add new row "device_token" in users table and model. than we need to create new migration. so let's create new migration by following command.
php artisan make:migration add_column_device_token
database/migrations/2020_10_23_144523_add_column_device_token.php
<?php
use Illuminate\Database\Migrations\Migration;
use Illuminate\Database\Schema\Blueprint;
use Illuminate\Support\Facades\Schema;
class AddColumnDeviceToken extends Migration
{
/**
* Run the migrations.
*
* @return void
*/
public function up()
{
Schema::table('users', function (Blueprint $table) {
$table->string('device_token')->nullable();
});
}
/**
* Reverse the migrations.
*
* @return void
*/
public function down()
{
}
}
app/Models/User.php
<?php
namespace App\Models;
use Illuminate\Contracts\Auth\MustVerifyEmail;
use Illuminate\Database\Eloquent\Factories\HasFactory;
use Illuminate\Foundation\Auth\User as Authenticatable;
use Illuminate\Notifications\Notifiable;
class User extends Authenticatable
{
use HasFactory, Notifiable;
/**
* The attributes that are mass assignable.
*
* @var array
*/
protected $fillable = [
'name',
'email',
'password',
'device_token'
];
/**
* The attributes that should be hidden for arrays.
*
* @var array
*/
protected $hidden = [
'password',
'remember_token',
];
/**
* The attributes that should be cast to native types.
*
* @var array
*/
protected $casts = [
'email_verified_at' => 'datetime',
];
}
Now we need to run migration.
so let's run bellow command:
php artisan migrate
Step 5: Create Route
Here, we need to add some routes to store token and send push notification so let's add that route in web.php file.
routes/web.php
<?php
use Illuminate\Support\Facades\Route;
/*
|--------------------------------------------------------------------------
| Web Routes
|--------------------------------------------------------------------------
|
| Here is where you can register web routes for your application. These
| routes are loaded by the RouteServiceProvider within a group which
| contains the "web" middleware group. Now create something great!
|
*/
Route::get('/', function () {
return view('welcome');
});
Auth::routes();
Route::get('/home', [App\Http\Controllers\HomeController::class, 'index'])->name('home');
Route::post('/save-token', [App\Http\Controllers\HomeController::class, 'saveToken'])->name('save-token');
Route::post('/send-notification', [App\Http\Controllers\HomeController::class, 'sendNotification'])->name('send.notification');
Step 6: Add Method on Controller
Here, we need add saveToken() and sendNotification() method for admin route in HomeController.
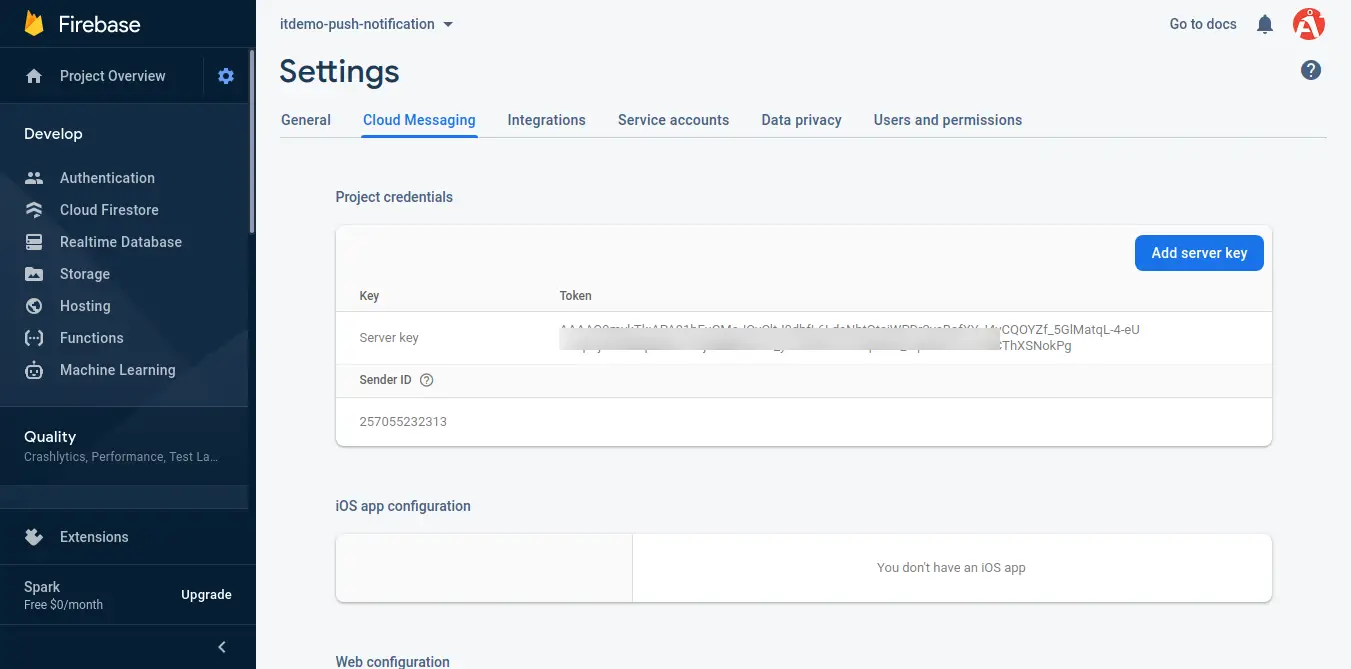
In this controller there is a $SERVER_API_KEY variable where you have to get server key from firebase console setting page as like bellow screenshot:
now, so let's add like as bellow:
app/Http/Controllers/HomeController.php
<?php
namespace App\Http\Controllers;
use Illuminate\Http\Request;
use App\Models\User;
class HomeController extends Controller
{
/**
* Create a new controller instance.
*
* @return void
*/
public function __construct()
{
$this->middleware('auth');
}
/**
* Show the application dashboard.
*
* @return \Illuminate\Contracts\Support\Renderable
*/
public function index()
{
return view('home');
}
/**
* Write code on Method
*
* @return response()
*/
public function saveToken(Request $request)
{
auth()->user()->update(['device_token'=>$request->token]);
return response()->json(['token saved successfully.']);
}
/**
* Write code on Method
*
* @return response()
*/
public function sendNotification(Request $request)
{
$firebaseToken = User::whereNotNull('device_token')->pluck('device_token')->all();
$SERVER_API_KEY = 'XXXXXX';
$data = [
"registration_ids" => $firebaseToken,
"notification" => [
"title" => $request->title,
"body" => $request->body,
]
];
$dataString = json_encode($data);
$headers = [
'Authorization: key=' . $SERVER_API_KEY,
'Content-Type: application/json',
];
$ch = curl_init();
curl_setopt($ch, CURLOPT_URL, 'https://fcm.googleapis.com/fcm/send');
curl_setopt($ch, CURLOPT_POST, true);
curl_setopt($ch, CURLOPT_HTTPHEADER, $headers);
curl_setopt($ch, CURLOPT_SSL_VERIFYPEER, false);
curl_setopt($ch, CURLOPT_RETURNTRANSFER, true);
curl_setopt($ch, CURLOPT_POSTFIELDS, $dataString);
$response = curl_exec($ch);
dd($response);
}
}
Step 7: Update Blade File
In this step, we need to update home.blade.php file where you have to write code for send notification and allow notification button. When you click on that button that browser popup will open with allow option and you have to allow it.
so let's change it.
resources/views/home.blade.php
@extends('layouts.app')
@section('content')
<div class="container">
<div class="row justify-content-center">
<div class="col-md-8">
<center>
<button id="btn-nft-enable" onclick="initFirebaseMessagingRegistration()" class="btn btn-danger btn-xs btn-flat">Allow for Notification</button>
</center>
<div class="card">
<div class="card-header">{{ __('Dashboard') }}</div>
<div class="card-body">
@if (session('status'))
<div class="alert alert-success" role="alert">
{{ session('status') }}
</div>
@endif
<form action="{{ route('send.notification') }}" method="POST">
@csrf
<div class="form-group">
<label>Title</label>
<input type="text" class="form-control" name="title">
</div>
<div class="form-group">
<label>Body</label>
<textarea class="form-control" name="body"></textarea>
</div>
<button type="submit" class="btn btn-primary">Send Notification</button>
</form>
</div>
</div>
</div>
</div>
</div>
<script src="https://www.gstatic.com/firebasejs/7.23.0/firebase.js"></script>
<script>
var firebaseConfig = {
apiKey: "XXXX",
authDomain: "XXXX.firebaseapp.com",
databaseURL: "https://XXXX.firebaseio.com",
projectId: "XXXX",
storageBucket: "XXXX",
messagingSenderId: "XXXX",
appId: "XXXX",
measurementId: "XXX"
};
firebase.initializeApp(firebaseConfig);
const messaging = firebase.messaging();
function initFirebaseMessagingRegistration() {
messaging
.requestPermission()
.then(function () {
return messaging.getToken()
})
.then(function(token) {
console.log(token);
$.ajaxSetup({
headers: {
'X-CSRF-TOKEN': $('meta[name="csrf-token"]').attr('content')
}
});
$.ajax({
url: '{{ route("save-token") }}',
type: 'POST',
data: {
token: token
},
dataType: 'JSON',
success: function (response) {
alert('Token saved successfully.');
},
error: function (err) {
console.log('User Chat Token Error'+ err);
},
});
}).catch(function (err) {
console.log('User Chat Token Error'+ err);
});
}
messaging.onMessage(function(payload) {
const noteTitle = payload.notification.title;
const noteOptions = {
body: payload.notification.body,
icon: payload.notification.icon,
};
new Notification(noteTitle, noteOptions);
});
</script>
@endsection
Step 8: Create firebase-messaging-sw.js File
In this step, we have to create firebase-messaging-sw.js in public folder and put bellow code.
public/firebase-messaging-sw.js
/*
Give the service worker access to Firebase Messaging.
Note that you can only use Firebase Messaging here, other Firebase libraries are not available in the service worker.
*/
importScripts('https://www.gstatic.com/firebasejs/7.23.0/firebase-app.js');
importScripts('https://www.gstatic.com/firebasejs/7.23.0/firebase-messaging.js');
/*
Initialize the Firebase app in the service worker by passing in the messagingSenderId.
* New configuration for app@pulseservice.com
*/
firebase.initializeApp({
apiKey: "XXXX",
authDomain: "XXXX.firebaseapp.com",
databaseURL: "https://XXXX.firebaseio.com",
projectId: "XXXX",
storageBucket: "XXXX",
messagingSenderId: "XXXX",
appId: "XXXX",
measurementId: "XXX"
});
/*
Retrieve an instance of Firebase Messaging so that it can handle background messages.
*/
const messaging = firebase.messaging();
messaging.setBackgroundMessageHandler(function(payload) {
console.log(
"[firebase-messaging-sw.js] Received background message ",
payload,
);
/* Customize notification here */
const notificationTitle = "Background Message Title";
const notificationOptions = {
body: "Background Message body.",
icon: "/itwonders-web-logo.png",
};
return self.registration.showNotification(
notificationTitle,
notificationOptions,
);
});
Ok, now we are ready to run.
So let's run project using this command:
php artisan serve
You can login and then allow push notification to click on button. then send notification from given form.
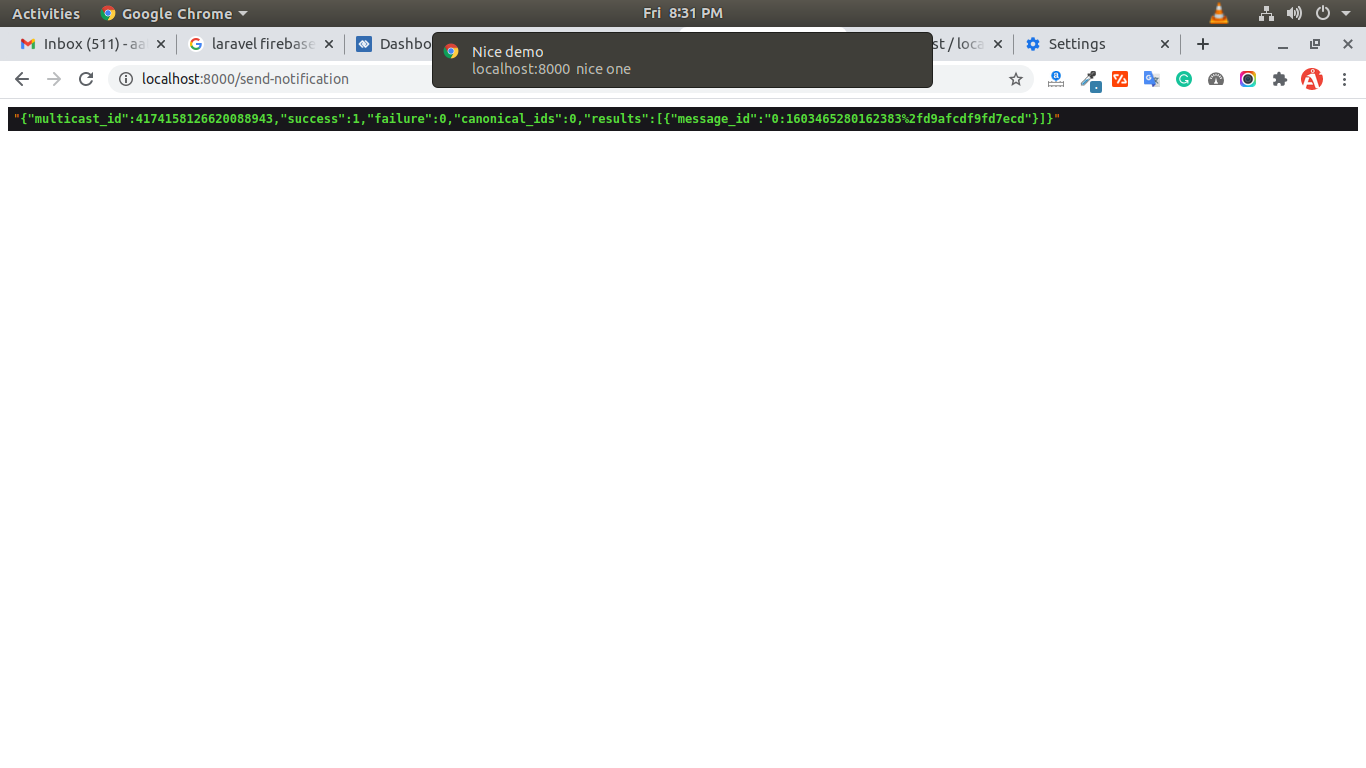
you will receive notification as like bellow:
You can download code from git: Download Code from Github
I hope it can help you...

