How to use Laravel 8/7 Authorization using Gates?
In this tutorial, i would like to explain you step by step gate and policy in laravel 8/7. we will create simple user role access control using laravel 7/6 gates and policies. i will give you very simple example of laravel 8/7 gates example.
Authorization is primary requirement of each project. we almost need to implementation of auth and user access by role wise. in this example i will show you how we can easily implement role access control in laravel 6 using gate and policy.
If you want to create roles and permission with laravel then you can also follow this tutorial, i explained step by step: Laravel User Roles and Permissions Tutorial.
You need to just follow few step to lean how you can implement laravel 6 gate and policy with our project.
Step 1: Install Laravel 6
first of all we need to get fresh Laravel 6 version application using bellow command, So open your terminal OR command prompt and run bellow command:
composer create-project --prefer-dist laravel/laravel blog
Step 2: Database Configuration
In second step, we will make database configuration for example database name, username, password etc for our crud application of laravel 6. So let's open .env file and fill all details like as bellow:
.env
DB_CONNECTION=mysql
DB_HOST=127.0.0.1
DB_PORT=3306
DB_DATABASE=here your database name(blog)
DB_USERNAME=here database username(root)
DB_PASSWORD=here database password(root)
Step 3: Create Migration Table
In this step, we will create new migration for adding new column for "role". we will take enum datatype for role column. we will take only "user", "manager" and "admin" value on that. we will keep "user" as default value.
so let's create as like bellow:
php artisan make:migration add_role_column_to_users_table
After this command you will find one file in following path "database/migrations" and you have to put bellow code in your migration file for create products table.
<?php
use Illuminate\Database\Migrations\Migration;
use Illuminate\Database\Schema\Blueprint;
use Illuminate\Support\Facades\Schema;
class AddRoleColumnToUsersTable extends Migration
{
/**
* Run the migrations.
*
* @return void
*/
public function up()
{
Schema::table('users', function (Blueprint $table) {
$table->enum('role', ['user', 'manager', 'admin'])->default('user');
});
}
/**
* Reverse the migrations.
*
* @return void
*/
public function down()
{
}
}
Now you have to run this migration by following command:
php artisan migrate
Step 4: Add Some Dummy Users
You need to add some dummy users to users table as like bellow screen shot:
You can user this link for creating dummy records to users table: Create Dummy Records using Tinker.

Step 5: Generate Auth Scaffold
You have to follow few step to make auth in your laravel 6 application.
First you need to install laravel/ui package as like bellow:
composer require laravel/ui
Here, we need to generate auth scaffolding in laravel 6 using laravel ui command. so, let's generate it by bellow command:
php artisan ui bootstrap --auth
Now you need to run npm command, otherwise you can not see better layout of login and register page.
Install NPM:
npm install
Run NPM:
npm run dev
Step 6: Define Custom Gates
In this step, we will define custom gate for user role access. we will define "user", "manager" and "admin" user. So let's update AuthServiceProvider.php file as like bellow:
app/Providers/AuthServiceProvider.php
<?php
namespace App\Providers;
use Illuminate\Foundation\Support\Providers\AuthServiceProvider as ServiceProvider;
use Illuminate\Support\Facades\Gate;
class AuthServiceProvider extends ServiceProvider
{
/**
* The policy mappings for the application.
*
* @var array
*/
protected $policies = [
];
/**
* Register any authentication / authorization services.
*
* @return void
*/
public function boot()
{
$this->registerPolicies();
/* define a admin user role */
Gate::define('isAdmin', function($user) {
return $user->role == 'admin';
});
/* define a manager user role */
Gate::define('isManager', function($user) {
return $user->role == 'manager';
});
/* define a user role */
Gate::define('isUser', function($user) {
return $user->role == 'user';
});
}
}
Step 7: Use Gates
Now, we will user our custom gate in our blade file. i created three button for each roles. When user will login then user will see only user button and same way others.
So, let's update your home file as like bellow:
resources/views/home.blade.php
@extends('layouts.app')
@section('content')
<div class="container">
<div class="row justify-content-center">
<div class="col-md-8">
<div class="card">
<div class="card-header">Dashboard</div>
<div class="card-body">
@if (session('status'))
<div class="alert alert-success" role="alert">
{{ session('status') }}
</div>
@endif
@can('isAdmin')
<div class="btn btn-success btn-lg">
You have Admin Access
</div>
@elsecan('isManager')
<div class="btn btn-primary btn-lg">
You have Manager Access
</div>
@else
<div class="btn btn-info btn-lg">
You have User Access
</div>
@endcan
</div>
</div>
</div>
</div>
</div>
@endsection
Now we can run our application.
Now you can test it by using following command:
php artisan serve
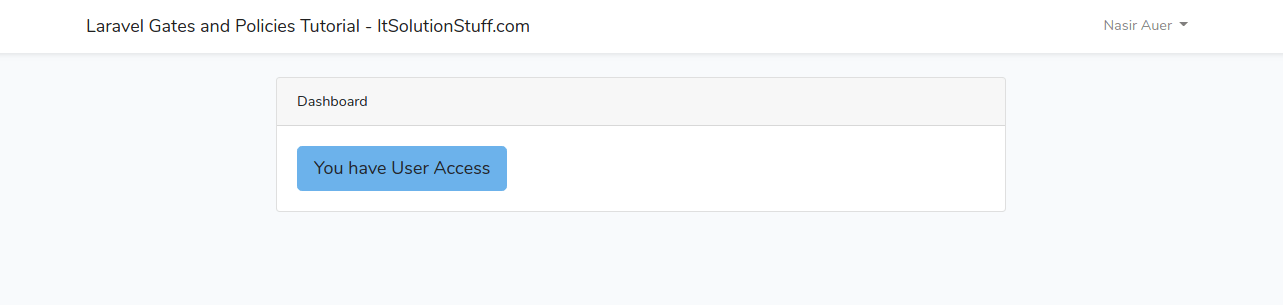
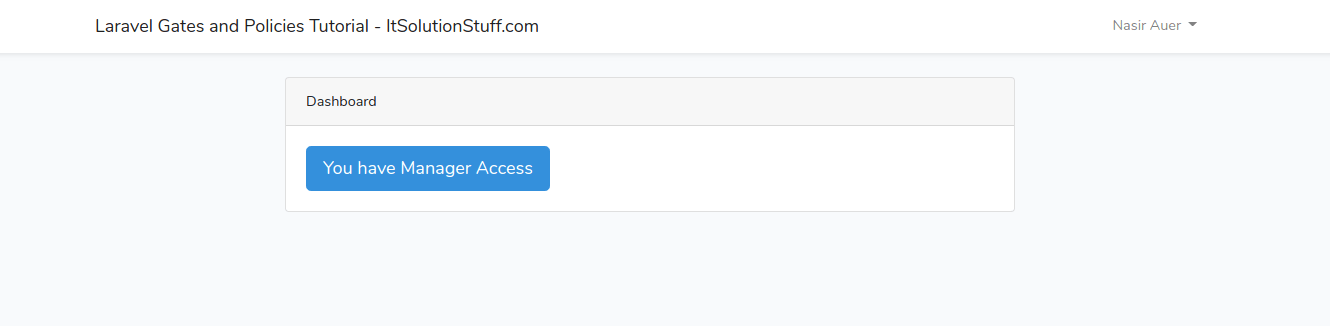
You can login with each user and output will be as like bellow:
User Login
Manager Login
Admin Login

Gates in Controller:
You can also check in Controller file as like bellow:
/**
* Create a new controller instance.
*
* @return void
*/
public function delete()
{
if (Gate::allows('isAdmin')) {
dd('Admin allowed');
} else {
dd('You are not Admin');
}
}
/**
* Create a new controller instance.
*
* @return void
*/
public function delete()
{
if (Gate::denies('isAdmin')) {
dd('You are not admin');
} else {
dd('Admin allowed');
}
}
/**
* Create a new controller instance.
*
* @return void
*/
public function delete()
{
$this->authorize('isAdmin');
}
/**
* Create a new controller instance.
*
* @return void
*/
public function delete()
{
$this->authorize('isUser');
}
Gates in Route with Middleware:
You can use role with middleware as like bellow:
Route::get('/posts/delete', 'PostController@delete')->middleware('can:isAdmin')->name('post.delete');
Route::get('/posts/update', 'PostController@update')->middleware('can:isManager')->name('post.update');
Route::get('/posts/create', 'PostController@create')->middleware('can:isUser')->name('post.create');
I hope it can help you...

