Laravel User Ban/Revoke Functionality Example
In this tutorial, i am going to share with you how to create user block and unblock feature in your laravel 5 application using laravel-ban composer package.
It will mostly require to create user ban and revoke functionality for security reason. If you are developing big web application then it must be require to enable and disabled user when admin user want. Because some user make in-activity on our website then we could ban that user. So basicaly it is good if you are give user ban and revoke functionality to client on your laravel 5 application.
In this article, we will learn how to make ban and revoke functionality in laravel 5 application using laravel ban composer package. Laravel-ban package give us option to sent ban user for specific time and there are several things. It's interesting so we will create full example of user ban and revoke from scratch.
You have to just follow bellow step and you will get layout as like bellow:
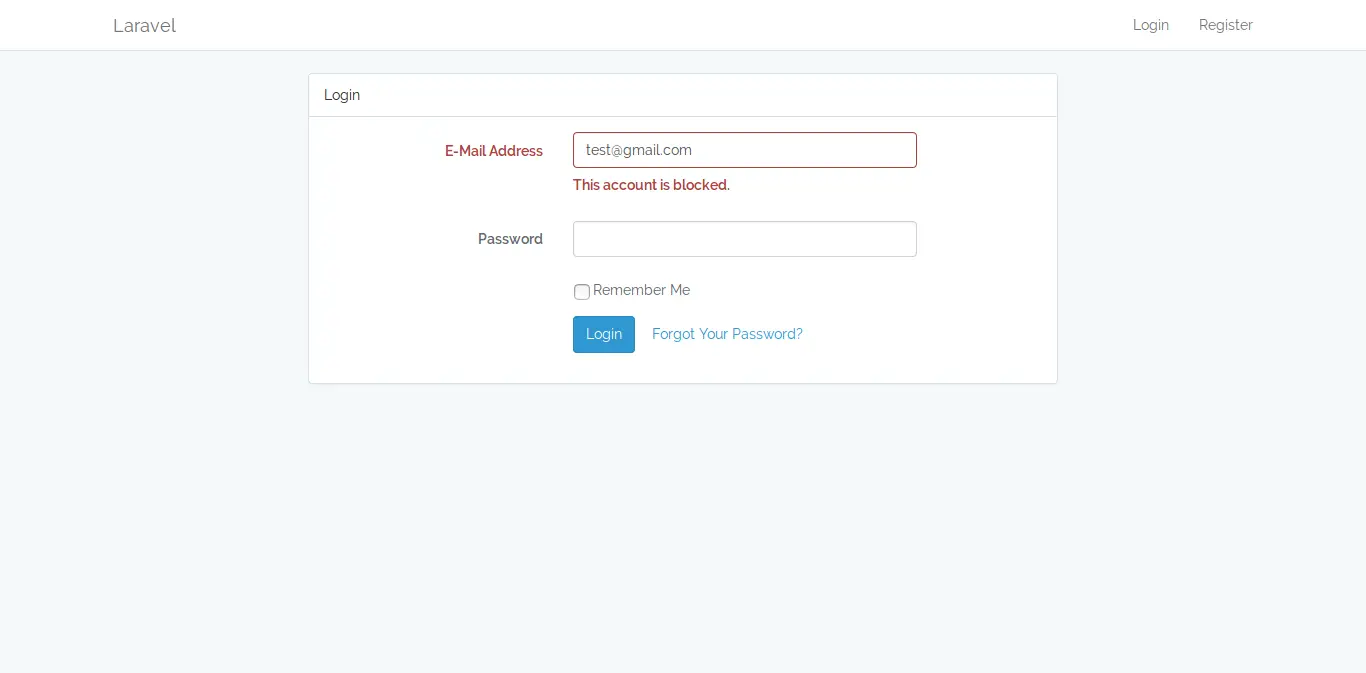
Preview:
Step 1 : Install Laravel Application
This tutorial is from scratch, So we require to get fresh Laravel application using bellow command, So open your terminal OR command prompt and run bellow command:
composer create-project --prefer-dist laravel/laravel blog
Step 2: Database Configuration
In this step we have to make database configuration for example database name, username, password etc. So let's open .env file and fill all details like as bellow:
.env
DB_CONNECTION=mysql
DB_HOST=127.0.0.1
DB_PORT=3306
DB_DATABASE=here your database name(blog)
DB_USERNAME=here database username(root)
DB_PASSWORD=here database password(root)
Step 3: Create Laravel Auth
In this step we will install laravel auth, so before that we will run default laravel migration. So first run bellow command for migration:
php artisan migrate
Next we will run laravel auth command that way we can create basic laravel structure with auth function. So let's run bellow command:
php artisan make:auth
After run you will get login, register, home and etc pages. Sp let's proceed on next step.
Step 4: Install package and configuration
In this step we have to laravel-ban package for user ban function so one your cmd or terminal and fire bellow command:
composer require cybercog/laravel-ban
After successfully install package, open config/app.php file and add service provider and alias.
config/app.php
'providers' => [
....
Cog\Ban\Providers\BanServiceProvider::class,
],
.....
we have to also make public configuration file by following command so run bellow command:
php artisan vendor:publish --provider="Cog\Ban\Providers\BanServiceProvider" --tag="migrations"
php artisan migrate
After run above both command we will have new table "ban". Let's proceed with next step.
Step 5: Add Migation and Model Config.
In this step we have to create another migration for add new column "banned_at" on users table. So let's create migration by following command:
php artisan make:migration add_banned_at_column_to_users_table
After above command you will find one file in following path database/migrations and you have to put bellow code in your migration file for create contactus table.
<?php
use Illuminate\Support\Facades\Schema;
use Illuminate\Database\Schema\Blueprint;
use Illuminate\Database\Migrations\Migration;
class AddBannedAtColumnToUsersTable extends Migration
{
/**
* Run the migrations.
*
* @return void
*/
public function up()
{
Schema::table('users', function (Blueprint $table) {
$table->timestamp('banned_at')->nullable();
});
}
/**
* Reverse the migrations.
*
* @return void
*/
public function down()
{
Schema::table('users', function (Blueprint $table) {
$table->dropColumn('banned_at');
});
}
}
Run migration by following command:
php artisan migrate
Now, we have to add Ban Class namespace on user model, So let's add User Model as like bellow:
app/User.php
<?php
namespace App;
use Cog\Ban\Contracts\HasBans as HasBansContract;
use Cog\Ban\Traits\HasBans;
use Illuminate\Notifications\Notifiable;
use Illuminate\Foundation\Auth\User as Authenticatable;
class User extends Authenticatable implements HasBansContract
{
use Notifiable;
use HasBans;
/**
* The attributes that are mass assignable.
*
* @var array
*/
protected $fillable = [
'name', 'email', 'password',
];
/**
* The attributes that should be hidden for arrays.
*
* @var array
*/
protected $hidden = [
'password', 'remember_token',
];
}
Step 6: Create Middleware
In this step we will create new custom middleware for check user is ban or not. They also provide default middleware but it not work as we want. So i simply create new and make it better. So let's create new middleware by following command:
php artisan make:middleware ForbidBannedUserCustom
Ok, now put bellow code on middleware file:
app/Http/Middleware/ForbidBannedUserCustom.php
<?php
namespace App\Http\Middleware;
use Closure;
use Illuminate\Contracts\Auth\Guard;
class ForbidBannedUserCustom
{
/**
* The Guard implementation.
*
* @var \Illuminate\Contracts\Auth\Guard
*/
protected $auth;
/**
* @param \Illuminate\Contracts\Auth\Guard $auth
*/
public function __construct(Guard $auth)
{
$this->auth = $auth;
}
/**
* Handle an incoming request.
*
* @param \Illuminate\Http\Request $request
* @param \Closure $next
* @return mixed
*/
public function handle($request, Closure $next)
{
$user = $this->auth->user();
if ($user && $user->isBanned()) {
\Session::flush();
return redirect('login')->withInput()->withErrors([
'email' => 'This account is blocked.',
]);
}
return $next($request);
}
}
Now register middleware on Kernel file so let's add.
app/Http/Kernel.php
<?php
namespace App\Http;
use Illuminate\Foundation\Http\Kernel as HttpKernel;
class Kernel extends HttpKernel
{
......
/**
* The application's route middleware.
*
* These middleware may be assigned to groups or used individually.
*
* @var array
*/
protected $routeMiddleware = [
....
'is-ban' => \App\Http\Middleware\ForbidBannedUserCustom::class,
];
}
Step 7: Add Route
In this is step we need to create route for users listing and ban/revoke. so open your routes/web.php file and add following route.
routes/web.php
Auth::routes();
Route::group(['middleware'=>'is-ban'], function(){
Route::get('/home', 'HomeController@index')->name('home');
Route::get('users', 'UserController@index')->name('users.index');
Route::get('userUserRevoke/{id}', array('as'=> 'users.revokeuser', 'uses' => 'UserController@revoke'));
Route::post('userBan', array('as'=> 'users.ban', 'uses' => 'UserController@ban'));
});
Step 8: Add Controller
In this step we will have two controller Home and User Controller. In this file we will return view and ban revoke method So let's add code on both controller.
app/Http/Controllers/HomeController.php
<?php
namespace App\Http\Controllers;
use Illuminate\Http\Request;
class HomeController extends Controller
{
/**
* Create a new controller instance.
*
* @return void
*/
public function __construct()
{
$this->middleware('auth');
}
/**
* Show the application dashboard.
*
* @return \Illuminate\Http\Response
*/
public function index()
{
return view('home');
}
}
app/Http/Controllers/UserController.php
<?php
namespace App\Http\Controllers;
use Illuminate\Http\Request;
use App\User;
class UserController extends Controller
{
/**
* Create a new controller instance.
*
* @return void
*/
public function __construct()
{
$this->middleware('auth');
}
/**
* Show the application dashboard.
*
* @return \Illuminate\Http\Response
*/
public function index()
{
$users = User::get();
return view('users',compact('users'));
}
/**
* Show the form for creating a new resource.
*
* @return Response
*/
public function ban(Request $request)
{
$input = $request->all();
if(!empty($input['id'])){
$user = User::find($input['id']);
$user->bans()->create([
'expired_at' => '+1 month',
'comment'=>$request->baninfo
]);
}
return redirect()->route('users.index')->with('success','Ban Successfully..');
}
/**
* Show the form for creating a new resource.
*
* @return Response
*/
public function revoke($id)
{
if(!empty($id)){
$user = User::find($id);
$user->unban();
}
return redirect()->route('users.index')
->with('success','User Revoke Successfully.');
}
}
Step 9: Create View
In Last step, let's create users.blade.php(resources/views/users.blade.php) for layout and we will write code for listing and ban/revoke function jquery code,so put following code:
resources/views/users.blade.php
@extends('layouts.app')
@section('content')
<script src="https://cdnjs.cloudflare.com/ajax/libs/jquery/3.2.1/jquery.min.js"></script>
<script src="https://cdnjs.cloudflare.com/ajax/libs/twitter-bootstrap/3.3.7/js/bootstrap.min.js"></script>
<script src="https://cdnjs.cloudflare.com/ajax/libs/bootbox.js/4.4.0/bootbox.min.js"></script>
<div class="container">
<div class="row">
<div class="col-md-12">
@if(Session::has('success'))
<div class="alert alert-success">
{{ Session::get('success') }}
@php
Session::forget('success');
@endphp
</div>
@endif
<div class="panel panel-default">
<div class="panel-heading">Users Management</div>
<div class="panel-body">
<table class="table table-bordered">
<tr>
<th>No</th>
<th>Name</th>
<th>Email</th>
<th>Is Ban?</th>
<th>Action</th>
</tr>
@if($users->count())
@foreach($users as $key => $user)
<tr>
<td>{{ ++$key }}</td>
<td>{{ $user->name }}</td>
<td>{{ $user->email }}</td>
<td>
@if($user->isBanned())
<label class="label label-danger">Yes</label>
@else
<label class="label label-success">No</label>
@endif
</td>
<td>
@if($user->isBanned())
<a href="{{ route('users.revokeuser',$user->id) }}" class="btn btn-success btn-sm"> Revoke</a>
@else
<a class="btn btn-success ban btn-sm" data-id="{{ $user->id }}" data-action="{{ URL::route('users.ban') }}"> Ban</a>
@endif
</td>
</tr>
@endforeach
@endif
</table>
</div>
</div>
</div>
</div>
</div>
<script type="text/javascript">
$("body").on("click",".ban",function(){
var current_object = $(this);
bootbox.dialog({
message: "<form class='form-inline add-to-ban' method='POST'><div class='form-group'><textarea class='form-control reason' rows='4' style='width:500px' placeholder='Add Reason for Ban this user.'></textarea></div></form>",
title: "Add To Black List",
buttons: {
success: {
label: "Submit",
className: "btn-success",
callback: function() {
var baninfo = $('.reason').val();
var token = $("input[name='_token']").val();
var action = current_object.attr('data-action');
var id = current_object.attr('data-id');
if(baninfo == ''){
$('.reason').css('border-color','red');
return false;
}else{
$('.add-to-ban').attr('action',action);
$('.add-to-ban').append('<input name="_token" type="hidden" value="'+ token +'">')
$('.add-to-ban').append('<input name="id" type="hidden" value="'+ id +'">')
$('.add-to-ban').append('<input name="baninfo" type="hidden" value="'+ baninfo +'">')
$('.add-to-ban').submit();
}
}
},
danger: {
label: "Cancel",
className: "btn-danger",
callback: function() {
// remove
}
},
}
});
});
</script>
@endsection
Step 10: Create Seeder
At last we will create new seeder and that way we can add some dummy user to users table. You can simply test everything. So let's run bellow comand to create seeder:
php artisan make:seeder UserTableSeeder
database/seeds/UserTableSeeder.php
<?php
use Illuminate\Database\Seeder;
use App\User;
class UserTableSeeder extends Seeder
{
/**
* Run the database seeds.
*
* @return void
*/
public function run()
{
$users = [
['name'=>'Admin', 'email'=>'admin@gmail.com','password'=>bcrypt('123456')],
['name'=>'User', 'email'=>'user@gmail.com','password'=>bcrypt('123456')],
['name'=>'Head', 'email'=>'head@gmail.com','password'=>bcrypt('123456')]
];
foreach ($users as $key => $value) {
User::create($value);
}
}
}
Run seeder be following command:
php artisan db:seed --class=UserTableSeeder
Now we are ready to run our example so run bellow command for quick run:
php artisan serve
Now you can open bellow URL on your browser:
http://localhost:8000/
You can login by following username and password :
Email: admin@gmail.com
Password: 123456
After login you have to open following url:
http://localhost:8000/users
I hope it can help you...

