Angular 17 CRUD with Node JS Express MongoDB Tutorial
Hello Dev,
In this tutorial we will go over crud operations in angular 17 and node js. If you want to see examples of angular 17 crud with node js and mongodb then you are at the right place. I just explained step by step crud angular 17 node js mongodb. I will show you about angular 17 crud usage using node js express mongodb.
Angular 17 CRUD with Node.js Express MongoDB involves creating, reading, updating, and deleting operations. Angular 17, a popular frontend framework, connects to Node.js backend with Express for handling HTTP requests. MongoDB serves as the NoSQL database for storing data. CRUD operations are implemented to interact with MongoDB via Node.js backend, enabling seamless data management in Angular 17 applications. This setup provides a robust foundation for building dynamic web applications with efficient data manipulation capabilities.
In this example, we use node.js express for the create a posts rest API. We use mongoose to store data in mongodb database. Then we proceed to implement CRUD (Create, Read, Update, Delete) operations for the posts module with the "title" and "body" fields. So, let’s follow the below steps:
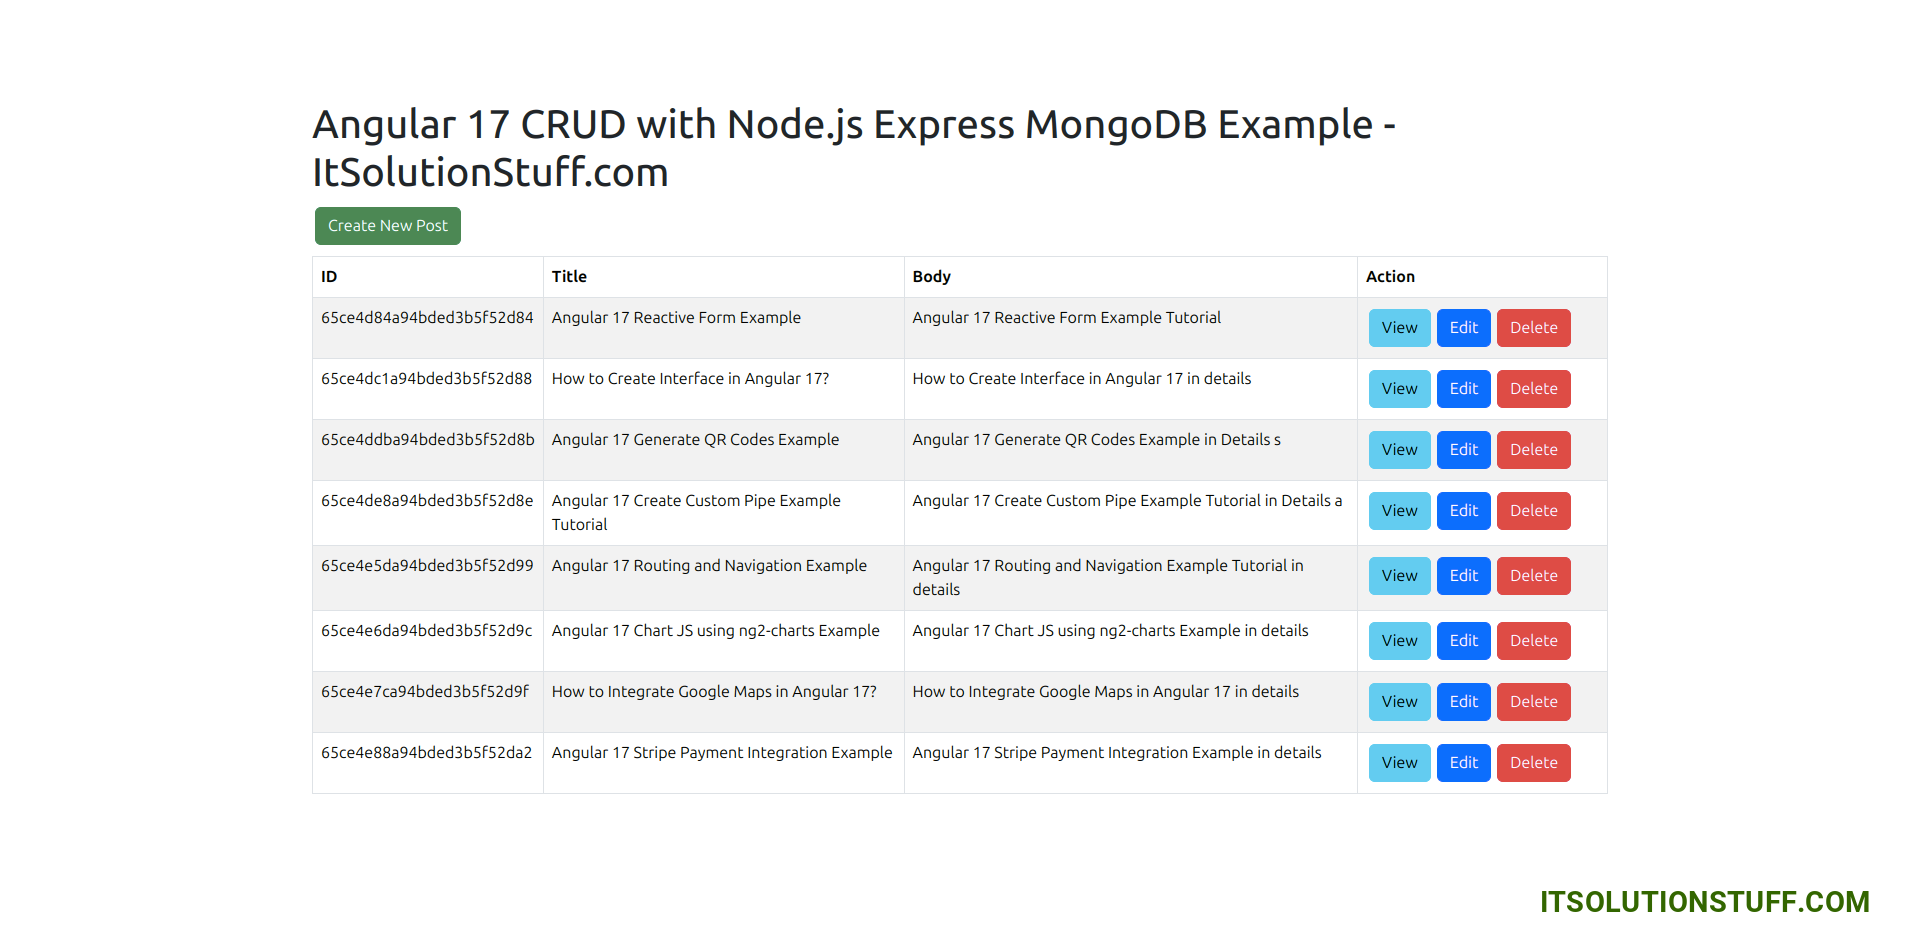
Home Page:
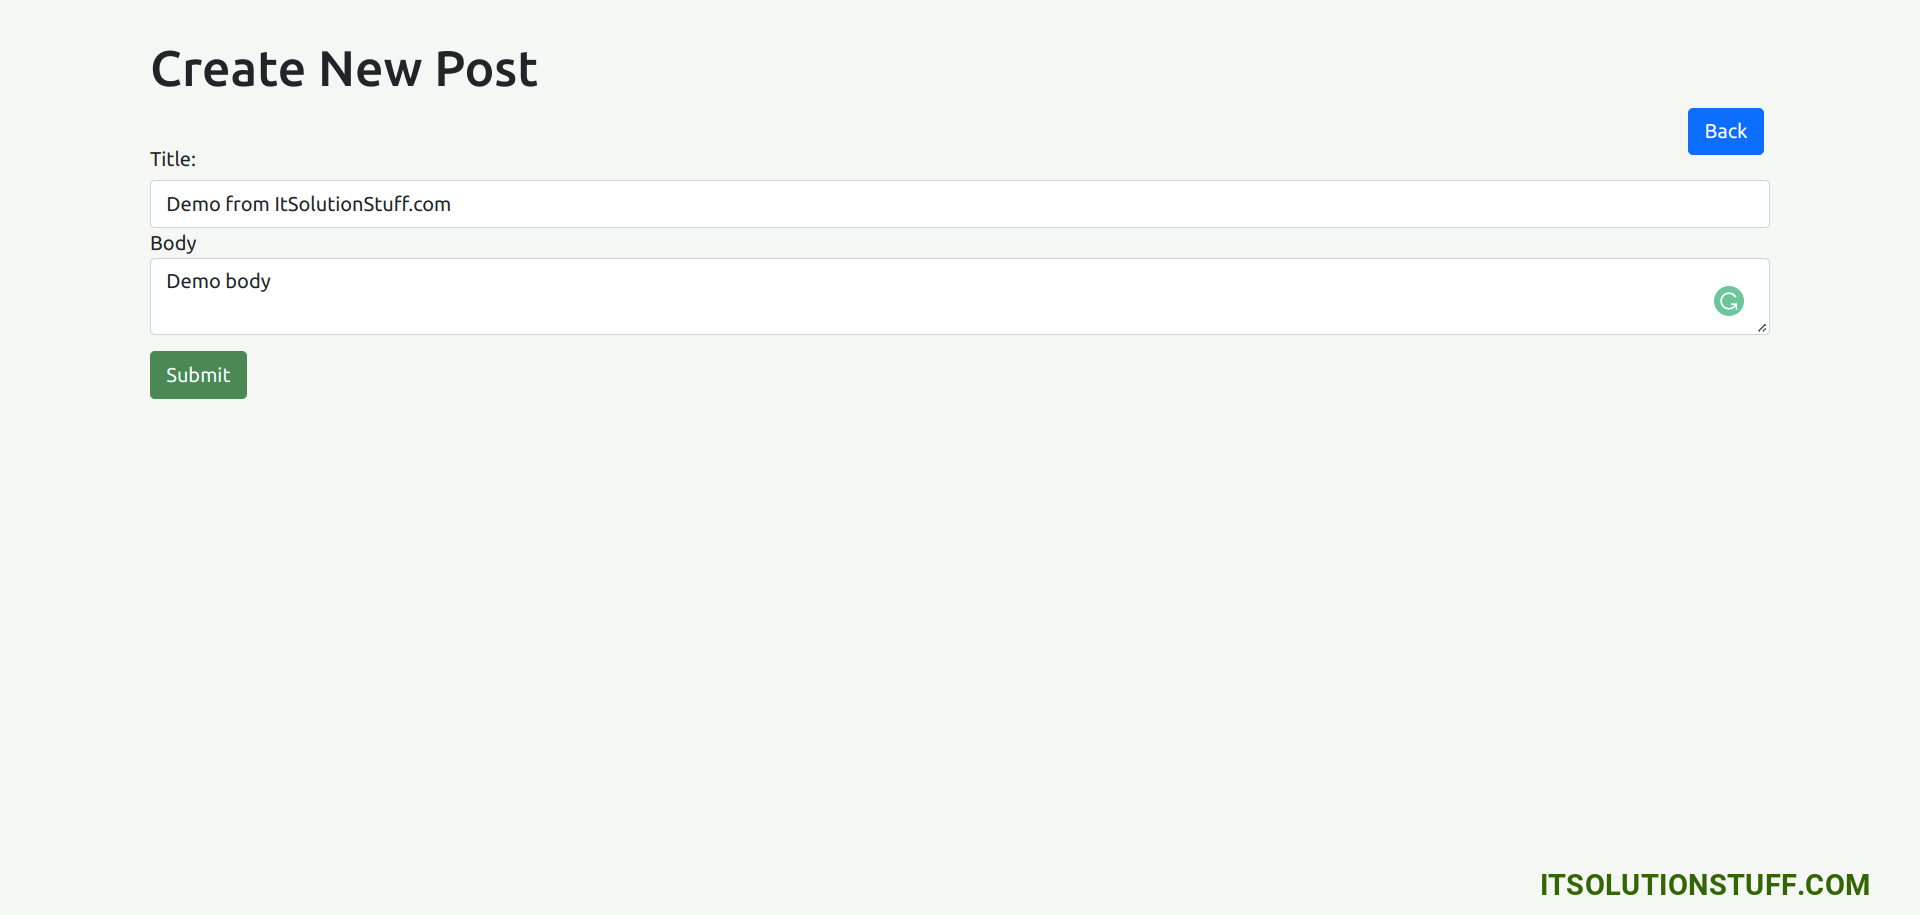
Create Page:
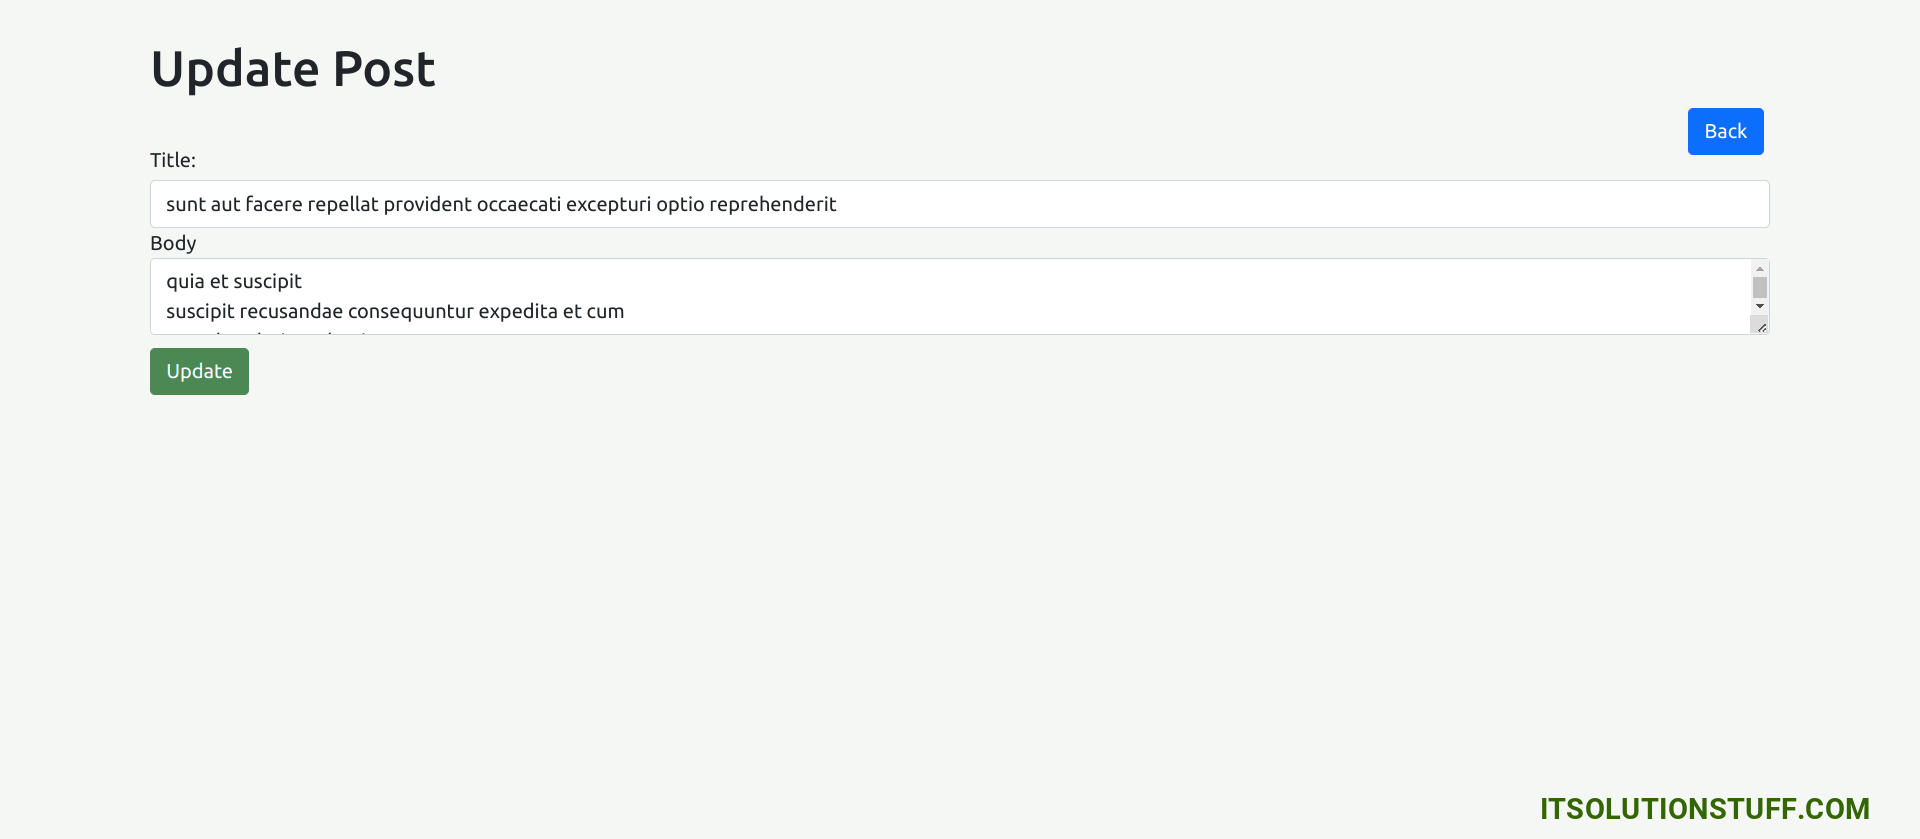
Edit Page:
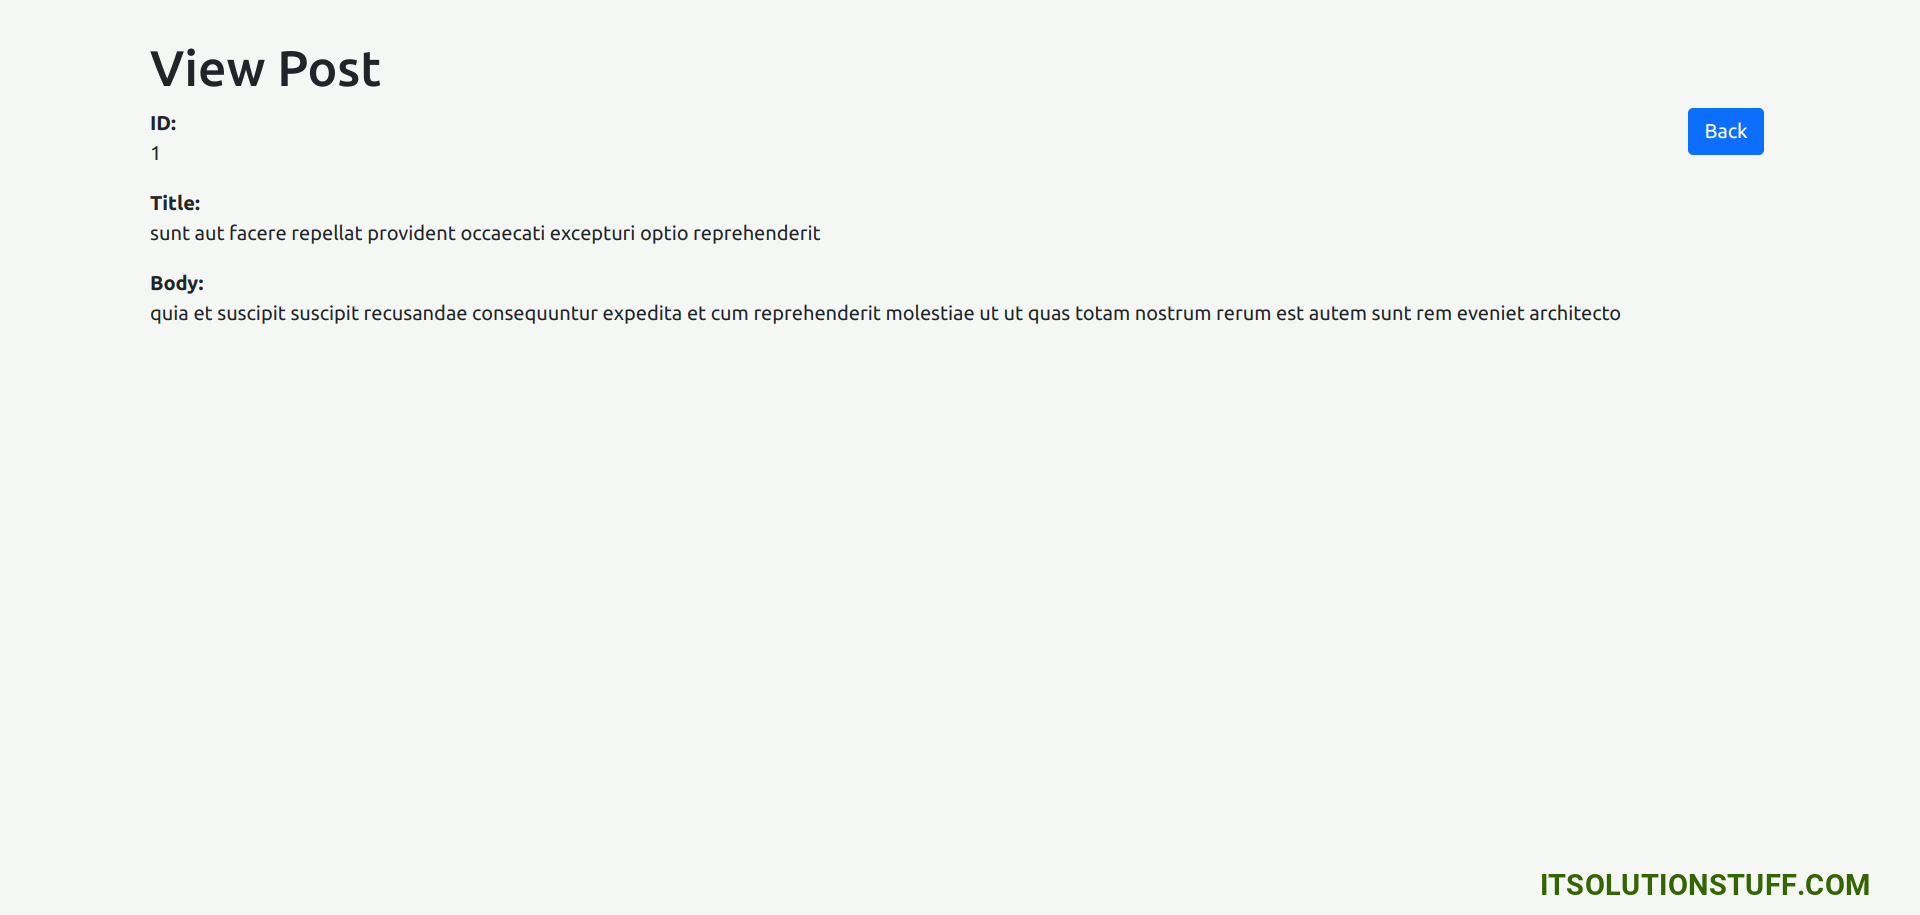
Detail Page:
Step for Angular 17 CRUD with Node JS and MongoDB
- Step 1: Create Angular 17 Project
- Step 2: Install Bootstrap
- Step 3: Create Post Module
- Step 4: Create Component For Module
- Step 5: Create Routes
- Step 6: Create Interface
- Step 7: Create Service
- Step 8: Update Component Logic and Template
- Step 9: export provideHttpClient()
- Step 10: Create REST API using Node JS and MongoDB
- Run Node JS App
- Run Angular App
Now, let's follow the below step to create crud operations with angular 17.
Step 1: Create Angular 17 Project
You can easily create your angular app using below command:
ng new my-new-app
Step 2: Install Bootstrap
now, we will install bootstrap for our crud application, so let's run bellow command and import it to css file.
npm install bootstrap --save
Now after successfully run above command. let's import it in angular.json file.
angular.json
....
"styles": [
"node_modules/bootstrap/dist/css/bootstrap.min.css",
"src/styles.css"
],
.....
Step 3: Create Post Module
After creating successfully app, we need to create post module using angular cli command. angular provide command to create module with routing in angular application. so let's run bellow command to create post module:
ng generate module post
run successfully command, it will create files as like bellow path:
src/app/post/post.module.ts
Step 4: Create Component For Module
Now we will add new component to our post module using bellow command, so let's create index, view, create and edit component for admin module:
ng generate component post/index
ng generate component post/view
ng generate component post/create
ng generate component post/edit
run successfully command, it will create folder with files as like bellow path:
src/app/post/index/*
src/app/post/view/*
src/app/post/create/*
src/app/post/edit/*
Step 5: Create Routes
In this step, we will simply create route for index, create, edit and view using generated new component. so we have to update our app.routes.ts module file as like bellow code:
src/app/app.routes.ts
import { Routes } from '@angular/router';
import { IndexComponent } from './post/index/index.component';
import { ViewComponent } from './post/view/view.component';
import { CreateComponent } from './post/create/create.component';
import { EditComponent } from './post/edit/edit.component';
export const routes: Routes = [
{ path: 'post', redirectTo: 'post/index', pathMatch: 'full'},
{ path: 'post/index', component: IndexComponent },
{ path: 'post/:postId/view', component: ViewComponent },
{ path: 'post/create', component: CreateComponent },
{ path: 'post/:postId/edit', component: EditComponent }
];
Step 6: Create Interface
in this step, we will create interface using angular command for post module. we will use post interface with Observable. so let's create interface with bellow code.
ng generate interface post/post
src/app/post/post.ts
export interface Post {
_id: number;
title: string;
body: string;
}
Step 7: Create Service
Here, we will create post service file and we will write and call all web services. we will create getAll(), create(), find(), update() and delete().
we are using http://localhost:8000 web site api for now. in step 10, we are creating a node js app with posts REST API.
Now, let's create post service and put all code for web service method.
ng generate service post/post
src/app/post/post.service.ts
import { Injectable } from '@angular/core';
import { HttpClient, HttpHeaders } from '@angular/common/http';
import { Observable, throwError } from 'rxjs';
import { catchError } from 'rxjs/operators';
import { Post } from './post';
@Injectable({
providedIn: 'root'
})
export class PostService {
private apiURL = "http://localhost:8000/api";
/*------------------------------------------
--------------------------------------------
Http Header Options
--------------------------------------------
--------------------------------------------*/
httpOptions = {
headers: new HttpHeaders({
'Content-Type': 'application/json'
})
}
/*------------------------------------------
--------------------------------------------
Created constructor
--------------------------------------------
--------------------------------------------*/
constructor(private httpClient: HttpClient) { }
/**
* Write code on Method
*
* @return response()
*/
getAll(): Observable
{
return this.httpClient.get(this.apiURL + '/posts/')
.pipe(
catchError(this.errorHandler)
)
}
/**
* Write code on Method
*
* @return response()
*/
create(post:Post): Observable
{
return this.httpClient.post(this.apiURL + '/posts/create', JSON.stringify(post), this.httpOptions)
.pipe(
catchError(this.errorHandler)
)
}
/**
* Write code on Method
*
* @return response()
*/
find(id:number): Observable
{
return this.httpClient.get(this.apiURL + '/posts/' + id)
.pipe(
catchError(this.errorHandler)
)
}
/**
* Write code on Method
*
* @return response()
*/
update(id:number, post:Post): Observable
{
return this.httpClient.put(this.apiURL + '/posts/' + id, JSON.stringify(post), this.httpOptions)
.pipe(
catchError(this.errorHandler)
)
}
/**
* Write code on Method
*
* @return response()
*/
delete(id:number){
return this.httpClient.delete(this.apiURL + '/posts/' + id, this.httpOptions)
.pipe(
catchError(this.errorHandler)
)
}
/**
* Write code on Method
*
* @return response()
*/
errorHandler(error:any) {
let errorMessage = '';
if(error.error instanceof ErrorEvent) {
errorMessage = error.error.message;
} else {
errorMessage = `Error Code: ${error.status}\nMessage: ${error.message}`;
}
return throwError(errorMessage);
}
}
Step 8: Update Component Logic and Template
Now in this step, we will work on our created component for crud application. we create four component for our crud application. now we will go one by one for creating list page, create page, edit page and view page.
so, let's see one by one:
1) List Page Template and Component
now, here we will work on post index component. we will call post service and display it with create, edit, delete and view button. so let's update it.
src/app/post/index/index.component.ts
import { Component } from '@angular/core';
import { CommonModule } from '@angular/common';
import { RouterModule, Router } from '@angular/router';
import { PostService } from '../post.service';
import { Post } from '../post';
@Component({
selector: 'app-index',
standalone: true,
imports: [CommonModule, RouterModule],
templateUrl: './index.component.html',
styleUrl: './index.component.css'
})
export class IndexComponent {
posts: Post[] = [];
/*------------------------------------------
--------------------------------------------
Created constructor
--------------------------------------------
--------------------------------------------*/
constructor(public postService: PostService, private router: Router) { }
/**
* Write code on Method
*
* @return response()
*/
ngOnInit(): void {
console.log(this.router.url);
console.log( window.location.href);
this.postService.getAll().subscribe((data: Post[])=>{
this.posts = data;
console.log(this.posts);
})
}
/**
* Write code on Method
*
* @return response()
*/
deletePost(id:number){
this.postService.delete(id).subscribe(res => {
this.posts = this.posts.filter(item => item._id !== id);
console.log('Post deleted successfully!');
})
}
}
src/app/post/index/index.component.html
<div class="container">
<h1>Angular 17 CRUD with Node.js Express MongoDB Example - ItSolutionStuff.com</h1>
<a href="#" routerLink="/post/create/" class="btn btn-success">Create New Post</a>
<table class="table table-striped table-bordered">
<thead>
<tr>
<th>ID</th>
<th>Title</th>
<th>Body</th>
<th width="250px">Action</th>
</tr>
</thead>
<tbody>
<tr *ngFor="let post of posts">
<td>{{ post._id }}</td>
<td>{{ post.title }}</td>
<td>{{ post.body }}</td>
<td>
<a href="#" [routerLink]="['/post/', post._id, 'view']" class="btn btn-info">View</a>
<a href="#" [routerLink]="['/post/', post._id, 'edit']" class="btn btn-primary">Edit</a>
<button type="button" (click)="deletePost(post._id)" class="btn btn-danger">Delete</button>
</td>
</tr>
</tbody>
</table>
</div>
You will see preview as like bellow:
2) Create Page Template and Component
now here, we will use reactive form store data into server using web services. so let's update it.
src/app/post/create/create.component.ts
import { Component } from '@angular/core';
import { CommonModule } from '@angular/common';
import { PostService } from '../post.service';
import { Router } from '@angular/router';
import { ReactiveFormsModule, FormGroup, FormControl, Validators } from '@angular/forms';
@Component({
selector: 'app-create',
standalone: true,
imports: [CommonModule, ReactiveFormsModule],
templateUrl: './create.component.html',
styleUrl: './create.component.css'
})
export class CreateComponent {
form!: FormGroup;
/*------------------------------------------
--------------------------------------------
Created constructor
--------------------------------------------
--------------------------------------------*/
constructor(
public postService: PostService,
private router: Router
) { }
/**
* Write code on Method
*
* @return response()
*/
ngOnInit(): void {
this.form = new FormGroup({
title: new FormControl('', [Validators.required]),
body: new FormControl('', Validators.required)
});
}
/**
* Write code on Method
*
* @return response()
*/
get f(){
return this.form.controls;
}
/**
* Write code on Method
*
* @return response()
*/
submit(){
console.log(this.form.value);
this.postService.create(this.form.value).subscribe((res:any) => {
console.log('Post created successfully!');
this.router.navigateByUrl('post/index');
})
}
}
src/app/post/create/create.component.html
<div class="container">
<h1>Create New Post</h1>
<a href="#" routerLink="/post/index" class="btn btn-primary">Back</a>
<form [formGroup]="form" (ngSubmit)="submit()">
<div class="form-group">
<label for="title">Title:</label>
<input
formControlName="title"
id="title"
type="text"
class="form-control">
<div *ngIf="f['title'].touched && f['title'].invalid" class="alert alert-danger">
<div *ngIf="f['title'].errors && f['title'].errors['required']">Title is required.</div>
</div>
</div>
<div class="form-group">
<label for="body">Body</label>
<textarea
formControlName="body"
id="body"
type="text"
class="form-control">
</textarea>
<div *ngIf="f['body'].touched && f['body'].invalid" class="alert alert-danger">
<div *ngIf="f['body'].errors && f['body'].errors['required']">Body is required.</div>
</div>
</div>
<button class="btn btn-primary" type="submit" [disabled]="!form.valid">Submit</button>
</form>
</div>
You will see preview as like bellow:
3) Edit Page Template and Component
now here, we will use reactive form store data into server using web services for update post information. so let's update it.
src/app/post/edit/edit.component.ts
import { Component } from '@angular/core';
import { CommonModule } from '@angular/common';
import { PostService } from '../post.service';
import { ActivatedRoute, Router } from '@angular/router';
import { Post } from '../post';
import { ReactiveFormsModule, FormGroup, FormControl, Validators } from '@angular/forms';
@Component({
selector: 'app-edit',
standalone: true,
imports: [CommonModule, ReactiveFormsModule],
templateUrl: './edit.component.html',
styleUrl: './edit.component.css'
})
export class EditComponent {
id!: number;
post!: Post;
form!: FormGroup;
/*------------------------------------------
--------------------------------------------
Created constructor
--------------------------------------------
--------------------------------------------*/
constructor(
public postService: PostService,
private route: ActivatedRoute,
private router: Router
) { }
/**
* Write code on Method
*
* @return response()
*/
ngOnInit(): void {
this.id = this.route.snapshot.params['postId'];
this.postService.find(this.id).subscribe((data: Post)=>{
this.post = data;
});
this.form = new FormGroup({
title: new FormControl('', [Validators.required]),
body: new FormControl('', Validators.required)
});
}
/**
* Write code on Method
*
* @return response()
*/
get f(){
return this.form.controls;
}
/**
* Write code on Method
*
* @return response()
*/
submit(){
console.log(this.form.value);
this.postService.update(this.id, this.form.value).subscribe((res:any) => {
console.log('Post updated successfully!');
this.router.navigateByUrl('post/index');
})
}
}
src/app/post/edit/edit.component.html
<div class="container">
<h1>Update Post</h1>
<a href="#" routerLink="/post/index" class="btn btn-primary">Back</a>
<form [formGroup]="form" (ngSubmit)="submit()">
<div class="form-group">
<label for="title">Title:</label>
<input
formControlName="title"
id="title"
type="text"
[(ngModel)]="post.title"
class="form-control">
<div *ngIf="f['title'].touched && f['title'].invalid" class="alert alert-danger">
<div *ngIf="f['title'].errors && f['title'].errors['required']">Title is required.</div>
</div>
</div>
<div class="form-group">
<label for="body">Body</label>
<textarea
formControlName="body"
id="body"
type="text"
[(ngModel)]="post.body"
class="form-control">
</textarea>
<div *ngIf="f['body'].touched && f['body'].invalid" class="alert alert-danger">
<div *ngIf="f['body'].errors && f['body'].errors['required']">Body is required.</div>
</div>
</div>
<button class="btn btn-primary" type="submit" [disabled]="!form.valid">Update</button>
</form>
</div>
You will see preview as like bellow:
4) Detail Page Template and Component
now here, we will display data into server using web services for update post information. so let's update it.
src/app/post/view/view.component.ts
import { Component } from '@angular/core';
import { PostService } from '../post.service';
import { ActivatedRoute, Router } from '@angular/router';
import { Post } from '../post';
@Component({
selector: 'app-view',
standalone: true,
imports: [],
templateUrl: './view.component.html',
styleUrl: './view.component.css'
})
export class ViewComponent {
id!: number;
post!: Post;
/*------------------------------------------
--------------------------------------------
Created constructor
--------------------------------------------
--------------------------------------------*/
constructor(
public postService: PostService,
private route: ActivatedRoute,
private router: Router
) { }
/**
* Write code on Method
*
* @return response()
*/
ngOnInit(): void {
this.id = this.route.snapshot.params['postId'];
this.postService.find(this.id).subscribe((data: Post)=>{
this.post = data;
});
}
}
src/app/post/view/view.component.html
<div class="container">
<h1>View Post</h1>
<a href="#" routerLink="/post/index" class="btn btn-primary">Back</a>
<div>
<strong>ID:</strong>
<p>{{ post._id }}</p>
</div>
<div>
<strong>Title:</strong>
<p>{{ post.title }}</p>
</div>
<div>
<strong>Body:</strong>
<p>{{ post.body }}</p>
</div>
</div>
You will see preview as like bellow:
Now let's update app html view:
src/app/app.component.html
<router-outlet></router-outlet>
Step 9: export provideHttpClient()
In this step, we need to export provideHttpClient() to app.config.ts file. so let's import it as like bellow:
src/app/app.config.ts
import { ApplicationConfig } from '@angular/core';
import { provideRouter } from '@angular/router';
import { routes } from './app.routes';
import { provideAnimations } from '@angular/platform-browser/animations';
import { provideHttpClient } from '@angular/common/http';
export const appConfig: ApplicationConfig = {
providers: [provideRouter(routes), provideAnimations(), provideHttpClient()]
};
Step 10: Create REST API using Node JS and MongoDB
In last step, we will create posts rest API using node js, express and mongoose.
Before proceed to this step, make sure you have installed MongoDB in your system.
Execute the below command to create new node js app:
mkdir rest-crud && cd rest-crud
Then run the below command to setup node js:
npm init -y
Next, execute the following commands to install imperative npm packages which will help us to create REST APIs for our Angular CRUD system:
npm install express cors body-parser mongoose
npm install nodemon --save-dev
Then, we will create database folder and create db.js file inside that folder. so, let's create it and update it.
rest-crud/database/db.js
module.exports = {
db: 'mongodb://127.0.0.1:27017/db'
};
Next, we will create Post.js file inside model folder. we need to define Post model schema on it. so, let's add it and update it.
rest-crud/model/Post.js
const mongoose = require('mongoose');
const Schema = mongoose.Schema;
let Post = new Schema({
title: {
type: String
},
body: {
type: String
}
}, {
collection: 'posts'
})
module.exports = mongoose.model('Post', Post)
Next, we will create post.routes.js file inside routes folder. we need to define rest api routes on it. so, let's add it and update it.
rest-crud/routes/post.routes.js
const express = require('express');
const Post = require('../model/Post');
const postRoute = express.Router();
/* Add Post */
postRoute.post('/posts/create', async (req, res, next) => {
try {
const post = await Post.create(req.body);
res.json(post);
} catch (error) {
next(error);
}
});
/* Get all Posts*/
postRoute.get('/posts', async (req, res, next) => {
try {
const posts = await Post.find();
res.json(posts);
} catch (error) {
next(error);
}
});
/* Get Post by ID */
postRoute.get('/posts/:id', async (req, res, next) => {
try {
const post = await Post.findById(req.params.id);
res.json(post);
} catch (error) {
next(error);
}
});
/* Update Post */
postRoute.put('/posts/:id', async (req, res, next) => {
try {
const updatedPost = await Post.findByIdAndUpdate(req.params.id, { $set: req.body }, { new: true });
res.json(updatedPost);
} catch (error) {
next(error);
}
});
/* Delete Post */
postRoute.delete('/posts/:id', async (req, res, next) => {
try {
const deletedPost = await Post.findOneAndDelete({ _id: req.params.id });
res.status(200).json({ msg: 'Post deleted successfully' });
} catch (error) {
next(error);
}
});
module.exports = postRoute;
Next, we will create index.js file inside rest-crud folder. we need to define database connection and post. so, let's add it and update it.
rest-crud/index.js
let express = require('express'),
path = require('path'),
mongoose = require('mongoose'),
cors = require('cors'),
bodyParser = require('body-parser'),
mongoDb = require('./database/db');
mongoose.Promise = global.Promise;
mongoose.connect(mongoDb.db).then(() => {
console.log('Database successfully connected ')
},
error => {
console.log('Database error: ' + error)
}
)
const postRoute = require('./routes/post.routes')
const app = express();
app.use(bodyParser.json());
app.use(bodyParser.urlencoded({
extended: false
}));
app.use(cors());
/* Static directory path */
app.use(express.static(path.join(__dirname, 'dist/angular-mean-crud-tutorial')));
/* API root */
app.use('/api', postRoute)
/* PORT */
const port = process.env.PORT || 8000;
app.listen(port, () => {
console.log('Listening on port ' + port)
})
/* 404 Handler */
app.use((req, res, next) => {
next(createError(404));
});
/* Base Route */
app.get('/', (req, res) => {
res.send('invaild endpoint');
});
app.get('*', (req, res) => {
res.sendFile(path.join(__dirname, 'dist/angular-mean-crud-tutorial/index.html'));
});
/* error handler */
app.use(function (err, req, res, next) {
console.error(err.message);
if (!err.statusCode) err.statusCode = 500;
res.status(err.statusCode).send(err.message);
});
Run Node JS App:
All the required steps have been done, now you have to type the given below command and hit enter to run the Node.js app:
node index.js
Now, it's enable http://localhost:8000 URL to access created REST API.
Run Angular App:
All the required steps have been done, now you have to type the given below command and hit enter to run the Angular app:
ng serve
Now, Go to your web browser, type the given URL and view the app output:
http://localhost:4200/post
I hope it can help you...

