Laravel 7/6 Socialite Login with Google Gmail Account
Here, i will explain you step by step login with google account in laravel 7/6 using socialite. laravel 7/6 socialite provide api to login with gmail account. we can easily login using google account in laravel project.
As we know social media is a become more and more popular in the world. every one have social account like gmail, facebook etc. i think also most of have gmail account. So if in your application have login with social then it become awesome. you got more people connect with your website because most of people does not want to fill sign up or sign in form. If there login with social than it become awesome.
So if you want to also implement login with google gmail account then i will help you step by step instruction. let's follow tutorial and implement it.
Preview:
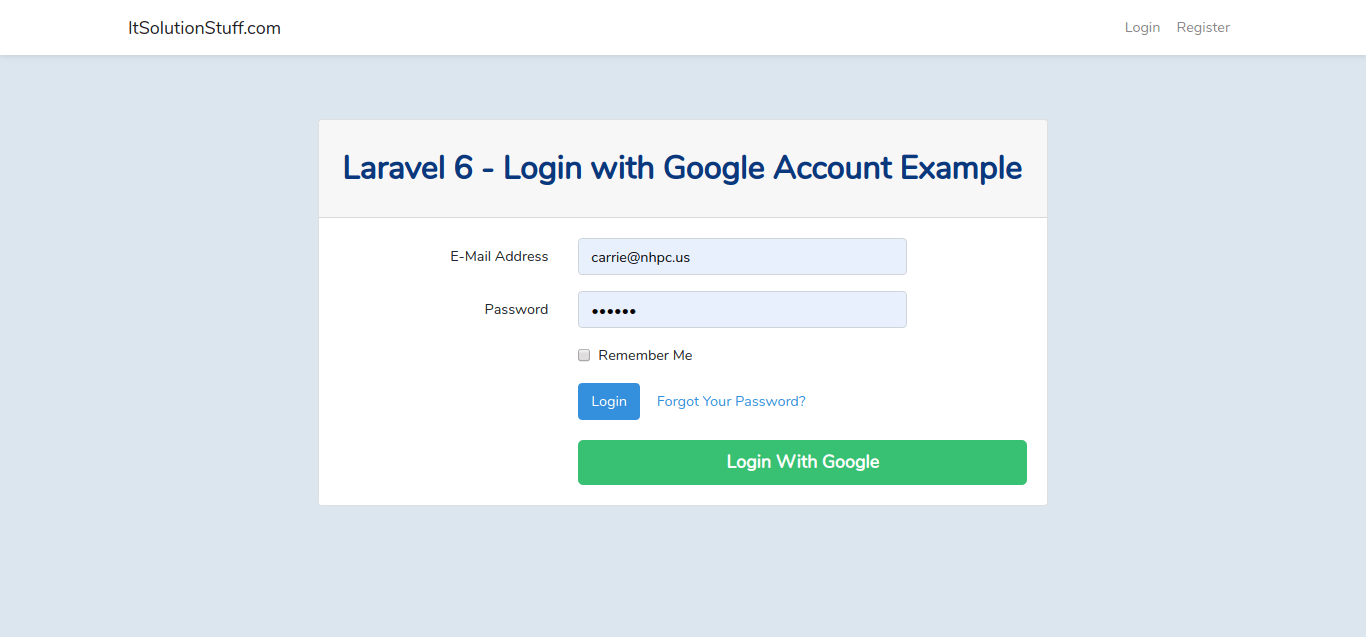
Step 1: Install Laravel 6
In this step, if you haven't laravel 6 application setup then we have to get fresh laravel 6 application. So run bellow command and get clean fresh laravel 6 application.
composer create-project --prefer-dist laravel/laravel googleLogin
Step 2: Install Socialite
In first step we will install Socialite Package that provide api to connect with google account. So, first open your terminal and run bellow command:
composer require laravel/socialite
After install above package we should add providers and aliases in config file, Now open config/app.php file and add service provider and aliase.
'providers' => [
....
Laravel\Socialite\SocialiteServiceProvider::class,
],
'aliases' => [
....
'Socialite' => Laravel\Socialite\Facades\Socialite::class,
],
Step 3: Create Google App
In this step we need google client id and secret that way we can get information of other user. so if you don't have google app account then you can create from here : Google Developers Console. you can find bellow screen :
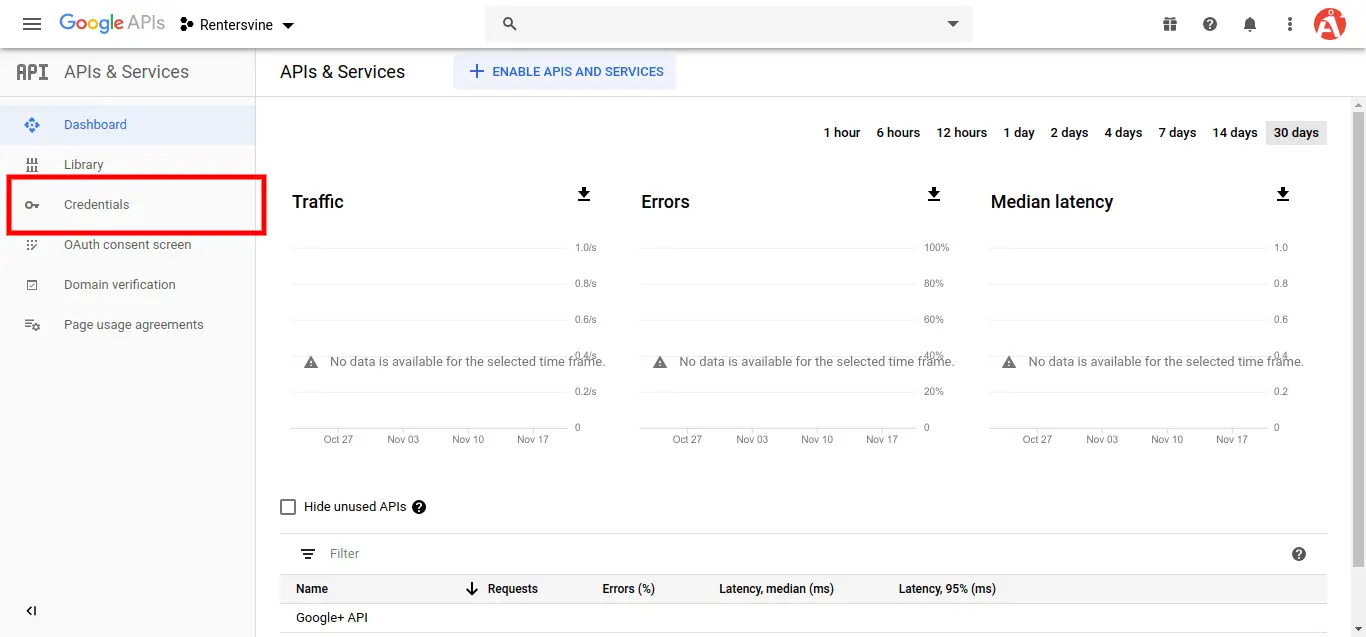
Now you have to click on Credentials and choose first option oAuth and click Create new Client ID button. now you can see following slide:
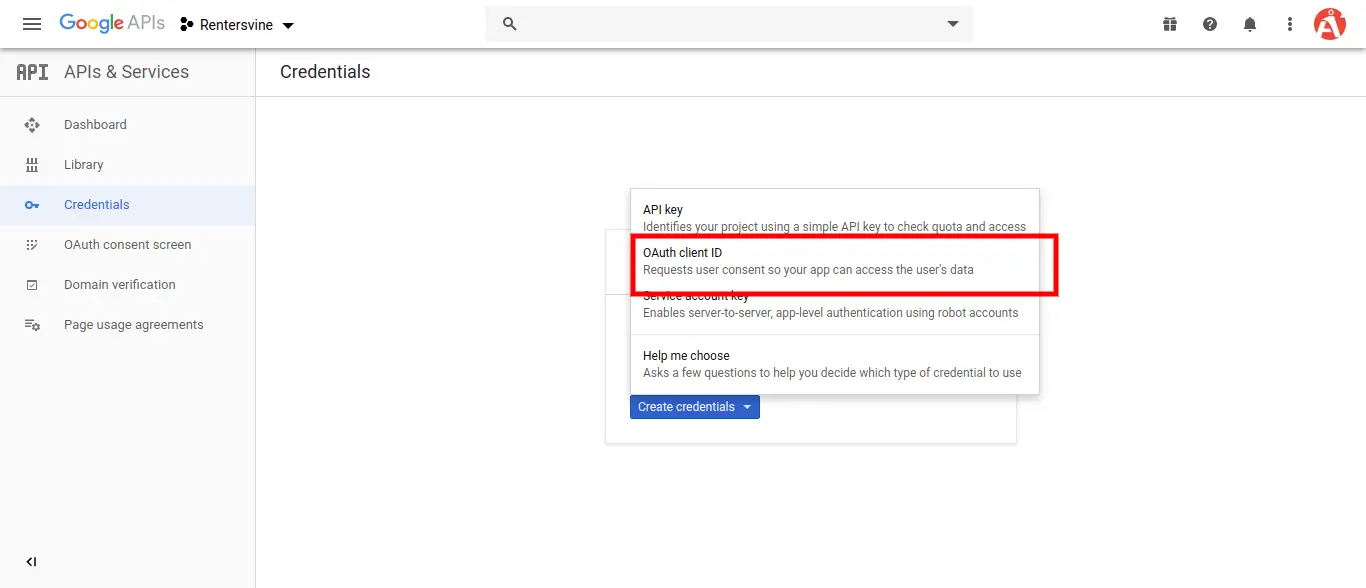
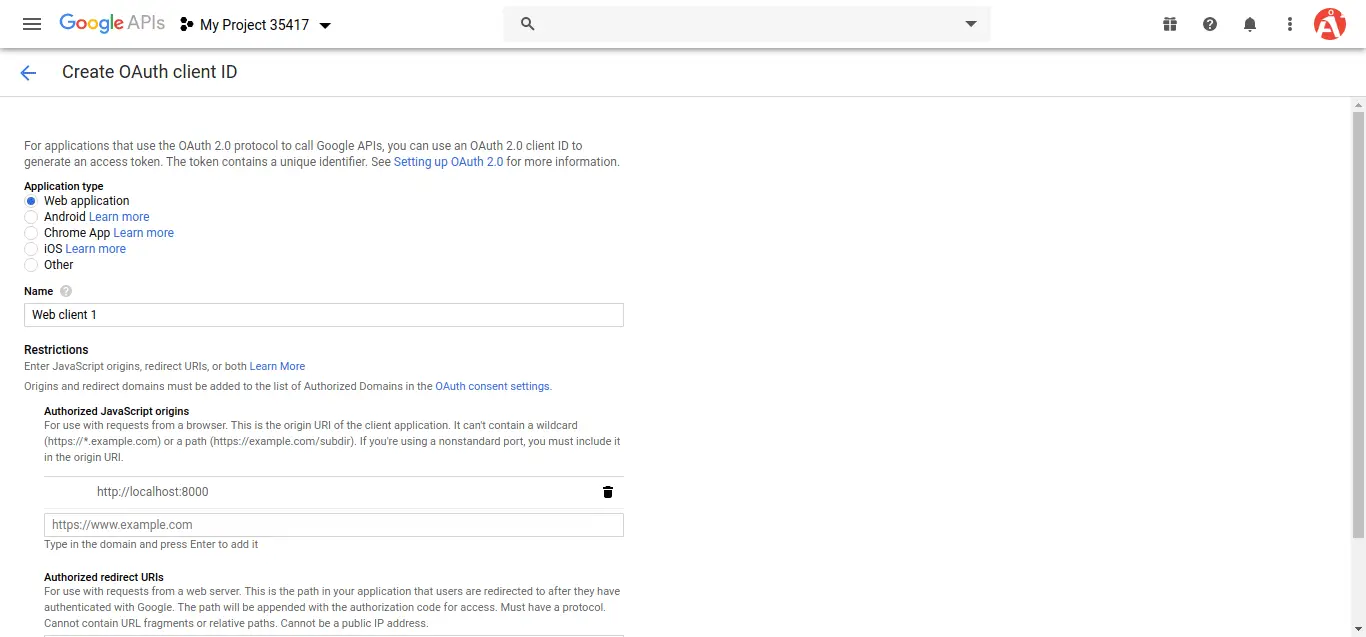
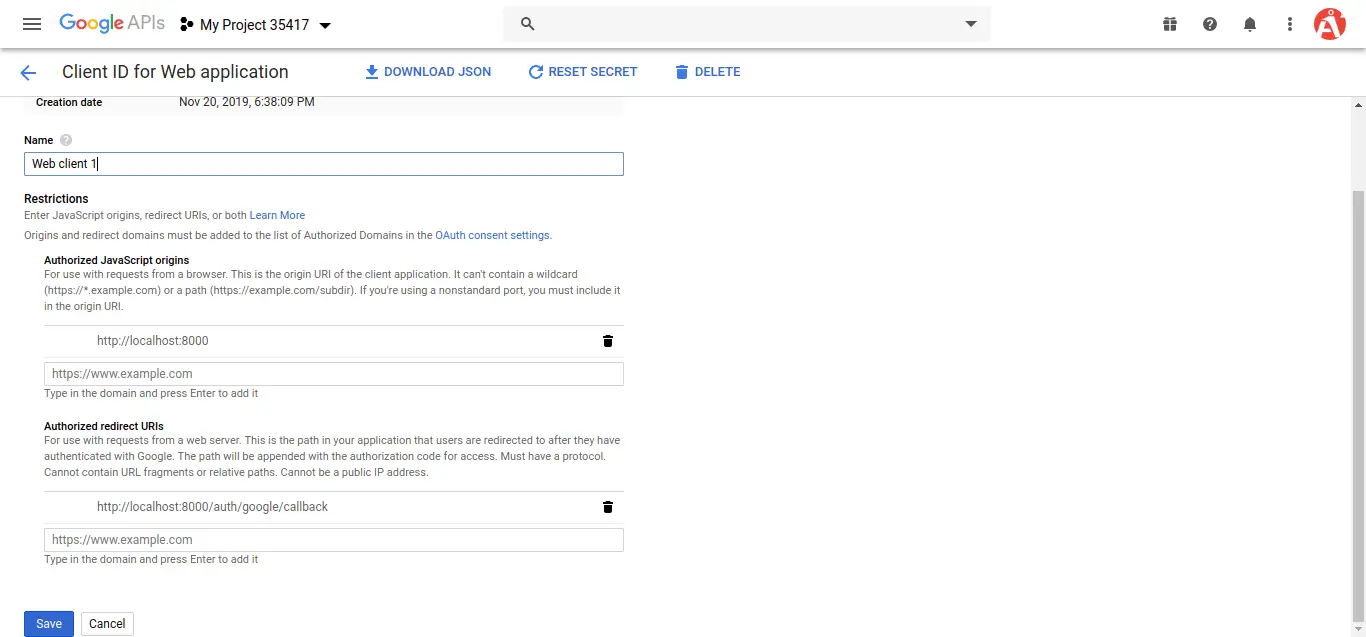
after create account you can copy client id and secret.
Now you have to set app id, secret and call back url in config file so open config/services.php and set id and secret this way:
config/services.php
return [
....
'google' => [
'client_id' => 'app id',
'client_secret' => 'add secret',
'redirect' => 'http://localhost:8000/auth/google/callback',
],
]
Step 4: Create Auth
In this step, we need to install laravel ui and generate auth in laravel 6 application so, let's run following command:
Install Laravel UI:
composer require laravel/ui
Create Auth:
php artisan ui bootstrap --auth
NPM Install:
npm install
Run NPM:
npm run dev
Step 4: Add Database Column
In this step first we have to create migration for add google_id in your user table. So let's run bellow command:
php artisan make:migration add_google_id_column
Migration
<?php
use Illuminate\Support\Facades\Schema;
use Illuminate\Database\Schema\Blueprint;
use Illuminate\Database\Migrations\Migration;
class AddGoogleIdColumn extends Migration
{
/**
* Run the migrations.
*
* @return void
*/
public function up()
{
Schema::table('users', function ($table) {
$table->string('google_id')->nullable();
});
}
/**
* Reverse the migrations.
*
* @return void
*/
public function down()
{
//
}
}
Update mode like this way:
app/User.php
<?php
namespace App;
use Illuminate\Contracts\Auth\MustVerifyEmail;
use Illuminate\Foundation\Auth\User as Authenticatable;
use Illuminate\Notifications\Notifiable;
class User extends Authenticatable
{
use Notifiable;
/**
* The attributes that are mass assignable.
*
* @var array
*/
protected $fillable = [
'name', 'email', 'password', 'google_id'
];
/**
* The attributes that should be hidden for arrays.
*
* @var array
*/
protected $hidden = [
'password', 'remember_token',
];
/**
* The attributes that should be cast to native types.
*
* @var array
*/
protected $casts = [
'email_verified_at' => 'datetime',
];
}
Step 5: Create Routes
After adding google_id column first we have to add new route for google login. so let's add bellow route in routes.php file.
app/Http/routes.php
Route::get('/', function () {
return view('welcome');
});
Auth::routes();
Route::get('/home', 'HomeController@index')->name('home');
Route::get('auth/google', 'Auth\GoogleController@redirectToGoogle');
Route::get('auth/google/callback', 'Auth\GoogleController@handleGoogleCallback');
Step 6: Create Controller
After add route, we need to add method of google auth that method will handle google callback url and etc, first put bellow code on your GoogleController.php file.
app/Http/Controllers/Auth/GoogleController.php
<?php
namespace App\Http\Controllers\Auth;
use App\Http\Controllers\Controller;
use Socialite;
use Auth;
use Exception;
use App\User;
class GoogleController extends Controller
{
/**
* Create a new controller instance.
*
* @return void
*/
public function redirectToGoogle()
{
return Socialite::driver('google')->redirect();
}
/**
* Create a new controller instance.
*
* @return void
*/
public function handleGoogleCallback()
{
try {
$user = Socialite::driver('google')->user();
$finduser = User::where('google_id', $user->id)->first();
if($finduser){
Auth::login($finduser);
return redirect('/home');
}else{
$newUser = User::create([
'name' => $user->name,
'email' => $user->email,
'google_id'=> $user->id,
'password' => encrypt('123456dummy')
]);
Auth::login($newUser);
return redirect('/home');
}
} catch (Exception $e) {
dd($e->getMessage());
}
}
}
Step 7: Update Blade File
Ok, now at last we need to add blade view so first create new file login.blade.php file and put bellow code:
resources/views/auth/login.blade.php
@extends('layouts.app')
@section('content')
<div class="container">
<div class="row justify-content-center">
<div class="col-md-8">
<div class="card">
<div class="card-header">Laravel 6 - Login with Google Account Example - ItSolutionStuuf.com</div>
<div class="card-body">
<form method="POST" action="{{ route('login') }}">
@csrf
<div class="form-group row">
<label for="email" class="col-md-4 col-form-label text-md-right">{{ __('E-Mail Address') }}</label>
<div class="col-md-6">
<input id="email" type="email" class="form-control @error('email') is-invalid @enderror" name="email" value="{{ old('email') }}" required autocomplete="email" autofocus>
@error('email')
<span class="invalid-feedback" role="alert">
<strong>{{ $message }}</strong>
</span>
@enderror
</div>
</div>
<div class="form-group row">
<label for="password" class="col-md-4 col-form-label text-md-right">{{ __('Password') }}</label>
<div class="col-md-6">
<input id="password" type="password" class="form-control @error('password') is-invalid @enderror" name="password" required autocomplete="current-password">
@error('password')
<span class="invalid-feedback" role="alert">
<strong>{{ $message }}</strong>
</span>
@enderror
</div>
</div>
<div class="form-group row">
<div class="col-md-6 offset-md-4">
<div class="form-check">
<input class="form-check-input" type="checkbox" name="remember" id="remember" {{ old('remember') ? 'checked' : '' }}>
<label class="form-check-label" for="remember">
{{ __('Remember Me') }}
</label>
</div>
</div>
</div>
<div class="form-group row mb-0">
<div class="col-md-8 offset-md-4">
<button type="submit" class="btn btn-primary">
{{ __('Login') }}
</button>
@if (Route::has('password.request'))
<a class="btn btn-link" href="{{ route('password.request') }}">
{{ __('Forgot Your Password?') }}
</a>
@endif
<a href="{{ url('auth/google') }}" style="margin-top: 20px;" class="btn btn-lg btn-success btn-block">
<strong>Login With Google</strong>
</a>
</div>
</div>
</form>
</div>
</div>
</div>
</div>
</div>
@endsection
Ok, now you are ready to use open your browser and check here : URL + '/login'.
You can download code from git: Download Code from Github
I hope it can help you...

