How to Create SEO Friendly Sluggable URL in Laravel?
In this post, I am going to share with you How to generate SEO friendly URL in Laravel 5 application.
SEO is very important part of website for increase users traffic. If your website have seo friendly URL then it can help to increase your site rand in google index, yahoo etc. So If you require to generate SEO friendly URL in your laravel application then We can do it by "eloquent-sluggable" package. eloquent-sluggable package developed by cviebrock.
Eloquent-sluggable package provide to automatic create unique url for our post. this package create unique slug url that way it is good for SEO.
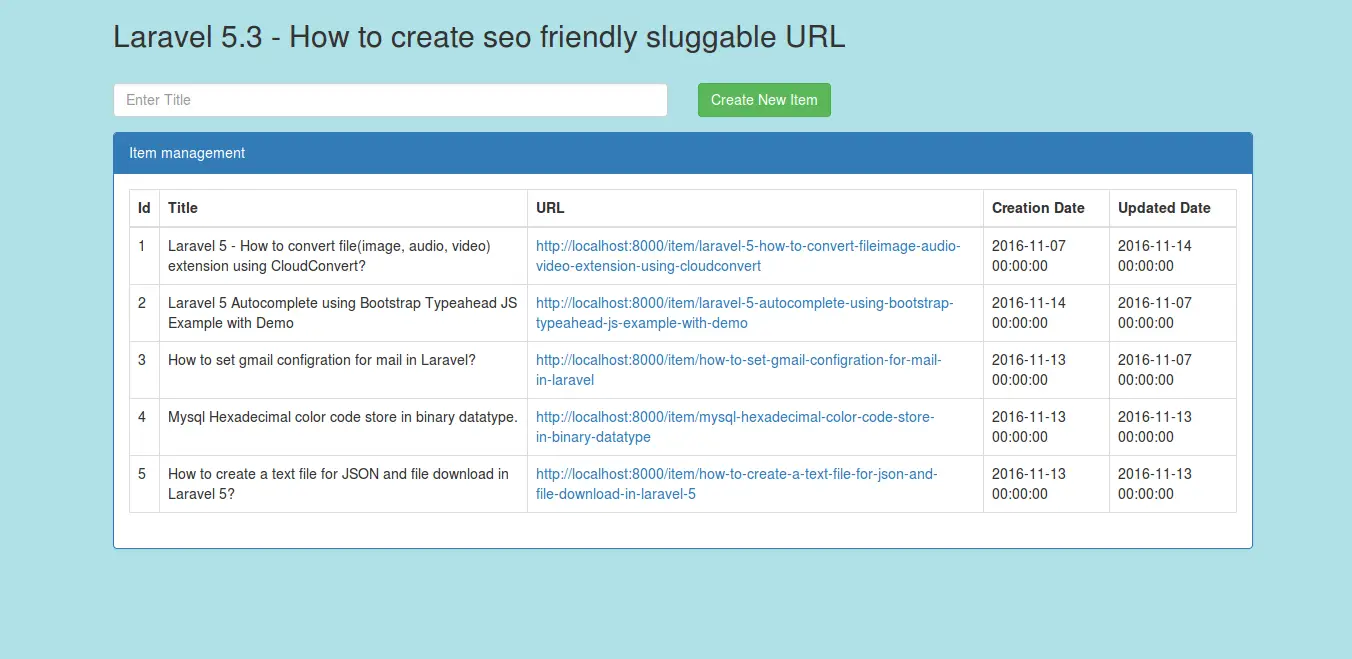
You can do it for your laravel application by following step or if you want to do it from scratch then you can get fresh laravel by following step 1. After finish this example you will get bellow output.
Preview:

Step 1: Install Laravel 5.3 Application
In this step, if you haven't laravel 5.3 application setup then we have to get fresh laravel 5.3 application. So run bellow command and get clean fresh laravel 5.3 application.
composer create-project --prefer-dist laravel/laravel blog
Step 2: Install Package
In this step we have to add eloquent-sluggable package for generate unique slug url so one your cmd or terminal and fire bellow command:
composer require cviebrock/eloquent-sluggable
After successfully install package, open config/app.php file and add service provider and alias.
config/app.php
'providers' => [
....
Cviebrock\EloquentSluggable\ServiceProvider::class,
]
.....
You can publish the default configuration file by following command:
php artisan vendor:publish --provider="Cviebrock\EloquentSluggable\ServiceProvider"
Step 3: Create Item Table and Model
In this step we have to create migration for items table using Laravel 5.3 php artisan command, so first fire bellow command:
php artisan make:migration create_items_table
After this command you will find one file in following path database/migrations and you have to put bellow code in your migration file for create items table.
use Illuminate\Support\Facades\Schema;
use Illuminate\Database\Schema\Blueprint;
use Illuminate\Database\Migrations\Migration;
class CreateItemsTable extends Migration
{
/**
* Run the migrations.
*
* @return void
*/
public function up()
{
Schema::create('items', function (Blueprint $table) {
$table->increments('id');
$table->string('title');
$table->string('slug');
$table->timestamps();
});
}
/**
* Reverse the migrations.
*
* @return void
*/
public function down()
{
Schema::drop("items");
}
}
After create "items" table you should create Item model for items, so first create file in this path app/Item.php and put bellow content in item.php file:
app/Item.php
<?php
namespace App;
use Illuminate\Database\Eloquent\Model;
use Cviebrock\EloquentSluggable\Sluggable;
class Item extends Model
{
use Sluggable;
public $fillable = ['title'];
/**
* Return the sluggable configuration array for this model.
*
* @return array
*/
public function sluggable()
{
return [
'slug' => [
'source' => 'title'
]
];
}
}
?>
Step 4: Create Route
In this is step we need to create route for listing items lists and create new item. so open your routes/web.php file and add following route.
routes/web.php
Route::get('items', 'ItemController@index');
Route::post('item-create', ['as'=>'item-create','uses'=>'ItemController@create']);
Step 5: Create Controller
In this point, now we should create new controller as ItemController in this path app/Http/Controllers/ItemController.php. this controller will manage all listing items and create new item request and return response, so put bellow content in controller file:
app/Http/Controllers/ItemController.php
<?php
namespace App\Http\Controllers;
use Illuminate\Http\Request;
use App\Http\Requests;
use App\Item;
class ItemController extends Controller
{
/**
* Get the index name for the model.
*
* @return string
*/
public function index()
{
$items = Item::all();
return view('items',compact('items'));
}
/**
* Get the index name for the model.
*
* @return string
*/
public function create(Request $request)
{
$this->validate($request,['title'=>'required']);
$items = Item::create($request->all());
return back();
}
}
?>
Step 6: Create View
In Last step, let's create items.blade.php(resources/views/items.blade.php) for layout and we will write design code here and put following code:
resources/views/items.blade.php
<!DOCTYPE html>
<html>
<head>
<title>Laravel 5.3 - How to create seo friendly sluggable URL</title>
<link rel="stylesheet" type="text/css" href="https://maxcdn.bootstrapcdn.com/bootstrap/3.3.7/css/bootstrap.min.css">
</head>
<body>
<div class="container">
<h2>Laravel 5.3 - How to create seo friendly sluggable URL</h2><br/>
<form method="POST" action="{{ route('item-create') }}" autocomplete="off">
@if(count($errors))
<div class="alert alert-danger">
<strong>Whoops!</strong> There were some problems with your input.
<br/>
<ul>
@foreach($errors->all() as $error)
<li>{{ $error }}</li>
@endforeach
</ul>
</div>
@endif
<input type="hidden" name="_token" value="{{ csrf_token() }}">
<div class="row">
<div class="col-md-6">
<div class="form-group {{ $errors->has('title') ? 'has-error' : '' }}">
<input type="text" id="title" name="title" class="form-control" placeholder="Enter Title" value="{{ old('title') }}">
<span class="text-danger">{{ $errors->first('title') }}</span>
</div>
</div>
<div class="col-md-6">
<div class="form-group">
<button class="btn btn-success">Create New Item</button>
</div>
</div>
</div>
</form>
<div class="panel panel-primary">
<div class="panel-heading">Item management</div>
<div class="panel-body">
<table class="table table-bordered">
<thead>
<th>Id</th>
<th>Title</th>
<th>URL</th>
<th>Creation Date</th>
<th>Updated Date</th>
</thead>
<tbody>
@if($items->count())
@foreach($items as $key => $item)
<tr>
<td>{{ ++$key }}</td>
<td>{{ $item->title }}</td>
<td><a href="">{{ URL::to('/') . '/item/' . $item->slug }}</a></td>
<td>{{ $item->created_at }}</td>
<td>{{ $item->updated_at }}</td>
</tr>
@endforeach
@else
<tr>
<td colspan="4">There are no data.</td>
</tr>
@endif
</tbody>
</table>
</div>
</div>
</div>
</body>
</html>
You can get more information about package from here : Click Here.
Maybe it can help you.

