Laravel 10 Email Verification Tutorial Example
Hi Friends,
Today, laravel 10 custom email verification example is our main topic. step by step explain laravel 10 custom email verification template. This post will give you a simple example of laravel 10 custom email verification system. we will help you to give an example of laravel 10 email verification example.
Laravel already provides an email verification feature by default. Still, if you want to do your own logic with a manual email verification process then I will help you with step-by-step email verification in laravel.
few days ago i posted one post with Custom Auth Login and Register with Laravel and Custom Reset Password with Laravel so you must have to follow that as well because i started this feature with that code.
Let's follow the below step for custom email verification.
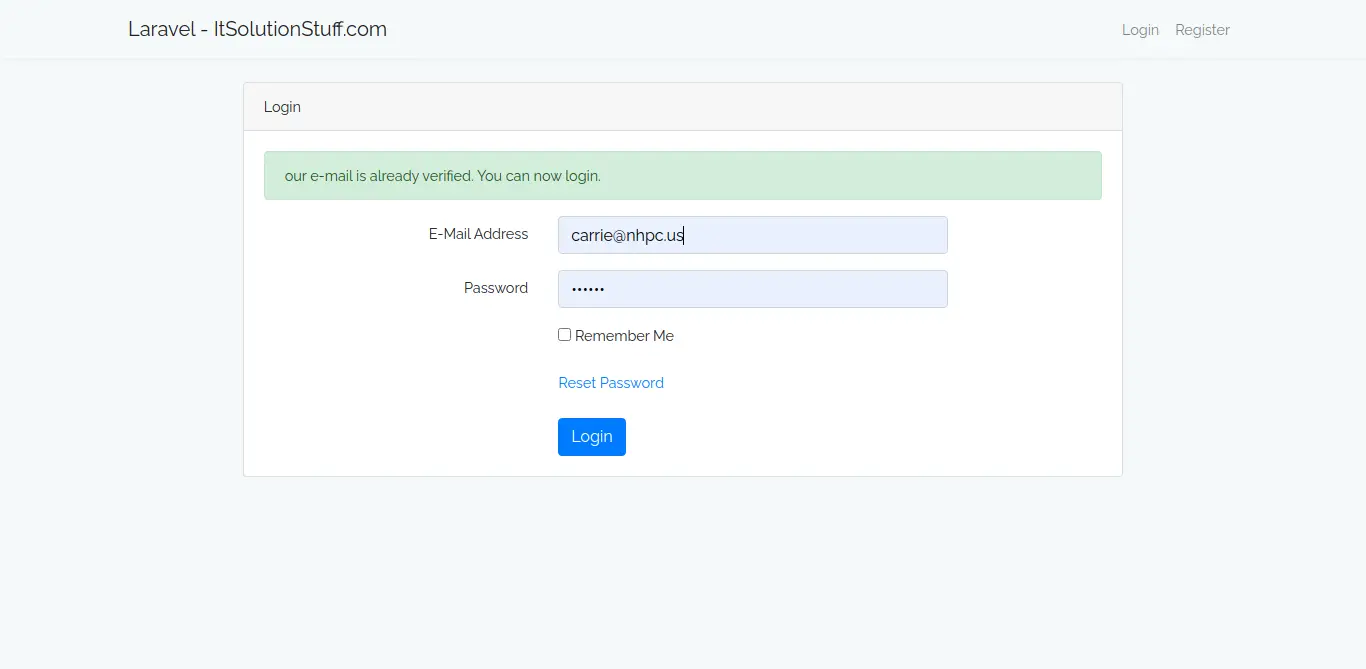
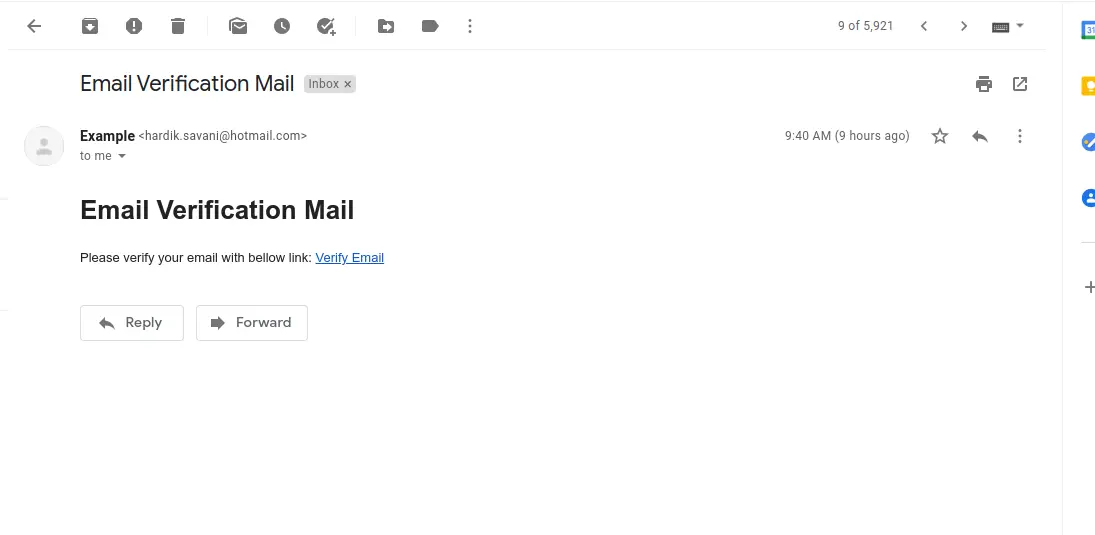
you can see below preview of pages:
After Verify Screenshot:
Email Screenshot:
Step 1: Install Laravel
first of all we need to get fresh Laravel version application using bellow command, So open your terminal OR command prompt and run bellow command:
composer create-project laravel/laravel example-app
Step 2: Create "users_verify" table
basically, we will create "users_verify" table and add new column "is_email_verified" in users table.
let's create new migration using below command:
php artisan make:migration create_users_verify_table
Migration
<?php
use Illuminate\Database\Migrations\Migration;
use Illuminate\Database\Schema\Blueprint;
use Illuminate\Support\Facades\Schema;
class UsersVerify extends Migration
{
/**
* Run the migrations.
*
* @return void
*/
public function up(): void
{
Schema::create('users_verify', function (Blueprint $table) {
$table->integer('user_id');
$table->string('token');
$table->timestamps();
});
Schema::table('users', function (Blueprint $table) {
$table->boolean('is_email_verified')->default(0);
});
}
/**
* Reverse the migrations.
*
* @return void
*/
public function down(): void
{
}
}
Step 3: Create Model and Update Model
In this step, we need to add "is_email_verified" field on fillable array in User model and create new model call UserVerify as like bellow:
app/Models/User.php
<?php
namespace App\Models;
use Illuminate\Contracts\Auth\MustVerifyEmail;
use Illuminate\Database\Eloquent\Factories\HasFactory;
use Illuminate\Foundation\Auth\User as Authenticatable;
use Illuminate\Notifications\Notifiable;
class User extends Authenticatable
{
use HasFactory, Notifiable;
/**
* The attributes that are mass assignable.
*
* @var array
*/
protected $fillable = [
'name',
'email',
'password',
'is_email_verified'
];
/**
* The attributes that should be hidden for arrays.
*
* @var array
*/
protected $hidden = [
'password',
'remember_token',
];
/**
* The attributes that should be cast to native types.
*
* @var array
*/
protected $casts = [
'email_verified_at' => 'datetime',
];
}
app/Models/UserVerify.php
<?php
namespace App\Models;
use Illuminate\Database\Eloquent\Factories\HasFactory;
use Illuminate\Database\Eloquent\Model;
class UserVerify extends Model
{
use HasFactory;
public $table = "users_verify";
/**
* Write code on Method
*
* @return response()
*/
protected $fillable = [
'user_id',
'token',
];
/**
* Write code on Method
*
* @return response()
*/
public function user()
{
return $this->belongsTo(User::class);
}
}
Step 4: Create Route
In this is step we need to create custom route for email verification. so open your routes/web.php file and add following route.
routes/web.php
<?php
use Illuminate\Support\Facades\Route;
use App\Http\Controllers\Auth\AuthController;
/*
|--------------------------------------------------------------------------
| Web Routes
|--------------------------------------------------------------------------
|
| Here is where you can register web routes for your application. These
| routes are loaded by the RouteServiceProvider within a group which
| contains the "web" middleware group. Now create something great!
|
*/
Route::get('login', [AuthController::class, 'index'])->name('login');
Route::post('post-login', [AuthController::class, 'postLogin'])->name('login.post');
Route::get('registration', [AuthController::class, 'registration'])->name('register');
Route::post('post-registration', [AuthController::class, 'postRegistration'])->name('register.post');
Route::get('logout', [AuthController::class, 'logout'])->name('logout');
/* New Added Routes */
Route::get('dashboard', [AuthController::class, 'dashboard'])->middleware(['auth', 'is_verify_email']);
Route::get('account/verify/{token}', [AuthController::class, 'verifyAccount'])->name('user.verify');
Step 5: Create Controller
in this step, we need to create AuthController, we updated code on postRegistration() and verifyAccount() method, let's copy as like bellow:
app/Http/Controllers/Auth/AuthController.php
<?php
namespace App\Http\Controllers\Auth;
use App\Http\Controllers\Controller;
use Illuminate\Http\Request;
use Illuminate\Support\Facades\Auth;
use Session;
use App\Models\User;
use App\Models\UserVerify;
use Hash;
use Illuminate\Support\Str;
use Mail;
use Illuminate\View\View;
use Illuminate\Http\RedirectResponse;
class AuthController extends Controller
{
/**
* Write code on Method
*
* @return response()
*/
public function index(): View
{
return view('auth.login');
}
/**
* Write code on Method
*
* @return response()
*/
public function registration(): View
{
return view('auth.registration');
}
/**
* Write code on Method
*
* @return response()
*/
public function postLogin(Request $request): RedirectResponse
{
$request->validate([
'email' => 'required',
'password' => 'required',
]);
$credentials = $request->only('email', 'password');
if (Auth::attempt($credentials)) {
return redirect()->intended('dashboard')
->withSuccess('You have Successfully loggedin');
}
return redirect("login")->withSuccess('Oppes! You have entered invalid credentials');
}
/**
* Write code on Method
*
* @return response()
*/
public function postRegistration(Request $request): RedirectResponse
{
$request->validate([
'name' => 'required',
'email' => 'required|email|unique:users',
'password' => 'required|min:6',
]);
$data = $request->all();
$createUser = $this->create($data);
$token = Str::random(64);
UserVerify::create([
'user_id' => $createUser->id,
'token' => $token
]);
Mail::send('email.emailVerificationEmail', ['token' => $token], function($message) use($request){
$message->to($request->email);
$message->subject('Email Verification Mail');
});
return redirect("dashboard")->withSuccess('Great! You have Successfully loggedin');
}
/**
* Write code on Method
*
* @return response()
*/
public function dashboard(): RedirectResponse
{
if(Auth::check()){
return view('dashboard');
}
return redirect("login")->withSuccess('Opps! You do not have access');
}
/**
* Write code on Method
*
* @return response()
*/
public function create(array $data)
{
return User::create([
'name' => $data['name'],
'email' => $data['email'],
'password' => Hash::make($data['password'])
]);
}
/**
* Write code on Method
*
* @return response()
*/
public function logout() {
Session::flush();
Auth::logout();
return Redirect('login');
}
/**
* Write code on Method
*
* @return response()
*/
public function verifyAccount($token): RedirectResponse
{
$verifyUser = UserVerify::where('token', $token)->first();
$message = 'Sorry your email cannot be identified.';
if(!is_null($verifyUser) ){
$user = $verifyUser->user;
if(!$user->is_email_verified) {
$verifyUser->user->is_email_verified = 1;
$verifyUser->user->save();
$message = "Your e-mail is verified. You can now login.";
} else {
$message = "Your e-mail is already verified. You can now login.";
}
}
return redirect()->route('login')->with('message', $message);
}
}
Step 6: Create Blade File
here, we need to create blade files for email only. so let's create one by one file:
resources/views/emails/emailVerificationEmail.blade.php
<h1>Email Verification Mail</h1>
Please verify your email with bellow link:
<a href="{{ route('user.verify', $token) }}">Verify Email</a>
Step 7: Create Middleware
here, we need to create middleware for checking user email is verified or not. so let's create as like bellow:
php artisan make:middleware IsVerifyEmail
app/Http/Middleware/IsVerifyEmail.php
<?php
namespace App\Http\Middleware;
use Closure;
use Illuminate\Http\Request;
use Illuminate\Support\Facades\Auth;
class IsVerifyEmail
{
/**
* Handle an incoming request.
*
* @param \Illuminate\Http\Request $request
* @param \Closure $next
* @return mixed
*/
public function handle(Request $request, Closure $next)
{
if (!Auth::user()->is_email_verified) {
auth()->logout();
return redirect()->route('login')
->with('message', 'You need to confirm your account. We have sent you an activation code, please check your email.');
}
return $next($request);
}
}
app/Http/Kernel.php
protected $routeMiddleware = [
....
'is_verify_email' => \App\Http\Middleware\IsVerifyEmail::class,
];
Step 8: Email Configuration
in this step, we will add email configuration on env file, because we will send email to reset password link from controller:
.env
MAIL_DRIVER=smtp
MAIL_HOST=smtp-mail.outlook.com
MAIL_PORT=587
MAIL_USERNAME=example@hotmail.com
MAIL_PASSWORD=123456789
MAIL_ENCRYPTION=tls
MAIL_FROM_ADDRESS=example@hotmail.com
Run Laravel App:
All the required steps have been done, now you have to type the given below command and hit enter to run the Laravel app:
php artisan serve
Now, Go to your web browser, type the given URL and view the app output:
http://localhost:8000/register
I hope it can help you...

