Laravel 10 Generate PDF and Send Email Example
Hey Folks,
In this example, you will learn laravel 10 generate pdf and send email. you'll learn dompdf send email attachment laravel 10. you'll learn laravel 10 send mail with pdf attachment. I would like to share with you laravel 10 generate pdf and send email.
In this example, I will simply use dompdf to generate a pdf file and send a mail with a pdf attachment. you just need to follow a few steps to create a simple example of sending a mail with created pdf file in Laravel app.
Let's see bellow steps:
Step 1: Install Laravel
I am going to explain step by step from scratch so, we need to get a fresh Laravel application using the bellow command, So open your terminal OR command prompt and run the bellow command:
composer create-project --prefer-dist laravel/laravel blog
Step 2: Install dompdf Package
first of all we will install barryvdh/laravel-dompdf composer package by following the composer command in your laravel application.
composer require barryvdh/laravel-dompdf
Step 3: Make Configuration
In the first step, you have to add send mail configuration with mail driver, mail host, mail port, mail username, and mail password so Laravel will use those sender details on the email. So you can simply add the following.
.env
MAIL_DRIVER=smtp
MAIL_HOST=smtp.gmail.com
MAIL_PORT=587
MAIL_USERNAME=mygoogle@gmail.com
MAIL_PASSWORD=rrnnucvnqlbsl
MAIL_ENCRYPTION=tls
MAIL_FROM_ADDRESS=mygoogle@gmail.com
MAIL_FROM_NAME="${APP_NAME}"
Step 4: Create Mail Class
We are going from scratch and in first step, we will create email for testing using Laravel Mail facade. So let's simple run bellow command.
php artisan make:mail MailExample
Now you will have new folder "Mail" in app directory with MailExample.php file. So let's simply copy bellow code and past on that file.
app/Mail/MailExample.php
<?php
namespace App\Mail;
use Illuminate\Bus\Queueable;
use Illuminate\Contracts\Queue\ShouldQueue;
use Illuminate\Mail\Mailable;
use Illuminate\Mail\Mailables\Content;
use Illuminate\Mail\Mailables\Envelope;
use Illuminate\Queue\SerializesModels;
use Illuminate\Mail\Mailables\Attachment;
class MailExample extends Mailable
{
use Queueable, SerializesModels;
public $mailData;
/**
* Create a new message instance.
*/
public function __construct($mailData)
{
$this->mailData = $mailData;
}
/**
* Get the message envelope.
*/
public function envelope(): Envelope
{
return new Envelope(
subject: $this->mailData['title'],
);
}
/**
* Get the message content definition.
*/
public function content(): Content
{
return new Content(
view: 'emails.myTestMail',
with: $this->mailData
);
}
/**
* Get the attachments for the message.
*
* @return array
*/
public function attachments(): array
{
return [
Attachment::fromData(fn () => $this->mailData['pdf']->output(), 'Report.pdf')
->withMime('application/pdf'),
];
}
}
Step 5: Add Route
In this is step we need to create routes for items listing. so open your "routes/web.php" file and add following route.
routes/web.php
<?php
use Illuminate\Support\Facades\Route;
use App\Http\Controllers\PDFController;
/*
|--------------------------------------------------------------------------
| Web Routes
|--------------------------------------------------------------------------
|
| Here is where you can register web routes for your application. These
| routes are loaded by the RouteServiceProvider within a group which
| contains the "web" middleware group. Now create something great!
|
*/
Route::get('send-email-pdf', [PDFController::class, 'index']);
Step 6: Add Controller
Here,we require to create new controller PDFController that will manage index method of route. So let's put bellow code.
app/Http/Controllers/PDFController.php
<?php
namespace App\Http\Controllers;
use Illuminate\Http\Request;
use App\Mail\MailExample;
use PDF;
use Mail;
class PDFController extends Controller
{
/**
* Show the application dashboard.
*
* @return \Illuminate\Http\Response
*/
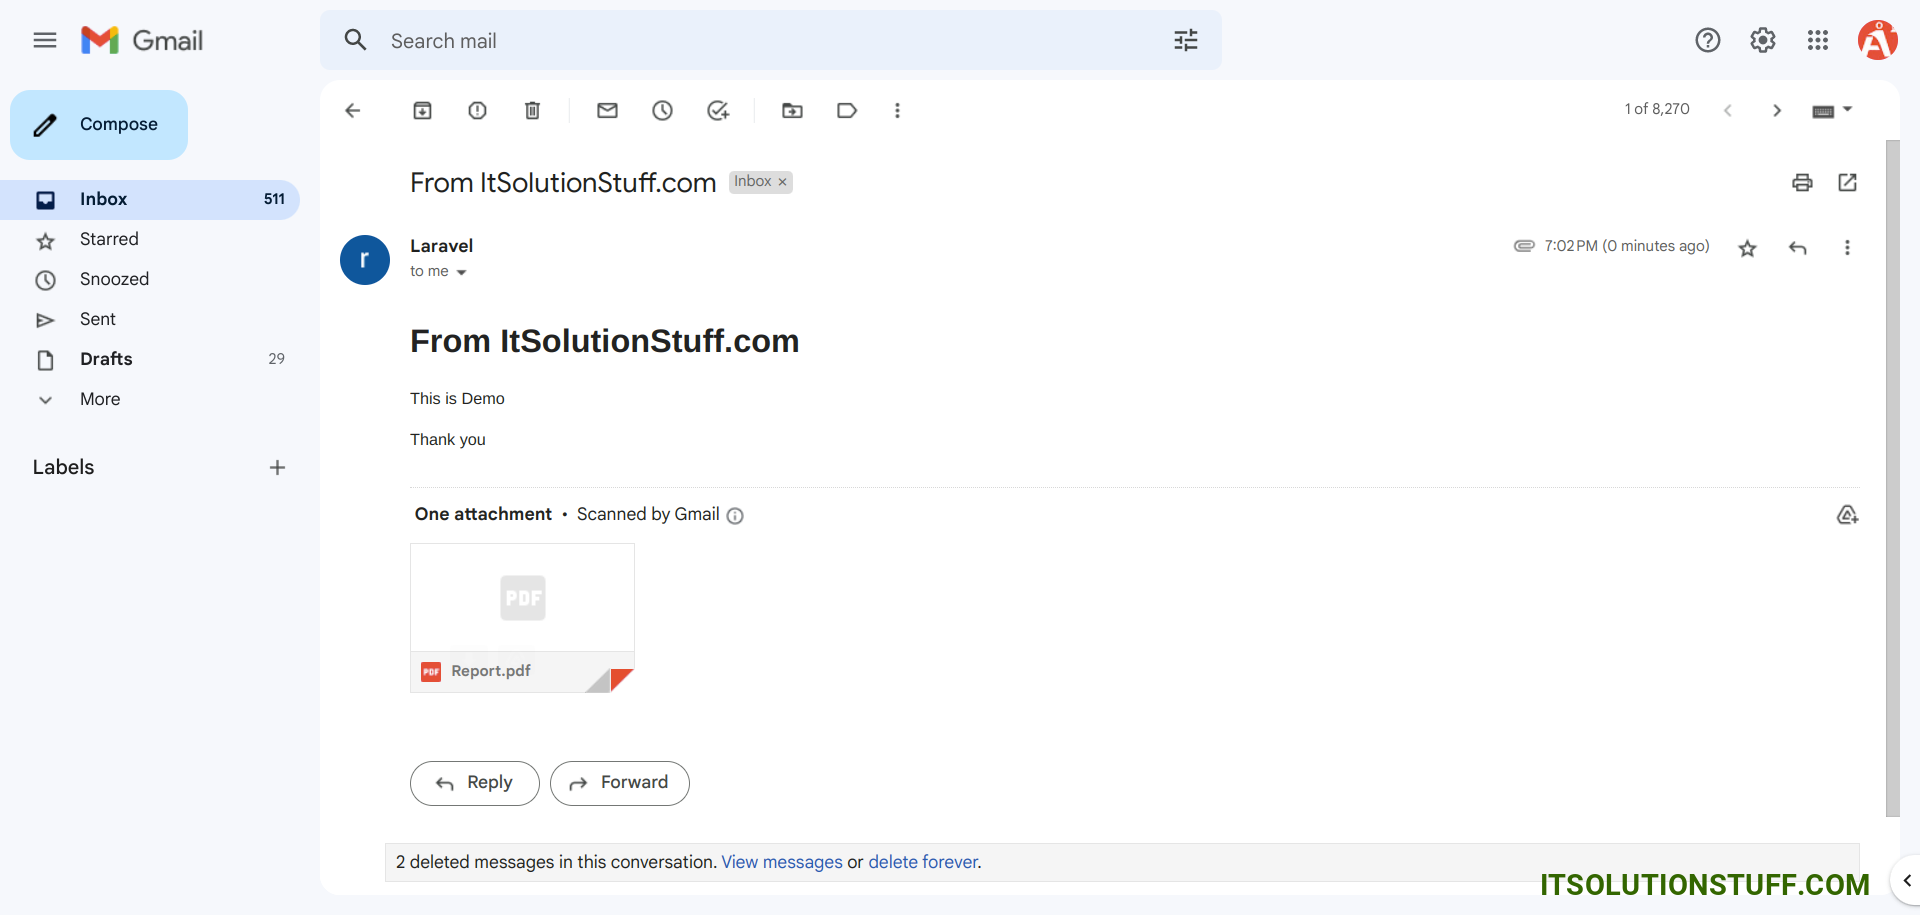
public function index()
{
$data["email"] = "your@gmail.com";
$data["title"] = "From ItSolutionStuff.com";
$data["body"] = "This is Demo";
$pdf = PDF::loadView('emails.myTestMail', $data);
$data["pdf"] = $pdf;
Mail::to($data["email"])->send(new MailExample($data));
dd('Mail sent successfully');
}
}
Step 6: Create View File
In Last step, let's create myTestMail.blade.php(resources/views/emails/myTestMail.blade.php) for layout of pdf file and put following code:
resources/views/emails/myTestMail.blade.php
<!DOCTYPE html>
<html>
<head>
<title>ItsolutionStuff.com</title>
</head>
<body>
<h1>{{ $title }}</h1>
<p>{{ $body }}</p>
<p>Thank you</p>
</body>
</html>
Run Laravel App:
All the required steps have been done, now you have to type the given below command and hit enter to run the Laravel app:
php artisan serve
Now, Go to your web browser, type the given URL and view the app output:
http://localhost:8000/send-email-pdf
Output:
I hope it can help you...

