How to Send Mail using PHPMailer in Laravel?
Hey Guys,
This tutorial will provide an example of how to send mail using phpmailer in laravel. you can see laravel phpmailer tutorial. We will use laravel send email using phpmailer. In this article, we will implement a how to run composer require phpmailer/phpmailer laravel.
Laravel typically employs the SwiftMailer library as its default email-sending mechanism, as SwiftMailer is integrated directly into the Laravel framework. Historically, the go-to method for sending emails in PHP-based web applications has been through the use of the standard mail() function. However, in this context, we'll explore the "PHPMailer" Laravel package as an alternative for sending emails.
PHPMailer is an open-source package that offers a straightforward setup process within the Laravel environment. It boasts a wide array of features, including the ability to send multiple emails with recipients designated as To, CC, BCC, and Reply-to addresses. Notably, PHPMailer provides robust security measures against header injection attacks, making it an exceptionally secure option for email communication.
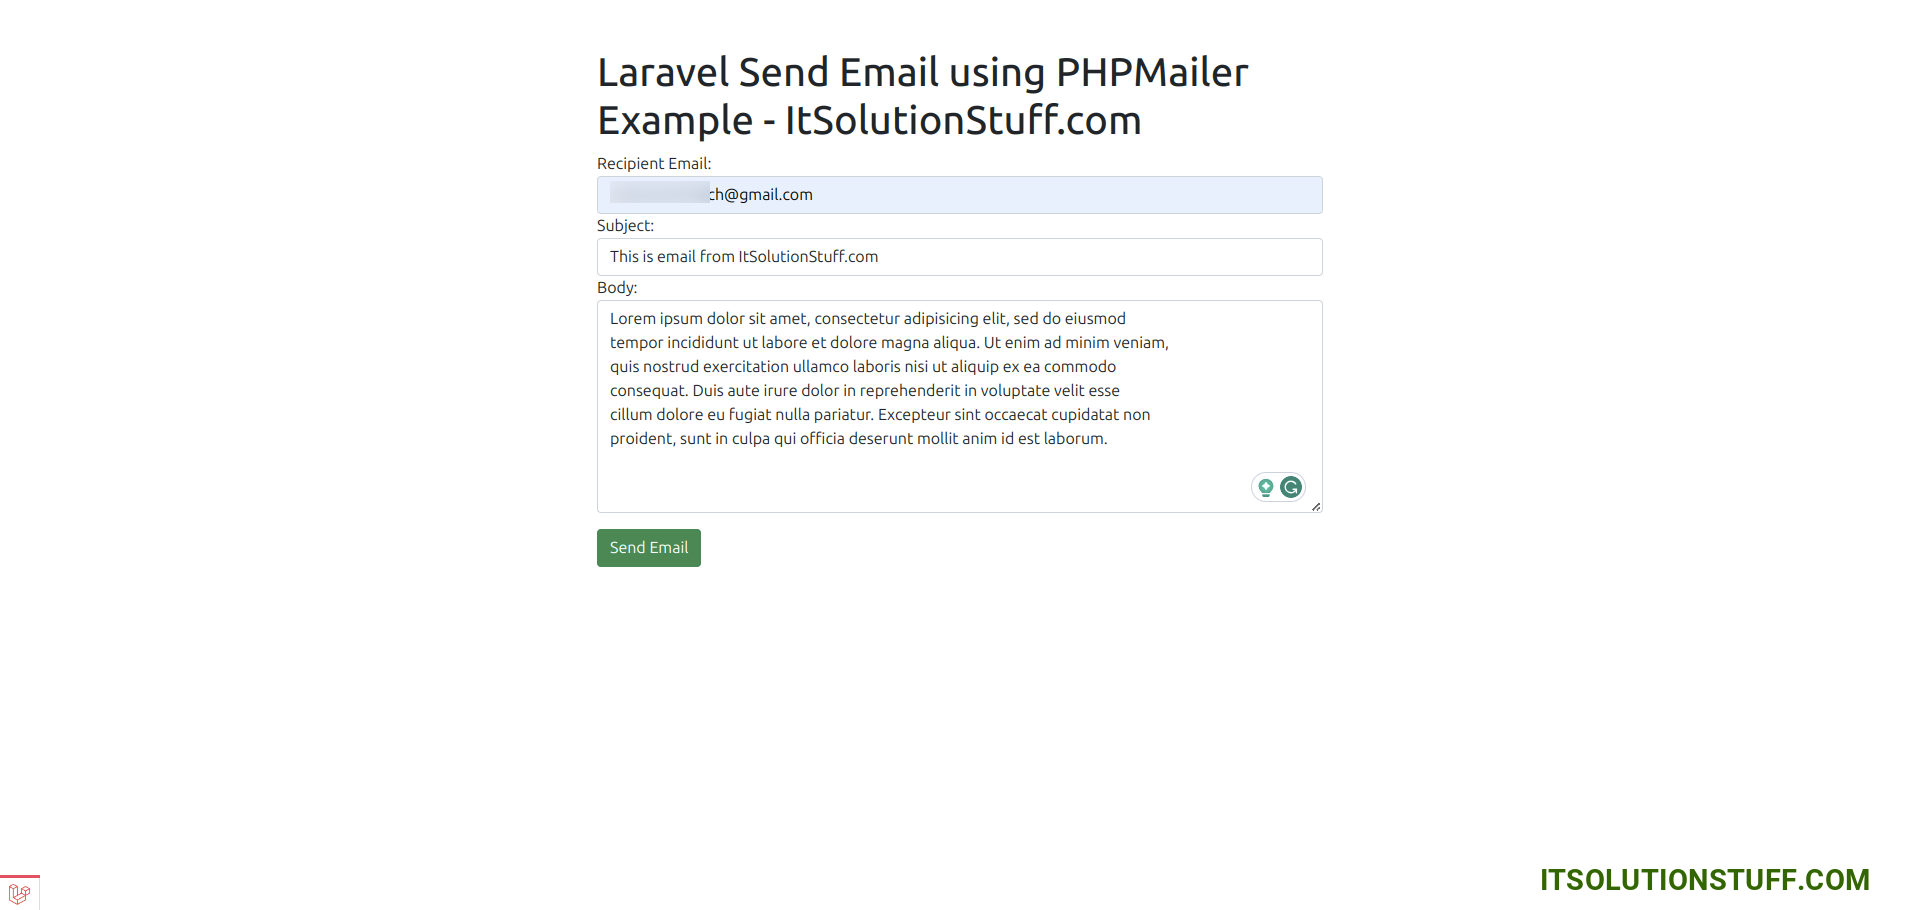
In this example, we will simply create form with "Recipient Email", "Subject" and "Body". Then we will simply send email. you can use this example with laravel 6, laravel 7, laravel 8, laravel 9, laravel 10 and laravel 11 versions. Let's follow the following steps:
Preview:
Step 1: Install Laravel
This step is not required; however, if you have not created the laravel app, then you may go ahead and execute the below command:
composer create-project laravel/laravel example-app
Step 2: Install PHPMailer Package
next, we will install the phpmailer/phpmailer package using the following composer command, let's run the below command:
composer require phpmailer/phpmailer
Step 3: Email SMTP Configuration
In first step, you have to add send mail configuration with mail driver as gmail server, mail host, mail port, mail username, mail password so laravel 10 will use those sender details on email. So you can simply add as like following. So you can simply add as like following.
.env
MAIL_MAILER=smtp
MAIL_HOST=smtp.gmail.com
MAIL_PORT=465
MAIL_USERNAME=mygoogle@gmail.com
MAIL_PASSWORD=rrnnucvnqlbsl
MAIL_ENCRYPTION=tls
MAIL_FROM_ADDRESS=mygoogle@gmail.com
MAIL_FROM_NAME="${APP_NAME}"
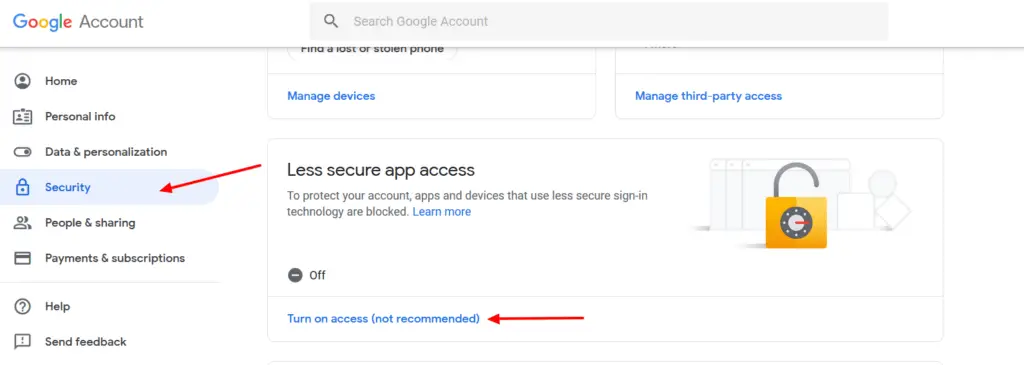
Make sure you have to enable google security setting form your gmail. go to Google account and click on ‘Account’. Once you are on the ‘Account’ page, click on ‘Security’. Scroll down to the bottom and you will find ‘Less secure app access’ settings. Set as ON.
Step 4: Create Controller
In this step, we will create PHPMailerController with index() and store() method to send email. so let's create controller using bellow command.
php artisan make:controller PHPMailerController
Now, update the code on the controller file.
app/Http/Controllers/PHPMailerController.php
<?php
namespace App\Http\Controllers;
use Illuminate\Http\Request;
use PHPMailer\PHPMailer\PHPMailer;
use PHPMailer\PHPMailer\Exception;
class PHPMailerController extends Controller
{
/**
* Write code on Method
*
* @return response()
*/
public function index(Request $request)
{
return view('sendEmail');
}
/**
* Write code on Method
*
* @return response()
*/
public function store(Request $request)
{
$mail = new PHPMailer(true);
try {
/* Email SMTP Settings */
$mail->SMTPDebug = 0;
$mail->isSMTP();
$mail->Host = env('MAIL_HOST');
$mail->SMTPAuth = true;
$mail->Username = env('MAIL_USERNAME');
$mail->Password = env('MAIL_PASSWORD');
$mail->SMTPSecure = env('MAIL_ENCRYPTION');
$mail->Port = env('MAIL_PORT');
$mail->setFrom(env('MAIL_FROM_ADDRESS'), env('MAIL_FROM_NAME'));
$mail->addAddress($request->email);
$mail->isHTML(true);
$mail->Subject = $request->subject;
$mail->Body = $request->body;
if( !$mail->send() ) {
return back()->with("error", "Email not sent.")->withErrors($mail->ErrorInfo);
}
else {
return back()->with("success", "Email has been sent.");
}
} catch (Exception $e) {
return back()->with('error','Message could not be sent.');
}
}
}
Step 5: Add Route
Furthermore, open routes/web.php file and update code on it.
routes/web.php
<?php
use Illuminate\Support\Facades\Route;
use App\Http\Controllers\PHPMailerController;
/*
|--------------------------------------------------------------------------
| Web Routes
|--------------------------------------------------------------------------
|
| Here is where you can register web routes for your application. These
| routes are loaded by the RouteServiceProvider within a group which
| contains the "web" middleware group. Now create something great!
|
*/
Route::get('send-email',[PHPMailerController::class, 'index'])->name('send.email');
Route::post('send-email',[PHPMailerController::class, 'store'])->name('send.email.post');
Step 6: Create View File
In Last step, let's create sendEmail.blade.php for form design and put following code:
resources/views/sendEmail.blade.php
<!DOCTYPE html>
<html lang="{{ str_replace('_', '-', app()->getLocale()) }}">
<head>
<meta name="csrf-token" content="{{ csrf_token() }}">
<title>Laravel Send Email using PHPMailer Example - ItSolutionStuff.com</title>
<link rel="stylesheet" href="https://cdn.jsdelivr.net/npm/bootstrap@5.0.0-beta1/dist/css/bootstrap.min.css">
</head>
<body>
<div class="container mt-5" style="max-width: 750px">
<h1>Laravel Send Email using PHPMailer Example - ItSolutionStuff.com</h1>
@if ($message = Session::get('success'))
<div class="alert alert-success alert-dismissible">
<strong>{{ $message }}</strong>
</div>
@endif
@if ($message = Session::get('error'))
<div class="alert alert-danger alert-dismissible">
<strong>{{ $message }}</strong>
</div>
@endif
<form method="post" action="{{ route('send.email.post') }}" enctype="multipart/form-data">
@csrf
<div class="form-group">
<label>Recipient Email:</label>
<input type="email" name="email" class="form-control" />
</div>
<div class="form-group">
<label>Subject:</label>
<input type="text" name="subject" class="form-control" />
</div>
<div class="form-group">
<label>Body:</label>
<textarea class="form-control" name="body"></textarea>
</div>
<div class="form-group mt-3 mb-3">
<button type="submit" class="btn btn-success btn-block">Send Email</button>
</div>
</form>
</div>
</body>
</html>
Run Laravel App:
All the required steps have been done, now you have to type the given below command and hit enter to run the Laravel app:
php artisan serve
Now, Go to your web browser, type the given URL and view the app output:
http://localhost:8000/send-email
Output:
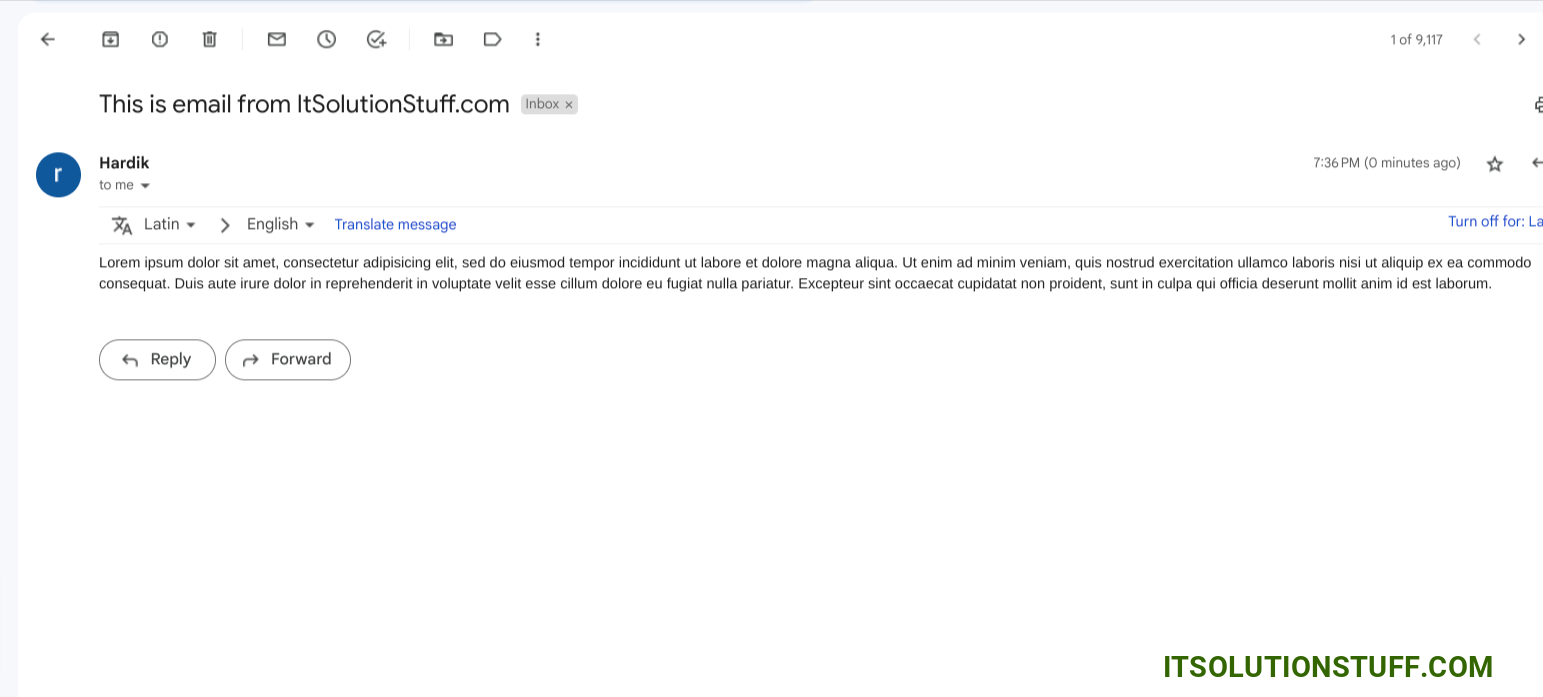
I hope it can help you...

