Laravel - Create CSV File from Custom Array using Maatwebsite
In this tutorial, you will learn laravel maatwebsite custom array. In this article, we will implement a custom array create csv file laravel. i explained simply step by step laravel maatwebsite custom array to create excel file. it's simple example of how to create csv file from array in laravel.
Here is a very simple example of how to create csv file from array in laravel using maatwebsite. you can use this example with laravel 6, laravel 7, laravel 8, laravel 9, laravel 10 and laravel 11 version.
Let's see bellow example:
Step 1: Install maatwebsite/excel Package
In this step we need to install maatwebsite/excel package via the Composer package manager, so one your terminal and fire bellow command:
composer require maatwebsite/excel
Now open config/app.php file and add service provider and aliase.
config/app.php
'providers' => [
....
Maatwebsite\Excel\ExcelServiceProvider::class,
],
'aliases' => [
....
'Excel' => Maatwebsite\Excel\Facades\Excel::class,
],
Step 2: Add Routes
In this step, we need to create route of import export file. so open your "routes/web.php" file and add following route.
routes/web.php
<?php
use Illuminate\Support\Facades\Route;
use App\Http\Controllers\UserImportController;
/*
|--------------------------------------------------------------------------
| Web Routes
|--------------------------------------------------------------------------
|
| Here is where you can register web routes for your application. These
| routes are loaded by the RouteServiceProvider within a group which
| contains the "web" middleware group. Now create something great!
|
*/
Route::get('export', [UserImportController::class, 'export']);
Step 4: Create Export Class
In maatwebsite 3 version provide way to built export class and we have to use in controller. So it would be great way to create new Export class. So you have to run following command and change following code on that file:
php artisan make:export UsersExport
app/Exports/UsersExport.php
<?php
namespace App\Exports;
use Maatwebsite\Excel\Concerns\FromCollection;
use Maatwebsite\Excel\Concerns\WithHeadings;
class UsersExport implements FromCollection, WithHeadings
{
protected $data;
/**
* Write code on Method
*
* @return response()
*/
public function __construct($data)
{
$this->data = $data;
}
/**
* Write code on Method
*
* @return response()
*/
public function collection()
{
return collect($this->data);
}
/**
* Write code on Method
*
* @return response()
*/
public function headings() :array
{
return [
'ID',
'Name',
'Email',
];
}
}
Step 4: Create Controller
In this step, now we should create new controller as UserImportController in this path "app/Http/Controllers/UserImportController.php". this controller will manage export method, so put bellow content in controller file:
app/Http/Controllers/UserImportController.php
<?php
namespace App\Http\Controllers;
use Illuminate\Http\Request;
use App\Exports\UsersExport;
use Maatwebsite\Excel\Facades\Excel;
class UserImportController extends Controller
{
/**
* @return \Illuminate\Support\Collection
*/
public function export()
{
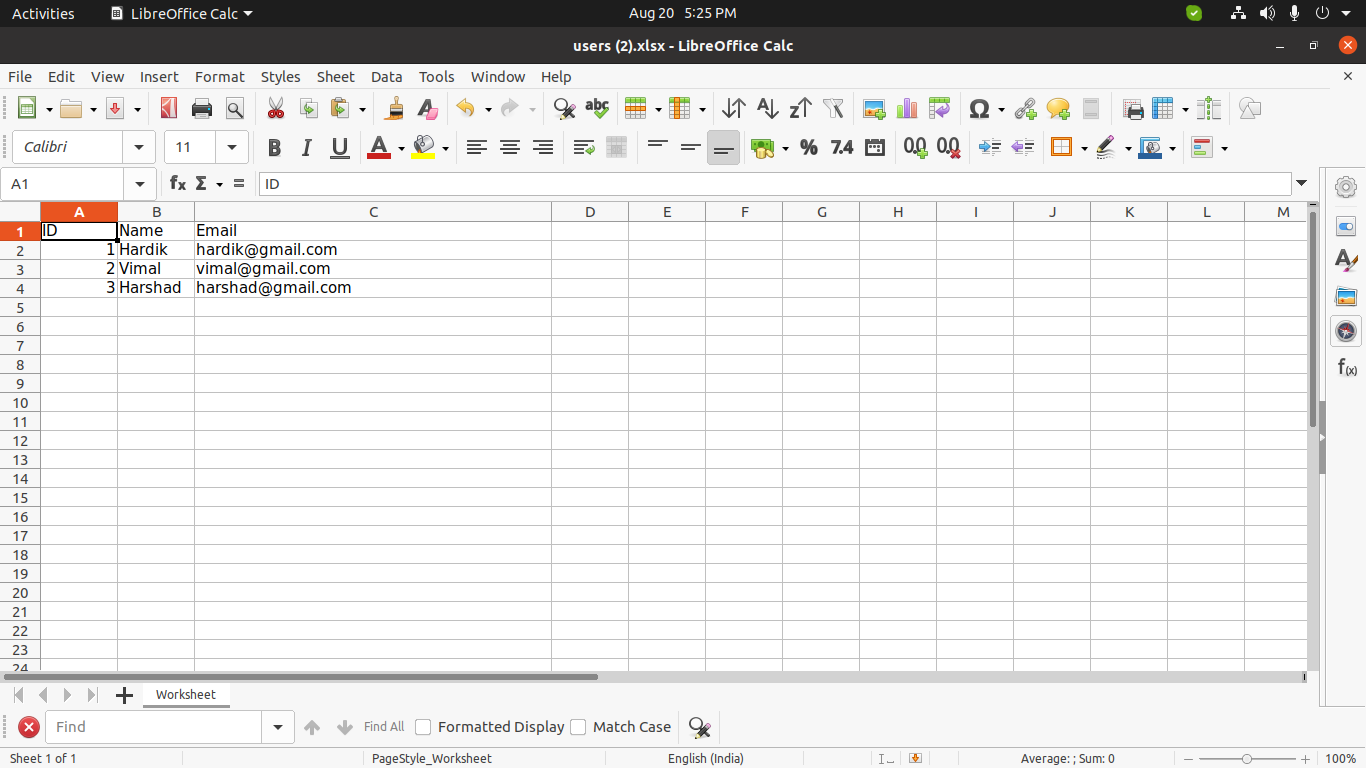
$users = [
[
'id' => 1,
'name' => 'Hardik',
'email' => 'hardik@gmail.com'
],
[
'id' => 2,
'name' => 'Vimal',
'email' => 'vimal@gmail.com'
],
[
'id' => 3,
'name' => 'Harshad',
'email' => 'harshad@gmail.com'
]
];
return Excel::download(new UsersExport($users), 'users.xlsx');
}
}
Now you can check on your laravel 8 application.
Now we are ready to run our example so run bellow command so quick run:
php artisan serve
Now you can open bellow URL on your browser:
localhost:8000/export
you have to upload csv file as like bellow:
I hope it can help you...

