Laravel 9 Queues: How to Use Queue in Laravel 9?
Here, I will show you laravel 9 queue example. Here you will learn how to use queue in laravel 9. This article goes in detail on laravel 9 queue and job example. I explained simply about laravel 9 queue step by step.
Sometimes, you see some processes take time to load like email send, payment gateway, etc. When you send an email for verification or send an invoice then it loads time to send mail because it is services. If you don't want to wait for the user to send an email or other process on loading server-side process then you can use a queue. because it's very fast and visitors will happy to see loading time.
In this example, we will create one mail class and create a job class. you can send test mail using a queue. just follow the below step and make it done this example:

Step 1: Install Laravel 9
This is optional; however, if you have not created the laravel app, then you may go ahead and execute the below command:
composer create-project laravel/laravel example-app
Step 2: Create Mail Class with Configuration
We are going from scratch and in first step, we will create email for testing using Laravel Mail facade. So let's simple run bellow command.
php artisan make:mail SendEmailTest
Now you will have new folder "Mail" in app directory with SendEmailTest.php file. So let's simply copy bellow code and past on that file.
app/Mail/SendEmailTest.php
<?php
namespace App\Mail;
use Illuminate\Bus\Queueable;
use Illuminate\Contracts\Queue\ShouldQueue;
use Illuminate\Mail\Mailable;
use Illuminate\Queue\SerializesModels;
class SendEmailTest extends Mailable
{
use Queueable, SerializesModels;
/**
* Create a new message instance.
*
* @return void
*/
public function __construct()
{
}
/**
* Build the message.
*
* @return $this
*/
public function build()
{
return $this->view('emails.test');
}
}
Ok, now we require to create email view using blade file. So we will create simple view file and copy bellow code om following path.
resources/views/emails/test.blade.php
<!DOCTYPE html>
<html>
<head>
<title>How to send mail using queue in Laravel 9? - ItSolutionStuff.com</title>
</head>
<body>
<center>
<h2 style="padding: 23px;background: #b3deb8a1;border-bottom: 6px green solid;">
<a href="https://itsolutionstuff.com">Visit Our Website : ItSolutionStuff.com</a>
</h2>
</center>
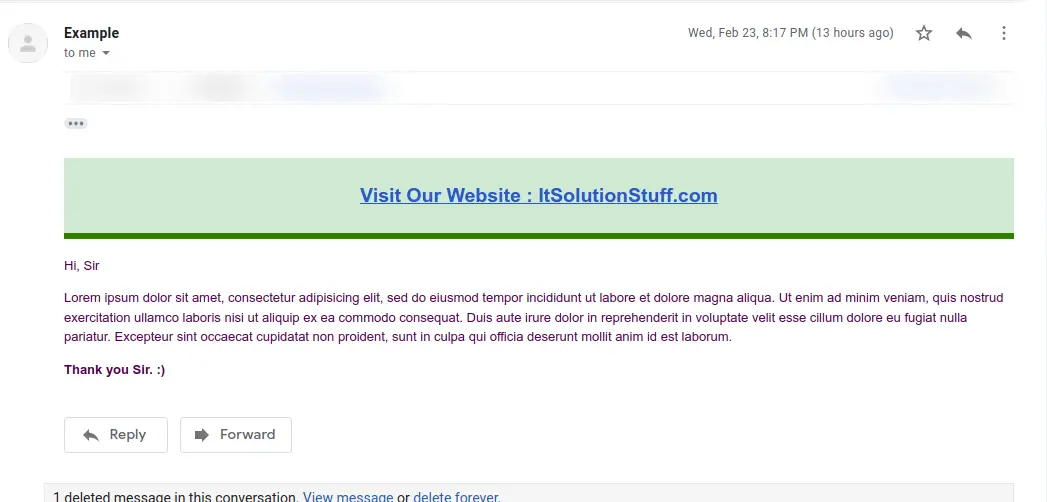
<p>Hi, Sir</p>
<p>Lorem ipsum dolor sit amet, consectetur adipisicing elit, sed do eiusmod
tempor incididunt ut labore et dolore magna aliqua. Ut enim ad minim veniam,
quis nostrud exercitation ullamco laboris nisi ut aliquip ex ea commodo
consequat. Duis aute irure dolor in reprehenderit in voluptate velit esse
cillum dolore eu fugiat nulla pariatur. Excepteur sint occaecat cupidatat non
proident, sunt in culpa qui officia deserunt mollit anim id est laborum.</p>
<strong>Thank you Sir. :)</strong>
</body>
</html>
after configuration of view file, we have to setup for email send, So let' set configuration in .env file:
.env
MAIL_MAILER=smtp
MAIL_HOST=smtp.gmail.com
MAIL_PORT=465
MAIL_USERNAME=mygoogle@gmail.com
MAIL_PASSWORD=rrnnucvnqlbsl
MAIL_ENCRYPTION=tls
MAIL_FROM_ADDRESS=mygoogle@gmail.com
MAIL_FROM_NAME="${APP_NAME}"
Step 3: Queue Configuration
Now in next step, we will make configuration on queue driver so first of all, we will set queue driver "database". You can set as you want also we will define driver as Redis too. So here define database driver on ".env" file:
.env
QUEUE_CONNECTION=database
After that we need to generate migration and create tables for queue. So let's run bellow command for queue database tables:
Generate Migration:
php artisan queue:table
Run Migration:
php artisan migrate
Step 4: Create Queue Job
now we will create queue job bey following command, this command will create queue job file with Queueable. So let's run bellow command:
php artisan make:job SendEmailJob
now you have SendEmailJob.php file in "Jobs" directory. So let's see that file and put bellow code on that file.
app/Jobs/SendEmailJob.php
<?php
namespace App\Jobs;
use Illuminate\Bus\Queueable;
use Illuminate\Contracts\Queue\ShouldBeUnique;
use Illuminate\Contracts\Queue\ShouldQueue;
use Illuminate\Foundation\Bus\Dispatchable;
use Illuminate\Queue\InteractsWithQueue;
use Illuminate\Queue\SerializesModels;
use App\Mail\SendEmailTest;
use Mail;
class SendEmailJob implements ShouldQueue
{
use Dispatchable, InteractsWithQueue, Queueable, SerializesModels;
protected $details;
/**
* Create a new job instance.
*
* @return void
*/
public function __construct($details)
{
$this->details = $details;
}
/**
* Execute the job.
*
* @return void
*/
public function handle()
{
$email = new SendEmailTest();
Mail::to($this->details['email'])->send($email);
}
}
Step 5: Test Queue Job
Now time is use and test created queue job, so let's simple create route with following code for testing created queue.
routes/web.php
Route::get('email-test', function(){
$details['email'] = 'your_email@gmail.com';
dispatch(new App\Jobs\SendEmailJob($details));
dd('done');
});
Next, you must have to run following command to see queue process, you must have to keep start this command:
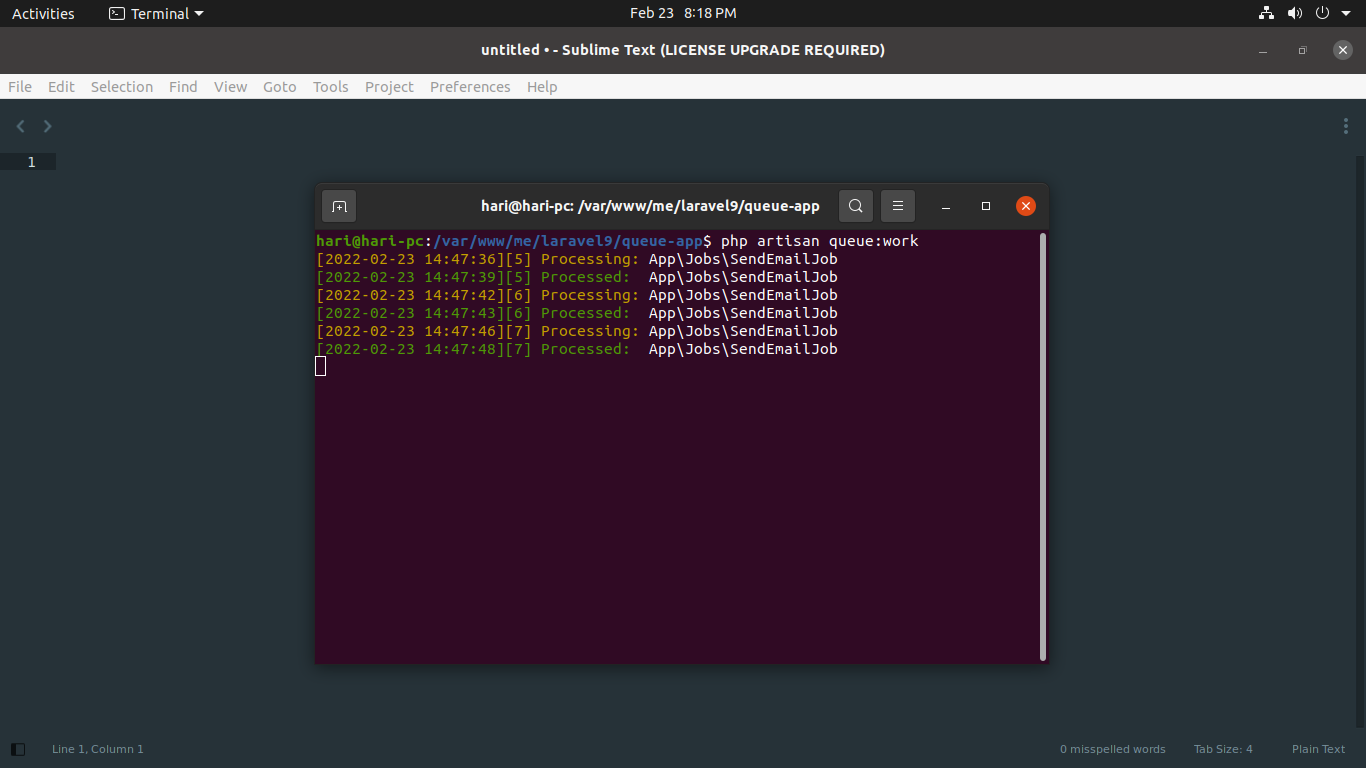
php artisan queue:work
You will see layout as like bellow if queue is works:
Run Laravel App:
All the required steps have been done, now you have to type the given below command and hit enter to run the Laravel app:
php artisan serve
Now, Go to your web browser, type the given URL and view the app output:
http://localhost:8000/email-test
Output:
Keep Laravel Queue System Running on Server:
As we know we must need to keep running "php artisan work" command on the terminal because then and then queue will work. so in server, you must have to keep running using Supervisor. A supervisor is a process monitor for the Linux operating system, and will automatically restart your queue:work processes if they fail.
So let's install Supervisor using bellow command:
Install Supervisor:
sudo apt-get install supervisor
Next, we need to configuration file on supervisor as below following path, you can set project path, user and output file location as well:
/etc/supervisor/conf.d/laravel-worker.conf
[program:laravel-worker]
process_name=%(program_name)s_%(process_num)02d
command=php /home/forge/app.com/artisan queue:work --tries=3
autostart=true
autorestart=true
stopasgroup=true
killasgroup=true
user=forge
numprocs=8
redirect_stderr=true
stdout_logfile=/home/forge/app.com/worker.log
stopwaitsecs=3600
Next, we will start supervisor with below commands:
sudo supervisorctl reread
sudo supervisorctl update
sudo supervisorctl start laravel-worker:*
Now you can check it, from your end.
I hope it can help you...

