Laravel 9 Flash Message Example Tutorial
Hi,
This article is focused on laravel 9 flash message example. you will learn how to implement flash message in laravel 9. Here you will learn laravel 9 flash message from the controller. This tutorial will give you a simple example of laravel 9 flash message notification.
we will define various types of flash message notifications like alert-success, alert danger, alert info, alert warning messages in bootstrap laravel 9 projects. When you have a success task on the controller method then you can use a success flash message, if you have any error task then you can use error flash message.
Flash messages are required in laravel 9 application because that way we can give alter with what progress is complete, error, warning, etc. In this tutorial, I added several ways to give a flash message like redirect with a success message, redirect with an error message, redirect with a warning message, and redirect with info message. In this example, we use a bootstrap flash alert layout that way it becomes a good layout.
So, you have to just follow the basic three-step to integrate flash messages in your laravel 9 application. So let's follow the below step:
Step 1: Create Global File For Flash Message
In first step we will create new blade file flash-message.blade.php. In this file we will write code of bootstrap alert and check which messages come.
There are following alert will added:
1)success
2)error
3)warning
4)info
5)validation error
So, let's create flash-message.blade.php file and put bellow code on that file.
resources/views/flash-message.blade.php
@if ($message = Session::get('success'))
<div class="alert alert-success alert-dismissible fade show" role="alert">
<strong>{{ $message }}</strong>
<button type="button" class="btn-close" data-bs-dismiss="alert" aria-label="Close"></button>
</div>
@endif
@if ($message = Session::get('error'))
<div class="alert alert-danger alert-dismissible fade show" role="alert">
<strong>{{ $message }}</strong>
<button type="button" class="btn-close" data-bs-dismiss="alert" aria-label="Close"></button>
</div>
@endif
@if ($message = Session::get('warning'))
<div class="alert alert-warning alert-dismissible fade show" role="alert">
<strong>{{ $message }}</strong>
<button type="button" class="btn-close" data-bs-dismiss="alert" aria-label="Close"></button>
</div>
@endif
@if ($message = Session::get('info'))
<div class="alert alert-info alert-dismissible fade show" role="alert">
<strong>{{ $message }}</strong>
<button type="button" class="btn-close" data-bs-dismiss="alert" aria-label="Close"></button>
</div>
@endif
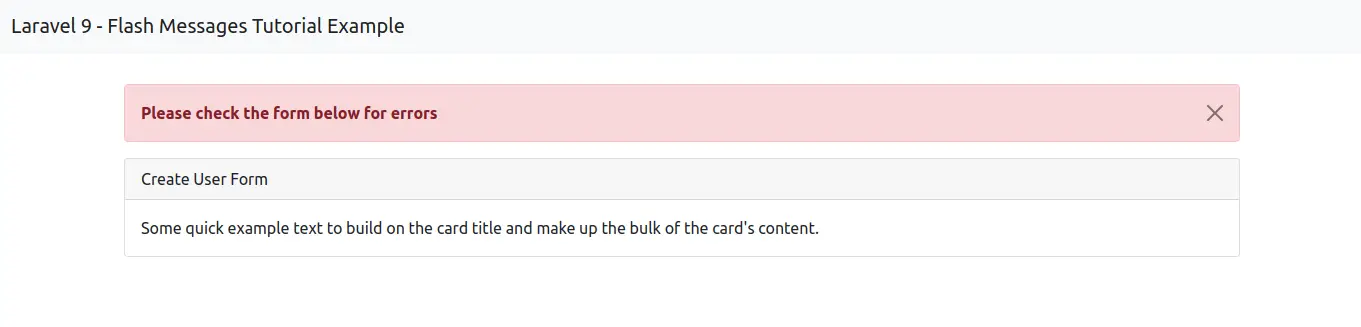
@if ($errors->any())
<div class="alert alert-danger alert-dismissible fade show" role="alert">
<strong>Please check the form below for errors</strong>
<button type="button" class="btn-close" data-bs-dismiss="alert" aria-label="Close"></button>
</div>
@endif
Step 2: Use Flash Message in Theme
In this step we have to just include flash-message.blade.php file in your theme default file. You have to just include this flash file in your default theme blade file like as bellow:
@include('flash-message')
You can also see i added flash file on my theme, so you can add that way. Let's see bellow example:
resources/views/layouts/app.blade.php
<!DOCTYPE html>
<html lang="en">
<head>
<meta charset="utf-8">
<meta http-equiv="X-UA-Compatible" content="IE=edge">
<meta name="viewport" content="width=device-width, initial-scale=1">
<!-- Styles -->
<link href="https://cdn.jsdelivr.net/npm/bootstrap@5.0.2/dist/css/bootstrap.min.css" rel="stylesheet">
<script src="https://cdn.jsdelivr.net/npm/bootstrap@5.0.2/dist/js/bootstrap.bundle.min.js" ></script>
</head>
<body>
<div class="container">
@include('flash-message')
@yield('content')
</div>
<!-- Scripts -->
<script src="/js/app.js"></script>
</body>
</html>
Step 3: Use Flash Messages with Redirect
In this step we will learn how to give message when you redirect one by one:
1. Redirect with success message
We can simple redirect route or redirect url or redirect back with success flash message, we can use in controller like this way:
public function create(Request $request)
{
$this->validate($request,[
'title' => 'required',
'details' => 'required'
]);
$items = Item::create($request->all());
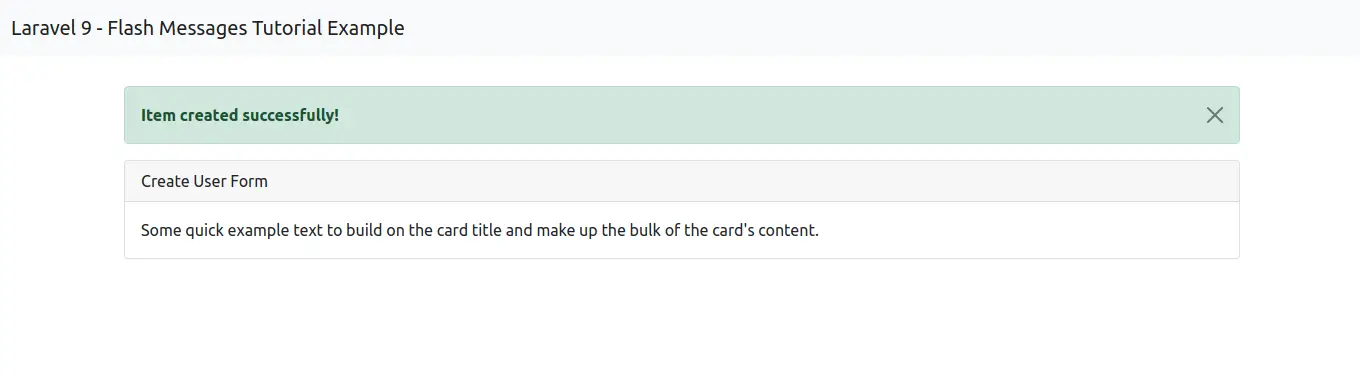
return back()->with('success','Item created successfully!');
}
You can get layout of success flash message:
2. Redirect with error message
We can simple redirect route or redirect url or redirect back with error flash message, we can use in controller like this way:
public function create(Request $request)
{
return redirect()->route('home')
->with('error','You have no permission for this page!');
}
You can get layout of error flash message:

3. Redirect with warning message
We can simple redirect route or redirect url or redirect back with warning flash message, we can use in controller like this way:
public function create(Request $request)
{
return redirect()->route('home')
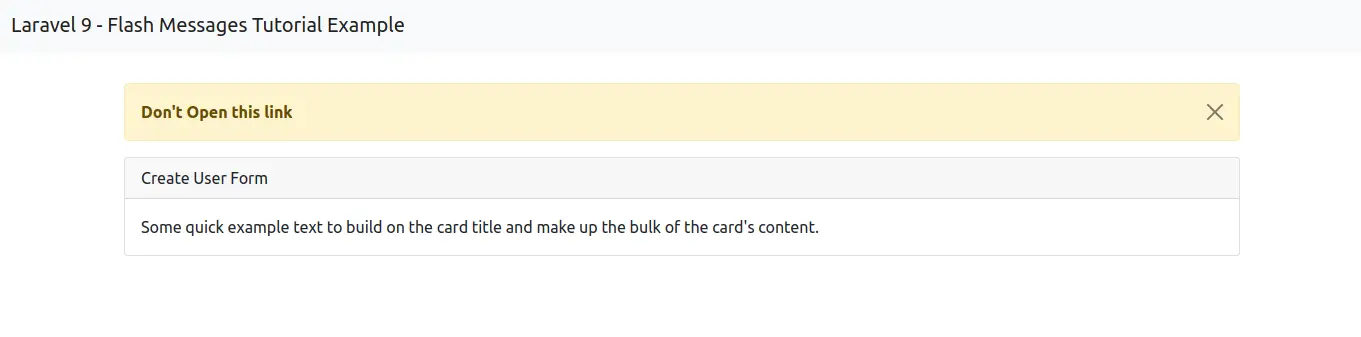
->with('warning',"Don't Open this link");
}
You can get layout of warning flash message:
4. Redirect with info message
We can simple redirect route or redirect url or redirect back with info flash message, we can use in controller like this way:
public function create(Request $request)
{
$this->validate($request,[
'title' => 'required',
'details' => 'required'
]);
$items = Item::create($request->all());
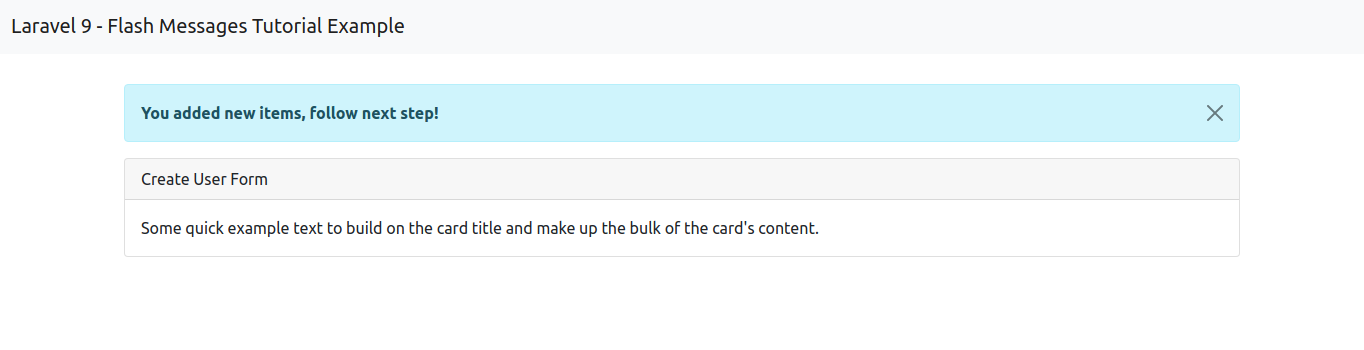
return back()->with('info','You added new items, follow next step!');
}
You can get layout of info flash message:
5. Validation Error
If you use laravel 5 validation then you will redirect back with errors automatically, At that time it will also generate error flash message.
public function create(Request $request)
{
$this->validate($request,[
'title' => 'required',
'details' => 'required'
]);
.....
}
You can get layout of error flash message:
This way you can simple implement flash message in your laravel 9 application.
I hope it can help you....

