Laravel 9 Livewire Datatables Example
Hi,
In this short tutorial, we will cover a laravel 9 livewire datatables. if you want to see example of laravel 9 livewire datatable then you are a right place. We will use datatables in laravel 9 livewire example. This post will give you simple example of laravel 9 mediconesystems/livewire-datatables.
In this tutorial, we will create laravel livewire datatables using laravel MedicOneSystems/livewire-datatables package.
Livewire is a full-stack framework for Laravel that makes building dynamic interfaces simple, without leaving the comfort of Laravel. if you are using livewire with laravel then you don't worry about writing jquery ajax code, livewire will help to write very simple way jquery ajax code using php. without page refresh laravel validation will work, form will submit etc.
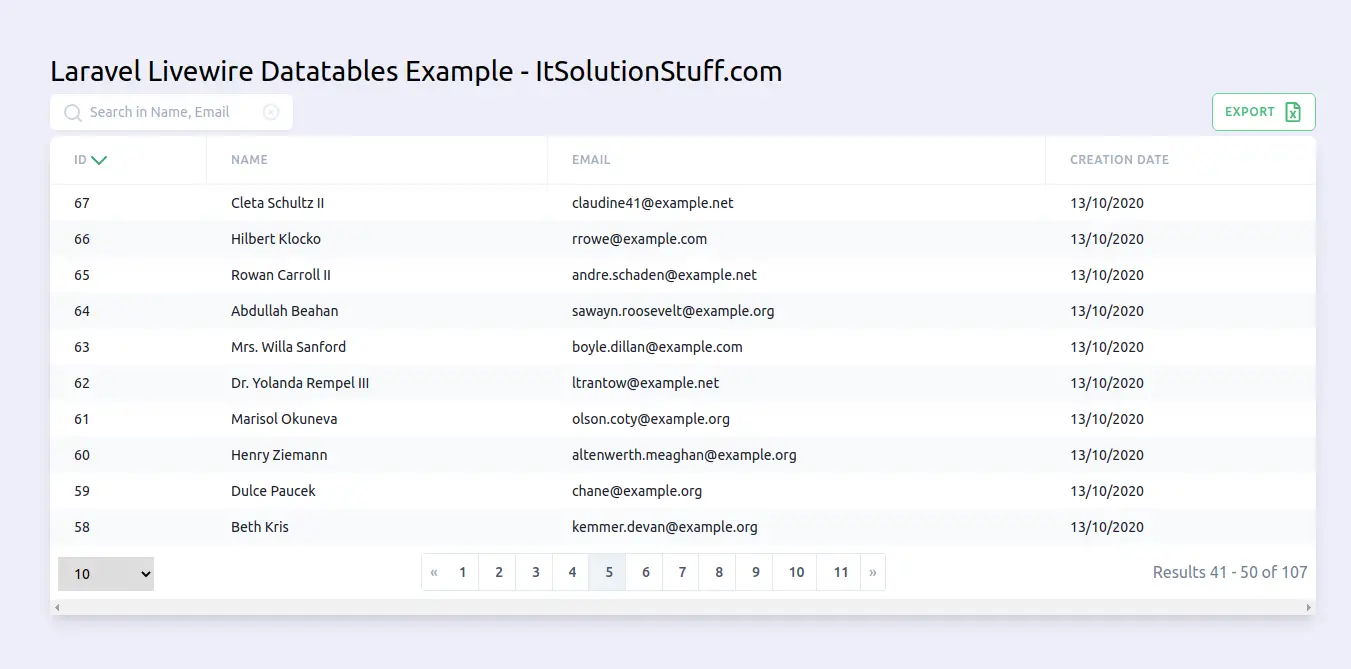
Here, I will give you a straightforward example of creating data tables with a users table and I will display data using datatables in the blade file. we will use only livewire/livewire package.
So, let's follow bellow step and you will get bellow layout:
Step 1 : Install Laravel
first of all we need to get fresh Laravel version application using bellow command, So open your terminal OR command prompt and run bellow command:
composer create-project laravel/laravel example-app
Step 2 : Create Dummy Records using Tinker Factory
you need to run following command to create dummy records in your users table. let's run both command:
php artisan tinker
App\Models\User::factory()->count(100)->create()
Step 3: Install Livewire & livewire-datatables Package
now in this step, we will simply install livewire to our laravel application using bellow command:
composer require livewire/livewire
composer require mediconesystems/livewire-datatables
Step 4: Create Component
Now here we will create livewire component using their command. so run bellow command to create datatables component.
php artisan make:livewire user-datatables
Now they created fies on both path:
app/Http/Livewire/UserDatatables.php
resources/views/livewire/user-datatables.blade.php
Now both file we will update as bellow for our contact us form.
app/Http/Livewire/UserDatatables.php
<?php
namespace App\Http\Livewire;
use Livewire\Component;
use App\Models\User;
use Illuminate\Support\Str;
use Mediconesystems\LivewireDatatables\Column;
use Mediconesystems\LivewireDatatables\NumberColumn;
use Mediconesystems\LivewireDatatables\DateColumn;
use Mediconesystems\LivewireDatatables\Http\Livewire\LivewireDatatable;
class UserDatatables extends LivewireDatatable
{
public $model = User::class;
/**
* Write code on Method
*
* @return response()
*/
public function columns()
{
return [
NumberColumn::name('id')
->label('ID')
->sortBy('id'),
Column::name('name')
->label('Name'),
Column::name('email'),
DateColumn::name('created_at')
->label('Creation Date')
];
}
}
Step 5: Create Route
now we will create one route for calling our example, so let's add new route to web.php file as bellow:
routes/web.php
Route::get('user-datatables', function () {
return view('default');
});
Step 6: Create View File
here, we will create blade file for call form route. in this file we will use @livewireStyles, @livewireScripts and @livewire('contact-form'). so let's add it.
resources/views/default.blade.php
<!DOCTYPE html>
<html>
<head>
<title>Laravel Livewire Example - ItSolutionStuff.com</title>
@livewireStyles
<link rel="stylesheet" href="https://cdnjs.cloudflare.com/ajax/libs/tailwindcss/1.9.2/tailwind.min.css" integrity="sha512-l7qZAq1JcXdHei6h2z8h8sMe3NbMrmowhOl+QkP3UhifPpCW2MC4M0i26Y8wYpbz1xD9t61MLT9L1N773dzlOA==" crossorigin="anonymous" />
</head>
<body>
<div class="container">
<div class="card">
<div class="card-header">
Laravel Livewire Example - ItSolutionStuff.com
</div>
<div class="card-body">
<livewire:user-datatables
searchable="name, email"
exportable
/>
</div>
</div>
</div>
</body>
@livewireScripts
</html>
Run Laravel App:
All the required steps have been done, now you have to type the given below command and hit enter to run the Laravel app:
php artisan serve
Now, Go to your web browser, type the given URL and view the app output:
http://localhost:8000/user-datatables
I hope it can help you...

