Laravel 9 Custom Email Verification Tutorial
Hello Friends,
In this article we will cover on how to implement laravel 9 custom email verification example. it's simple example of laravel 9 custom email verification template. you can understand a concept of laravel 9 custom email verification system. you can see laravel 9 email verification example.
Laravel already provides an email verification feature by default. Still, if you want to do your own logic with a manual email verification process then I will help you with step-by-step email verification in laravel.
few days ago i posted one post with Custom Auth Login and Register with Laravel and Custom Reset Password with Laravel so you must have to follow that as well because i started this feature with that code.
Let's follow the below step for custom email verification.
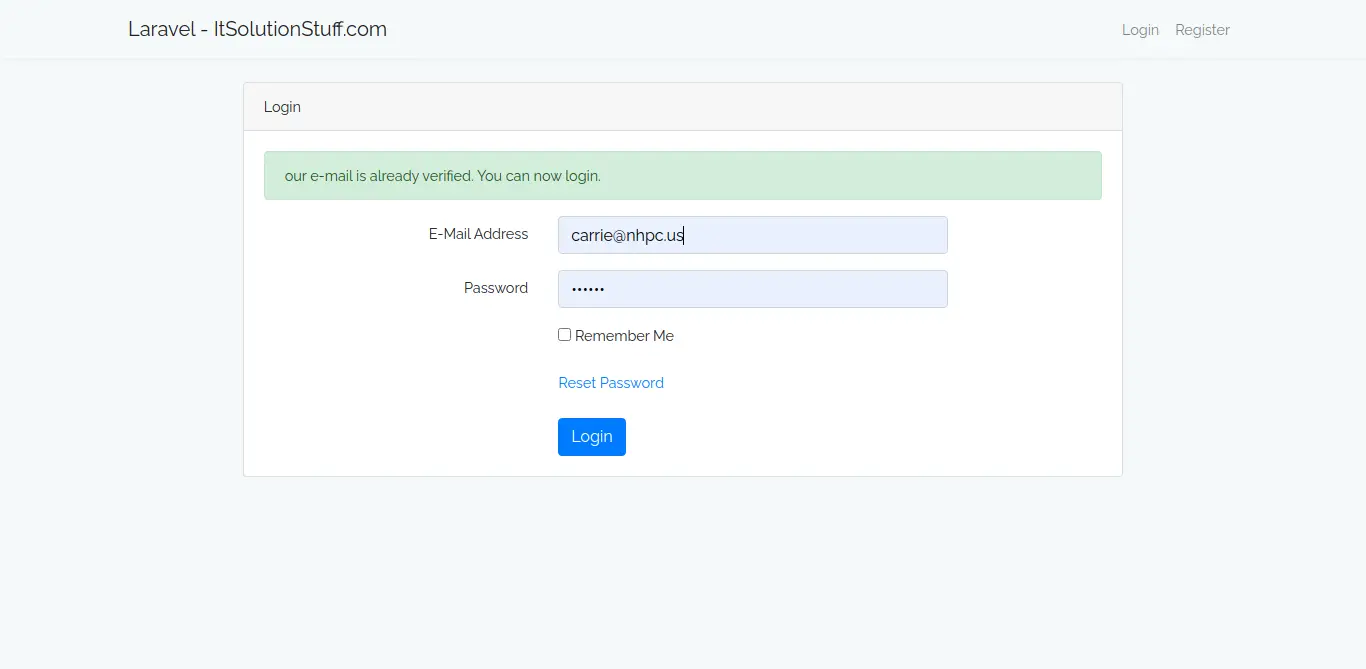
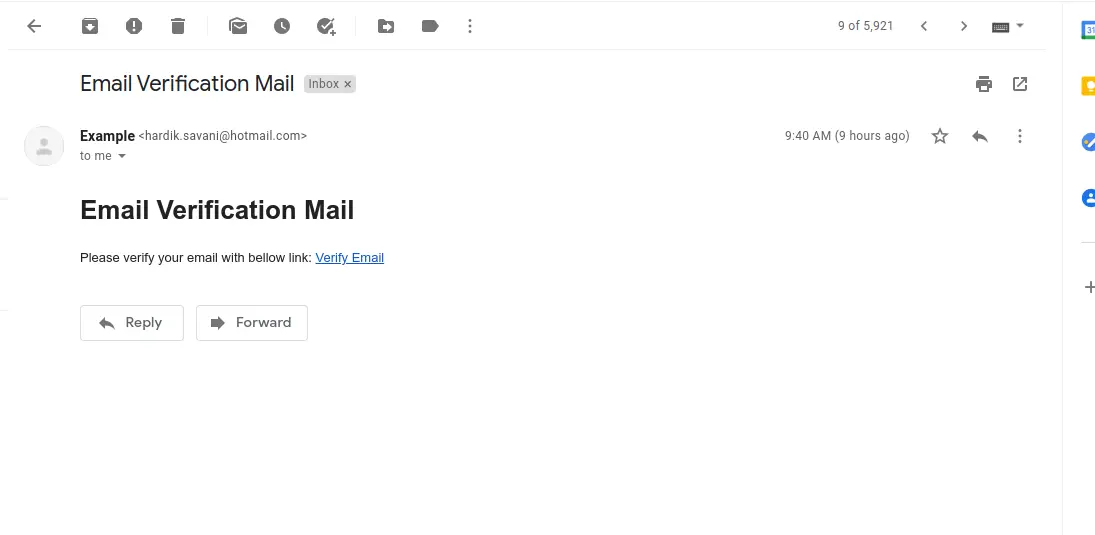
you can see below preview of pages:
After Verify Screenshot:
Email Screenshot:
Step 1: Install Laravel
first of all we need to get fresh Laravel version application using bellow command, So open your terminal OR command prompt and run bellow command:
composer create-project laravel/laravel example-app
Step 2: Create "users_verify" table
basically, we will create "users_verify" table and add new column "is_email_verified" in users table.
let's create new migration using below command:
php artisan make:migration create_users_verify_table
Migration
<?php
use Illuminate\Database\Migrations\Migration;
use Illuminate\Database\Schema\Blueprint;
use Illuminate\Support\Facades\Schema;
class UsersVerify extends Migration
{
/**
* Run the migrations.
*
* @return void
*/
public function up()
{
Schema::create('users_verify', function (Blueprint $table) {
$table->integer('user_id');
$table->string('token');
$table->timestamps();
});
Schema::table('users', function (Blueprint $table) {
$table->boolean('is_email_verified')->default(0);
});
}
/**
* Reverse the migrations.
*
* @return void
*/
public function down()
{
}
}
Step 3: Create Model and Update Model
In this step, we need to add "is_email_verified" field on fillable array in User model and create new model call UserVerify as like bellow:
app/Models/User.php
<?php
namespace App\Models;
use Illuminate\Contracts\Auth\MustVerifyEmail;
use Illuminate\Database\Eloquent\Factories\HasFactory;
use Illuminate\Foundation\Auth\User as Authenticatable;
use Illuminate\Notifications\Notifiable;
class User extends Authenticatable
{
use HasFactory, Notifiable;
/**
* The attributes that are mass assignable.
*
* @var array
*/
protected $fillable = [
'name',
'email',
'password',
'is_email_verified'
];
/**
* The attributes that should be hidden for arrays.
*
* @var array
*/
protected $hidden = [
'password',
'remember_token',
];
/**
* The attributes that should be cast to native types.
*
* @var array
*/
protected $casts = [
'email_verified_at' => 'datetime',
];
}
app/Models/UserVerify.php
<?php
namespace App\Models;
use Illuminate\Database\Eloquent\Factories\HasFactory;
use Illuminate\Database\Eloquent\Model;
class UserVerify extends Model
{
use HasFactory;
public $table = "users_verify";
/**
* Write code on Method
*
* @return response()
*/
protected $fillable = [
'user_id',
'token',
];
/**
* Write code on Method
*
* @return response()
*/
public function user()
{
return $this->belongsTo(User::class);
}
}
Step 4: Create Route
In this is step we need to create custom route for email verification. so open your routes/web.php file and add following route.
routes/web.php
<?php
use Illuminate\Support\Facades\Route;
use App\Http\Controllers\Auth\AuthController;
/*
|--------------------------------------------------------------------------
| Web Routes
|--------------------------------------------------------------------------
|
| Here is where you can register web routes for your application. These
| routes are loaded by the RouteServiceProvider within a group which
| contains the "web" middleware group. Now create something great!
|
*/
Route::get('login', [AuthController::class, 'index'])->name('login');
Route::post('post-login', [AuthController::class, 'postLogin'])->name('login.post');
Route::get('registration', [AuthController::class, 'registration'])->name('register');
Route::post('post-registration', [AuthController::class, 'postRegistration'])->name('register.post');
Route::get('logout', [AuthController::class, 'logout'])->name('logout');
/* New Added Routes */
Route::get('dashboard', [AuthController::class, 'dashboard'])->middleware(['auth', 'is_verify_email']);
Route::get('account/verify/{token}', [AuthController::class, 'verifyAccount'])->name('user.verify');
Step 5: Create Controller
in this step, we need to create AuthController, we updated code on postRegistration() and verifyAccount() method, let's copy as like bellow:
app/Http/Controllers/Auth/AuthController.php
<?php
namespace App\Http\Controllers\Auth;
use App\Http\Controllers\Controller;
use Illuminate\Http\Request;
use Illuminate\Support\Facades\Auth;
use Session;
use App\Models\User;
use App\Models\UserVerify;
use Hash;
use Illuminate\Support\Str;
use Mail;
class AuthController extends Controller
{
/**
* Write code on Method
*
* @return response()
*/
public function index()
{
return view('auth.login');
}
/**
* Write code on Method
*
* @return response()
*/
public function registration()
{
return view('auth.registration');
}
/**
* Write code on Method
*
* @return response()
*/
public function postLogin(Request $request)
{
$request->validate([
'email' => 'required',
'password' => 'required',
]);
$credentials = $request->only('email', 'password');
if (Auth::attempt($credentials)) {
return redirect()->intended('dashboard')
->withSuccess('You have Successfully loggedin');
}
return redirect("login")->withSuccess('Oppes! You have entered invalid credentials');
}
/**
* Write code on Method
*
* @return response()
*/
public function postRegistration(Request $request)
{
$request->validate([
'name' => 'required',
'email' => 'required|email|unique:users',
'password' => 'required|min:6',
]);
$data = $request->all();
$createUser = $this->create($data);
$token = Str::random(64);
UserVerify::create([
'user_id' => $createUser->id,
'token' => $token
]);
Mail::send('email.emailVerificationEmail', ['token' => $token], function($message) use($request){
$message->to($request->email);
$message->subject('Email Verification Mail');
});
return redirect("dashboard")->withSuccess('Great! You have Successfully loggedin');
}
/**
* Write code on Method
*
* @return response()
*/
public function dashboard()
{
if(Auth::check()){
return view('dashboard');
}
return redirect("login")->withSuccess('Opps! You do not have access');
}
/**
* Write code on Method
*
* @return response()
*/
public function create(array $data)
{
return User::create([
'name' => $data['name'],
'email' => $data['email'],
'password' => Hash::make($data['password'])
]);
}
/**
* Write code on Method
*
* @return response()
*/
public function logout() {
Session::flush();
Auth::logout();
return Redirect('login');
}
/**
* Write code on Method
*
* @return response()
*/
public function verifyAccount($token)
{
$verifyUser = UserVerify::where('token', $token)->first();
$message = 'Sorry your email cannot be identified.';
if(!is_null($verifyUser) ){
$user = $verifyUser->user;
if(!$user->is_email_verified) {
$verifyUser->user->is_email_verified = 1;
$verifyUser->user->save();
$message = "Your e-mail is verified. You can now login.";
} else {
$message = "Your e-mail is already verified. You can now login.";
}
}
return redirect()->route('login')->with('message', $message);
}
}
Step 6: Create Blade File
here, we need to create blade files for email only. so let's create one by one file:
resources/views/emails/emailVerificationEmail.blade.php
<h1>Email Verification Mail</h1>
Please verify your email with bellow link:
<a href="{{ route('user.verify', $token) }}">Verify Email</a>
Step 7: Create Middleware
here, we need to create middleware for checking user email is verified or not. so let's create as like bellow:
php artisan make:middleware IsVerifyEmail
app/Http/Middleware/IsVerifyEmail.php
<?php
namespace App\Http\Middleware;
use Closure;
use Illuminate\Http\Request;
use Illuminate\Support\Facades\Auth;
class IsVerifyEmail
{
/**
* Handle an incoming request.
*
* @param \Illuminate\Http\Request $request
* @param \Closure $next
* @return mixed
*/
public function handle(Request $request, Closure $next)
{
if (!Auth::user()->is_email_verified) {
auth()->logout();
return redirect()->route('login')
->with('message', 'You need to confirm your account. We have sent you an activation code, please check your email.');
}
return $next($request);
}
}
app/Http/Kernel.php
protected $routeMiddleware = [
....
'is_verify_email' => \App\Http\Middleware\IsVerifyEmail::class,
];
Step 8: Email Configuration
in this step, we will add email configuration on env file, because we will send email to reset password link from controller:
.env
MAIL_DRIVER=smtp
MAIL_HOST=smtp-mail.outlook.com
MAIL_PORT=587
MAIL_USERNAME=example@hotmail.com
MAIL_PASSWORD=123456789
MAIL_ENCRYPTION=tls
MAIL_FROM_ADDRESS=example@hotmail.com
Run Laravel App:
All the required steps have been done, now you have to type the given below command and hit enter to run the Laravel app:
php artisan serve
Now, Go to your web browser, type the given URL and view the app output:
http://localhost:8000/register
I hope it can help you...

