Laravel 10 VUE 3 Axios Get Request Example
Hello Dev,
In this tute, we will discuss axios vue 3 laravel example. In this article, we will implement a laravel vue axios get data example. you will learn laravel 10 vue 3 axios get data. It's a simple example of vue axios get request in laravel.
If you're working on a Vue.js app within Laravel web applications, incorporating data retrieval or display in a Vue.js component can be achieved through an Axios GET request. The primary purpose of an Axios GET request is to fetch data from a server. When initiating a GET request with Axios, you specify the URL endpoint from which you intend to retrieve data. The request is then transmitted to the server, which processes it and sends back the requested data in the response.
GET requests are commonly employed to obtain information or resources from a server, such as fetching data from an API, retrieving web pages, or accessing files stored on a server. For instance, Axios GET requests can be utilized to retrieve JSON data from a RESTful API, HTML content from a web page, or images stored on a server.
In this tutorial, you'll gain insights into installing and utilizing Axios for GET requests in Laravel Vue 3. This process allows you to retrieve data from the database and seamlessly transmit data to Vue 3 views components.
Step for Laravel 10 Vue 3 Axios Example
- Step 1: Install Laravel 10
- Step 2: Create Controller
- Step 3: Create Route
- Step 4: Install Laravel UI
- Step 5: Update Vue Component
- Step 6: Update Blade File
- Run Laravel App
Let's follow the following step to create simple example with Laravel 10 VUE 3 Axios Get Request example.
Step 1: Install Laravel 10
This step is not required; however, if you have not created the laravel app, then you may go ahead and execute the below command:
composer create-project laravel/laravel example-app
Step 2: Create Controller
in this step, we will create APIController.php and getData() method to return data, so let's update controller code:
app/Http/Controllers/APIController.php
<?php
namespace App\Http\Controllers;
use Illuminate\Http\Request;
class APIController extends Controller
{
/**
* Write code on Method
*
* @return response()
*/
public function getData()
{
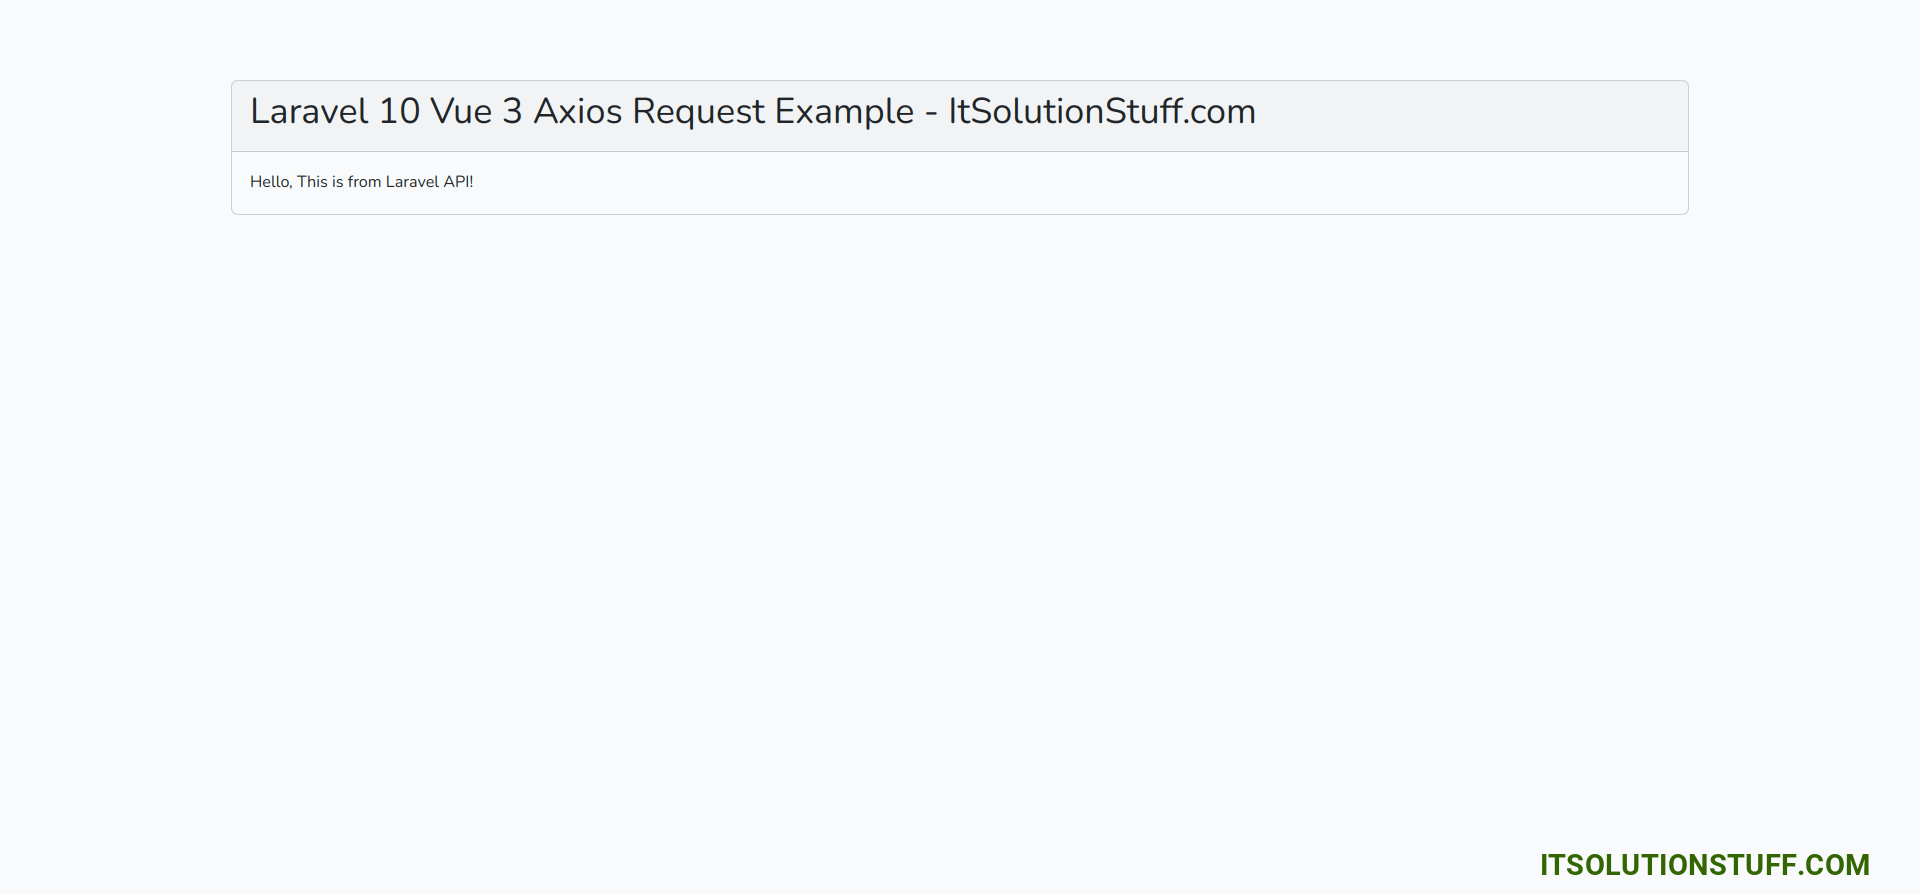
$data = ['message' => 'Hello, This is from Laravel API!'];
return response()->json($data);
}
}
Step 3: Create Route
now we will create one route for calling our api, so let's add new route to web.php file as bellow:
routes/web.php
<?php
use Illuminate\Support\Facades\Route;
use App\Http\Controllers\APIController;
/*
|--------------------------------------------------------------------------
| Web Routes
|--------------------------------------------------------------------------
|
| Here is where you can register web routes for your application. These
| routes are loaded by the RouteServiceProvider and all of them will
| be assigned to the "web" middleware group. Make something great!
|
*/
Route::get('/', function () {
return view('welcome');
});
Route::get('/api/data', [APIController::class, 'getData']);
Step 4: Install Laravel UI
Let's run bellow command to install laravel ui package by bellow command:
composer require laravel/ui
Next you have to install laravel ui package command for creating auth scaffolding using vue. so let's run bellow command:
php artisan ui vue
Now let's run bellow command for install npm:
npm install && npm run dev
Step 5: Update Vue Component
Here, we will use default "ExampleComponent.vue" component and update it as like the bellow:
resources/js/components/ExampleComponent.vue
<template>
<div class="container">
<div class="row justify-content-center">
<div class="col-md-8">
<div class="card">
<div class="card-header"><h1>Laravel 10 Vue 3 Axios Request Example - ItSolutionStuff.com</h1></div>
<div class="card-body">
{{ message }}
</div>
</div>
</div>
</div>
</div>
</template>
<script>
export default {
data() {
return {
message: '',
};
},
mounted() {
this.fetchData();
},
methods: {
fetchData() {
axios.get('/api/data')
.then(response => {
this.message = response.data.message;
})
.catch(error => {
console.error('Error fetching data:', error);
});
},
},
};
</script>
resources/js/app.js
import './bootstrap';
import { createApp } from 'vue';
const app = createApp({});
import ExampleComponent from './components/ExampleComponent.vue';
app.component('example-component', ExampleComponent);
app.mount('#app');
Step 6: Update Blade File
Here, we need to update our welcome.blade.php file with following code:
resources/views/welcome.blade.php
<!doctype html>
<html lang="{{ str_replace('_', '-', app()->getLocale()) }}">
<head>
<meta charset="utf-8">
<meta name="viewport" content="width=device-width, initial-scale=1">
<!-- CSRF Token -->
<meta name="csrf-token" content="{{ csrf_token() }}">
<title>{{ config('app.name', 'Laravel') }}</title>
<!-- Fonts -->
<link rel="dns-prefetch" href="//fonts.bunny.net">
<link href="https://fonts.bunny.net/css?family=Nunito" rel="stylesheet">
<!-- Scripts -->
@vite(['resources/sass/app.scss', 'resources/js/app.js'])
</head>
<body>
<div id="app">
<example-component></example-component>
</div>
</body>
</html>
Run Laravel App:
All the required steps have been done, now you have to type the given below command and hit enter to run the Laravel app:
php artisan serve
Now, Go to your web browser, type the given URL and view the app output:
http://localhost:8000/
Now, you will see the following output:
I hope it can help you...

