How to Create and Use Enum in Laravel 11?

Hello,
In this article, i would like to show you how to create and use enum in laravel 11 framework.
Laravel 11 coming with a slimmer application skeleton. Laravel 11 introduce streamlined application structure, per-second rate limiting, health routing etc.
An enum, short for "enumeration," is a data type in programming that consists of a set of named values, often called members or elements. It allows developers to define a collection of related constants, making code more readable and maintainable. Each member of an enum typically represents a unique value, and they can be used in place of integers to improve code clarity. Enums are commonly used for representing things like days of the week, months, or status types in a program.
Laravel 11 added a new Artisan command to create an enum. In this example, we will create a "ProductStatus" enum. We will define the Pending, Active, Inactive, and Rejected statuses. Then, we will use enum attribute casting with a Laravel model. So, let's look at the simple example steps:
You can use the following command to create a new enum in Laravel 11.
php artisan make:enum {enumName}Let's see the simple steps:
Step 1: Install Laravel 11
This is optional; however, if you have not created the Laravel app, then you may go ahead and execute the command below:
composer create-project --prefer-dist laravel/laravel laravel-dev dev-master
Step 2: Create Migration
Here, we need to create a database migration for the "products" table with name, body, and status columns. Additionally, we will create a model for the products table.
php artisan make:migration create_products_tabledatabase/migrations/2024_03_03_141714_create_products_table.php
<?php

use Illuminate\Database\Migrations\Migration;
use Illuminate\Database\Schema\Blueprint;
use Illuminate\Support\Facades\Schema;

return new class extends Migration
{
    /**
     * Run the migrations.
     */
    public function up(): void
    {
        Schema::create('products', function (Blueprint $table) {
            $table->id();
            $table->string('name');
            $table->text('body');
            $table->string('status')->default('pending');
            $table->timestamps();
        });
    }

    /**
     * Reverse the migrations.
     */
    public function down(): void
    {
        Schema::dropIfExists('products');
    }
};
Then run the migration command to create the "products" table.
php artisan migrateStep 3: Create Enum Class
In this step, we will create ProductStatus.php class and define all enum values. Let's create the model and update the following code:
Run the following class to create a new enum:
php artisan make:enum Enums/ProductStatusnow, update the following code:
app/Enums/ProductStatus.php
<?php

namespace App\Enums;

enum ProductStatus: string
{
    case Pending = 'pending';
    case Active = 'active';
    case Inactive = 'inactive';
    case Rejected = 'rejected';
}
Step 4: Create Model
In this step, we will create Product.php model with casting. Let's create the model and update the following code:
php artisan make:model ProductApp/Models/Product.php
<?php

namespace App\Models;

use Illuminate\Database\Eloquent\Factories\HasFactory;
use Illuminate\Database\Eloquent\Model;
use App\Enums\ProductStatus;

class Product extends Model
{
    use HasFactory;

    /**
     * Write code on Method
     *
     * @return response()
     */
    protected $fillable = [
        'name', 'body', 'status'
    ];

    /**
     * Write code on Method
     *
     * @return response()
     */
    protected function casts(): array
    {
        return [
            'status' => ProductStatus::class,
        ];
    }
}
Step 5: Create Route
In this step, we will create one route for testing. So, create one route here.
routes/web.php
<?php

use Illuminate\Support\Facades\Route;

use App\Http\Controllers\ProductController;


Route::get('/product-test', [ProductController::class, 'index']);
Step 6: Create Controller
In this step, we will create ProductController file and write an index() method to create item records with an array and access them as an array.
app/Http/Controllers/ProductController.php
<?php

namespace App\Http\Controllers;

use Illuminate\Http\Request;
use App\Enums\ProductStatus;
use App\Models\Product;

class ProductController extends Controller
{
    /**
     * Write code on Method
     *
     * @return response()
     */
    public function index()
    {
        $input = [
            'name' => 'Gold',
            'body' => 'This is a Gold',
            'status' => ProductStatus::Active
        ];

        $product = Product::create($input);

        dd($product->status, $product->status->value);

    }
}
Run Laravel App:
All the required steps have been done, now you have to type the given below command and hit enter to run the Laravel app:
php artisan serveNow, Go to your web browser, type the given URL and view the app output:
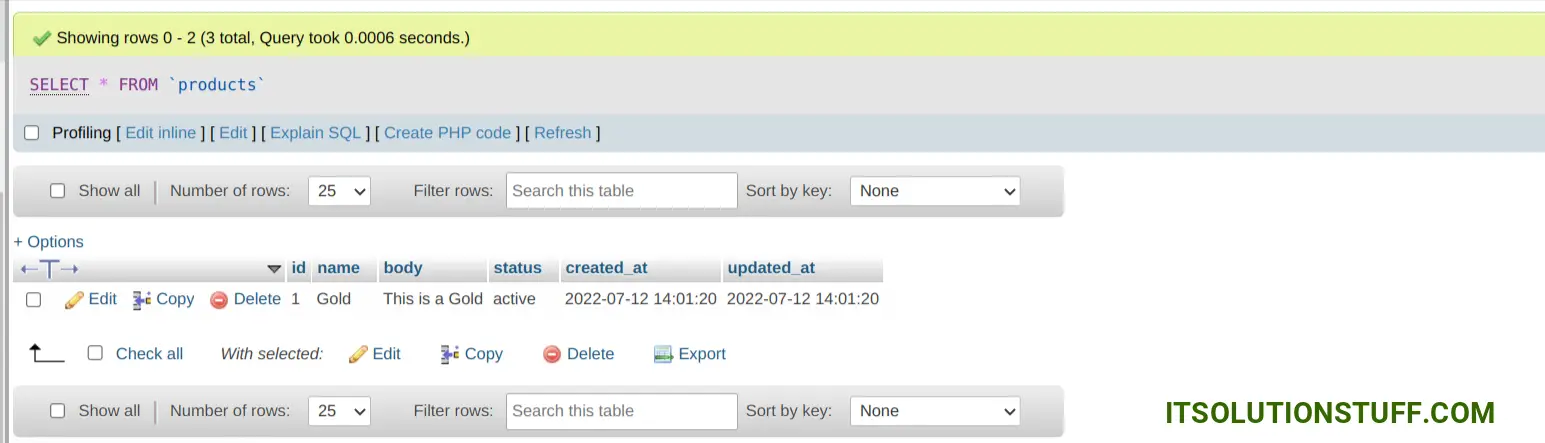
http://localhost:8000/product-testYou can see database output and print variable output:
Database Output:
Output:
App\Enums\ProductStatusEnum {#1250
name: "Active"
value: "active"
}
active
I hope it can help you...

